2
Thermo Scientific Revco Laboratory Refrigerators and Freezers
Installation and Operation
4
Installation
CAUTION!
Improper operation of the equipment
could result in dangerous conditions. To preclude
hazard and minimize risk, follow all instructions and
operate within design limits noted on the dataplate.
4.1
Location
Install the unit in a level area free from vibration with a minimum
of 1.5 inches of space on all sides.
Do not position the equipment in direct sunlight or near heating
diffusers, radiators, or other sources of heat. The ambient
temperature range must be between 60 and 90
°
F (16 to 32
°
C).
4.2
Wiring
CAUTION!
Connect the equipment to the correct
power source. Incorrect voltage can result in severe
damage to the equipment.
DANGER!
For personal safety and trouble-free
operation, this unit must be properly grounded before
it is used. Failure to ground the equipment may cause
personal injury or damage to the equipment. Always
conform to the National Electrical Code and local
codes. Do not connect unit to already overloaded
power lines.
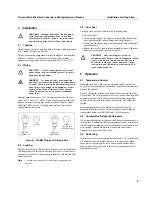
General purpose units use 15 or 20 amp power cords. They are
rated for 115 volts, AC, 60 Hz. Do not use extension cords, and
always use a three prong grounded wall outlet. Figure 1 shows
standard NEMA service cord plugs and wall outlets used for
refrigerators and freezers.
Figure 1. NEMA Plugs and Receptacles
4.3
Leveling
The unit must be level. Rotate the leveling screws, located under
the front corners of the unit, until the unit is level. If the floor is
seriously out of level, you may need to shim the corners with thin
sheets of metal.
Note:
Use thin sheets of metal to level units equipped with
casters.
4.4
Door Seal
To check the door seal, complete the following steps:
1. Open the door.
2. Insert a strip of paper (a couple of inches wide) between the
door gasket and the cabinet flange and close the door.
3. Slowly pull the paper strip from the outside. You should feel
some resistance.
4. Repeat this test at 4 inch intervals around the door. If the door
does not seal properly, replace the gasket.
CAUTION!
Door seal integrity is critical for
refrigerators and freezers. A loose fitting gasket allows
moist air to be drawn into the cabinet, resulting in
quicker frost buildup on the evaporator coil, longer
running time, poor temperature maintenance, and
increased operation cost.
5
Operation
5.1
Temperature Control
Standard units have cold controls mounted inside the cabinet,
except for some compact units that have the controls mounted in
back of the cabinet.
Start by setting the control one quarter turn clockwise from the
Off position. (The Off position is as far as you can turn the knob
counterclockwise.) Wait 24 hours before adjusting the setting
again. The farther you turn the knob clockwise, the colder the
setting.
Some compact models have digital displays and controls
mounted inside the cabinet. For these models, adjust setpoint
temperature using the
WARMER
and
COLDER
buttons.
5.2
Combination Refrigerator/Freezers
If your unit has separate refrigerator and freezer compartments, it
is important to remember that the temperature sensor is located in
the refrigerator compartment. If you find that your freezer is not
cold enough, you should open the refrigerator door more
frequently to initiate cooling cycles.
5.3
Defrosting
When frost in the freezer compartment exceeds
¼
”, turn the unit
off and allow the ice to melt. Do not use an ice pick or other
sharp object to dislodge the ice. You can speed defrosting by
placing a pan of warm water in the freezer compartment after
turning the unit off.
15A-115V
NEMA 5-15P
20A-115V
NEMA 5-20P
5-15R
5-20R
(accepts both
5-15P and 5-20P)


