Smart2Pure Pro Ultrapure water system
Maintenance | 41
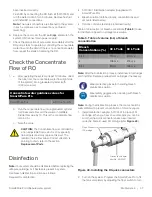
Figure 49. Extracting UV lamp
6. a
Now, carefully rotate a new UV lamp into place by
turning it in a counter-clockwise direction into the UV
assembly.
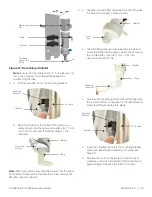
Figure 50. Installing UV lamp
b. You can then re-attach the plug to the UV lamp and
re-tighten the UV assembly on the mounting plate
using the two retaining brackets and the two screws
that you removed previously.
7. Insert the ultrapure cartridge back into the system (refer
to the section
Replacing the Ultrapure Cartridge
) and
the RO
cartridge
too (refer to the section
8. Switch the system ON (connect main power supply).
Replacing the 0.1 μm Final
Filter
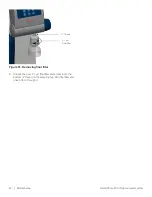
1. Rotate the exhausted or clogged 0.1
μ
m final filter in a
clockwise direction to remove it.
CAUTION:
When you are removing the UV lamp
you must ensure that the glass of the UV lamp is
not soiled or that you do not touch it with your
fingers. This could impair proper functioning of the
lamp. We therefore recommend that you wear
clean, disposable gloves when performing this
work.
CAUTION:
When installing a new UV lamp ensure
that the flat seal ring and the O-ring are on the
correct position. The flat seal ring must fit exactly
in the groove provided for it on the top of the
union nut (
). The O-ring fits in the
bottom groove in the union nut (
these items do not fit exactly in the grooves and
you restart the system, the UV assembly will not
be leak-tight at these locations.
UV Lamp
UV Lamp
Casing
O-Ring
Union Nut
Grove
Seal Ring
Union Nut
Seal Ring
UV Lamp
UV Lamp
Casting
UV Lamp
UV Lamp
Casting

