background image

Thermo Fisher Scientific ULT Freezers

 Maintenance  |   19

Maintenance

Cleaning the Condenser

Clean the condenser at least every six months; more often if 
the laboratory area is dusty.

To clean the condenser, complete the following steps:

1. Pull the grille door open.

2. Vacuum the condenser.

3. Inspect the filter cleanliness and clean as required.

4. Close the grille door. 

Cleaning the Condenser 

Filter

Clean the condenser filters every two or three months.

1. Pull the grille door open.

2. Remove the filter.

3. Shake the filter to remove loose dust, rinse the filters in 

clean water, shake the excess water from the filter, and 
replace the filter.

4. Close the grille door.

Gasket Maintenance

Periodically check the gaskets around the door/ lid for 
punctures or tears. Leaks are indicated by a streak of frost 
which forms at the point of gasket failure. Ensure that the 
cabinet is level (refer 

Leveling

 for leveling information).

Keep the door gaskets clean and frost free. Wipe with a soft 
cloth or cryo-gloved hand. If needed, a rubber mallet may be 
gently used to loosen ice.

Defrosting the Freezer

Defrost the freezer once per year or whenever the ice buildup 
exceeds 3/8". To defrost, complete the following steps:

1. Remove all products and place in another ULT freezer.

2. Turn off the freezer.

3. Open the outer door/lid and all inner doors/sublids.

4. Let the freezer stand with doors/lid open for at least 24 

hours. This allows both the interior and foamed 
refrigeration system to warm to room temperature.

5. Dispose of the ice and wipe out any water standing in the 

bottom of the cabinet.

6. If there is freezer odor, wash the interior with a solution of 

baking soda and warm water. 

7. Clean the exterior with any common household cleaner. 

8. Close the doors, restart the freezer and reload. Refer 

Initial Loading

 to follow the instructions.

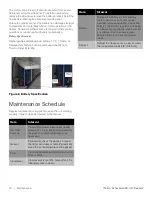
Battery Maintenance

The freezer monitors the voltage status of the battery daily 
and indicates the battery’s voltage via visual and auditory 
alarm. Replace the battery as indicated by system alarms or 
as necessary per individual status evaluation. Check the 
battery connections regularly. Although not required, annual 
battery replacement is recommended to ensure proper 
battery status in the event of power failure. 

For safety, it is recommended to power off the unit and 
disconnect it from the power source before replacing the 
battery. Battery terminals are color coded in red and black. 
Ensure the corresponding colored wires are connected to the 
matching color terminals on the battery. 

WARNING: 

Unauthorized repair of your freezer will invalidate your warranty. Contact Technical Service. See 

Contact Information

 for phone numbers. 

CAUTION: 

Maintenance should only be performed by trained personnel.

Summary of Contents for Thermo Scientific TDE Series

Page 1: ...Ultra Low Temperature Freezers Thermo ScientificTM TDE Series Installation and Operation 332851H01 Revision A July 2022...

Page 2: ...e performed by qualified service personnel Material in this manual is for informational purposes only The contents and the product it describes are subject to change without notice Thermo Fisher Scien...

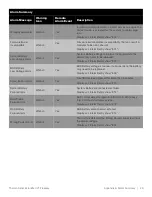
Page 3: ...onitoring system 8 General Usage 8 Initial Loading 8 Grille Door Opening Closing 8 Operating Standards 9 Electrical Specifications 9 Installation 10 Location 10 Protective Conductor current 10 Wiring...

Page 4: ...t Up 17 Operation 17 Chart Recorders Optional 18 Set Up and Operation 18 Changing Chart Paper 18 Calibration Adjustment 18 Maintenance 19 Cleaning the Condenser 19 Cleaning the Condenser Filter 19 Gas...

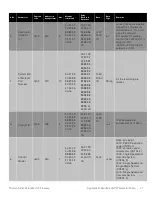
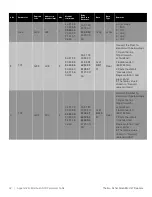
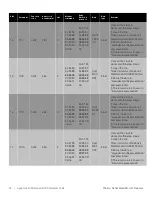
Page 5: ...Appendix A Alarm Summary 28 Appendix B Modbus ASCII Parameter Table 30 End of Life Care 38 Contact Information 39...

Page 6: ...Thermo Fisher Scientific ULT Freezers Models 1 Models Table 1 Applicable Models Model Size xxx Voltage Description TDECxxx86L 063 252 396 A D V Medical Device...

Page 7: ...the product literature and in this manual Before using it verify that this product is suitable for its intended use If this equipment is used in a manner not specified by the manufacturer the protecti...

Page 8: ...rigerant used To be repaired only by trained service personnel Do not puncture refrigerant tubing AVERTISSEMENT Risque d incendie ou d explosion R frig rant inflammable utilis Pour tre r par uniquemen...

Page 9: ...rs are covered with synthetic material the relative humidity should be at least 30 Electrical fast transient burst IEC 61000 4 4 1 kV for input output lines 2 kV for AC powerlines 1 kV for input outpu...

Page 10: ...tes uses and can radiate radio frequency energy and if not installed and used in accordance with the instruction manual may cause harmful interference to radio communications Operation of this equipme...

Page 11: ...ied hazardous locations nor to be used for the storage of flammable inventory Symbols Glossary NOTICE AVIS WE RECOMMEND THE USE OF A REDUNDANT AND INDEPENDENT TEMPERATURE MONITORING SYSTEM AND THAT FR...

Page 12: ...authorization When submitting a claim for shipping damage request that the carrier inspect the shipping container and equipment The packaging can be stored and re used Packing List Inside the freezer...

Page 13: ...point before loading the next shelf Repeat this process until the freezer is fully loaded Fill a chest by starting at the left side near the probe Filling with room temperature racks will result in a...

Page 14: ...30 V 60 Hz Main supply voltage fluctuations not to exceed 5 or 10 of the nominal voltage for 100 V 60 Hz Electrical Specifications The last character in the model number listed on the data plate ident...

Page 15: ...ed on the lower left side of the unit WARNING Use care when closing the door lid so that fingers are not pinched between cabinet and door lid CAUTION Connect the equipment to the correct power source...

Page 16: ...the wiring from the remote alarm to the connector install the connector to the freezer micro board The pin configuration is shown in Figure 3 below Figure 3 Remote Alarm Pin Configuration For systems...

Page 17: ...m a warm start condition Cold Alarm value The range is 99 C to within 5 C of setpoint Note A setpoint change may automatically change the warm cold alarm setpoints as well to maintain a minimum 5 C se...

Page 18: ...lay Warm Alarm Test Press the plus and checkmark buttons at the same time to initiate the warm alarm test During the warm alarm test the actual cabinet temperature will not be displayed The display te...

Page 19: ...are showing Press the checkmark while YES is showing With a flashing YES you are required to confirm by pressing the checkmark button a second time Power down will then be complete If the checkmark bu...

Page 20: ...ey provide useful safety information about installation use and maintenance to help avoid mishaps and possible accidents Remove the packing and make sure the scraper and magnetic hook are in good cond...

Page 21: ...liquid from the bottom of the cylinder CO2 cylinders must be kept at room temperature to function properly LN2 bottles are functional at any reasonable temperature WARNING If a CO2 or LN2 cylinder fa...

Page 22: ...e flexible hose to sharp bends Doing so may shorten the life of the hose Start Up When the unit is started it will recognize if a backup system is installed 1 Follow the instructions in Backup System...

Page 23: ...d The pen will move off the scale 3 Unscrew the center nut remove the old chart paper and install new chart paper Carefully align the day and time with the reference mark a small groove on the left si...

Page 24: ...off the freezer 3 Open the outer door lid and all inner doors sublids 4 Let the freezer stand with doors lid open for at least 24 hours This allows both the interior and foamed refrigeration system t...

Page 25: ...edule Regular maintenance is important to keep the unit working properly Inspect clean as directed in the manual Item Interval Ice Frost build up To maintain proper closure of sublids remove any ice o...

Page 26: ...on with a minimum of 8 20 cm of space on the top and sides 6 15 cm in back Icing Frost due to high relative humidity Check if the location meets requirements Maximum relative humidity 60 for temperatu...

Page 27: ...nit must be properly grounded in conformity with national and local electrical codes Troubleshooting procedures involving live voltage is dangerous and if done improperly can result in injury and or d...

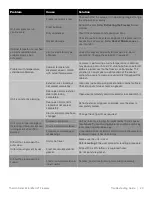
Page 28: ...t is constantly alarming Exterior lid is closed but not sealed completely Clean any ice build up on gasket and or cabinet surface Check for punctures or tears on gasket Door open alarm exterior door n...

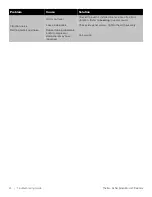
Page 29: ...noise Unit is not level Check if the unit is installed in a level area free from vibration Refer to Leveling in user manual Loose side panels Check side panel screws tighten them if necessary Rubber t...

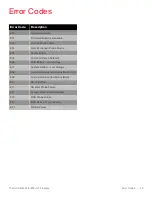
Page 30: ...ure E03 Heat Exchanger Probe Failure E04 Power Failure E05 Failure to Reach Setpoint E06 BUS Battery Low Voltage E07 System Battery Low Voltage E08 Lost Communication Failure Main to UI E09 Lost Commu...

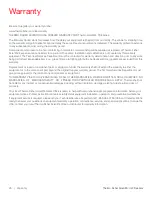
Page 31: ...Replacement or repair of component parts or equipment under this warranty shall not extend the warranty to either the equipment or to the component part beyond the original five year warranty period T...

Page 32: ...lights light bulbs batteries and door gaskets are excluded from this warranty Replacement or repair of component parts or equipment under this warranty shall not extend the warranty to either the equi...

Page 33: ...erature variation will increase Contact customer service Display will intermittently show E03 Ambient Probe Failure Wrench Yes Ambient Probe TC has malfunctioned This doesn t affect the performance of...

Page 34: ...Battery voltage is too low If error persists the battery may need to be replaced Display will intermittently show E06 Stuck Button Alarm Wrench Yes A button has been pressed for more than 5 minutes D...

Page 35: ...ata Data Type Remarks 1 cabinet setpoint c 0x03 530 2 3a 31 39 30 33 30 35 33 30 30 30 30 32 41 44 0d 0a 3A 31 39 30 33 30 34 46 46 46 46 46 43 45 30 30 32 0D 0A 0xFFF FFCE 0 int Convert the data valu...

Page 36: ...0 33 31 35 32 32 30 32 30 32 30 32 30 32 30 32 30 32 30 32 30 32 30 32 30 44 30 0D 0A 155D R0A0 1R String All the remaining are spaces 5 Product ID 0x03 598 2 3a 31 39 30 33 30 35 39 38 30 30 30 32 34...

Page 37: ...www h schmidt net FloatConverter IEEE754 html 2 Paste the data in Hexadecimal Representation and press Enter 3 The temp value is shown in Decimal representation 9 TC2 0x03 4CC 2 3a 31 39 30 33 30 34...

Page 38: ...with below steps 1 Open the link https www h schmidt net FloatConverter IEEE754 html 2 Paste the data in Hexadecimal Representation and press Enter 3 The temp value is shown in Decimal representation...

Page 39: ...resentation and press Enter 3 The temp value is shown in Decimal representation 16 TC9 0x03 4E8 2 3a 31 39 30 33 30 34 45 38 30 30 30 32 46 36 0d 0a 3A 31 39 30 33 30 34 34 31 42 45 32 34 41 31 31 34...

Page 40: ...D Temperature value is 78 C 19 Alarms 0x03 514 2 3a 31 39 30 33 30 35 31 34 30 30 30 32 43 39 0d 0a 3A 31 39 30 33 30 34 30 30 30 30 30 34 30 32 44 36 0D 0A 0x00 0004 02 unit 1 Active 0 Inactive b19 B...

Page 41: ...Bus Solenoid Injection b1 Bus Pressure switch b2 Reserved for factory use only b3 Line voltage circuit state change normal buck boost b4 Compensated line voltage change b5 Reserved for factory use onl...

Page 42: ...30 30 30 32 41 39 0d 0a 3A 31 39 30 33 30 34 30 30 30 30 30 30 30 30 44 43 0D 0A 0xFF FFFC E0 int Convert the data value into signed 2 s complement and divide with 10 which gives the setpoint Ex Signe...

Page 43: ...ed household waste Please use the public collection system to return recycle or treat them in compliance with the local regulations Remove all samples and items before defrosting a unit to room ambien...

Page 44: ...This page is intentionally left blank...

Page 45: ...This page is intentionally left blank...

Page 46: ...ntact information for your area Countries Sales North America 1 866 984 3766 India toll free 1800 22 8374 India 91 22 6716 2200 China 800 810 5118 400 650 5118 Japan 81 3 5826 1616 France 33 2 2803 21...

Reviews: