background image

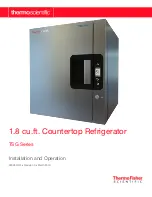
1.8 cu.ft. Countertop Refrigerator

 Installation  |   9

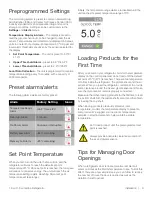
Preprogrammed Settings

The monitoring system is preset to common Federal Drug 
Administration (FDA) and Center for Disease Control (CDC) 
industry standards for pharmaceutical drug and vaccine 
storage conditions. Settings can be customized via the 

Settings

 and 

Alerts

 menus. 

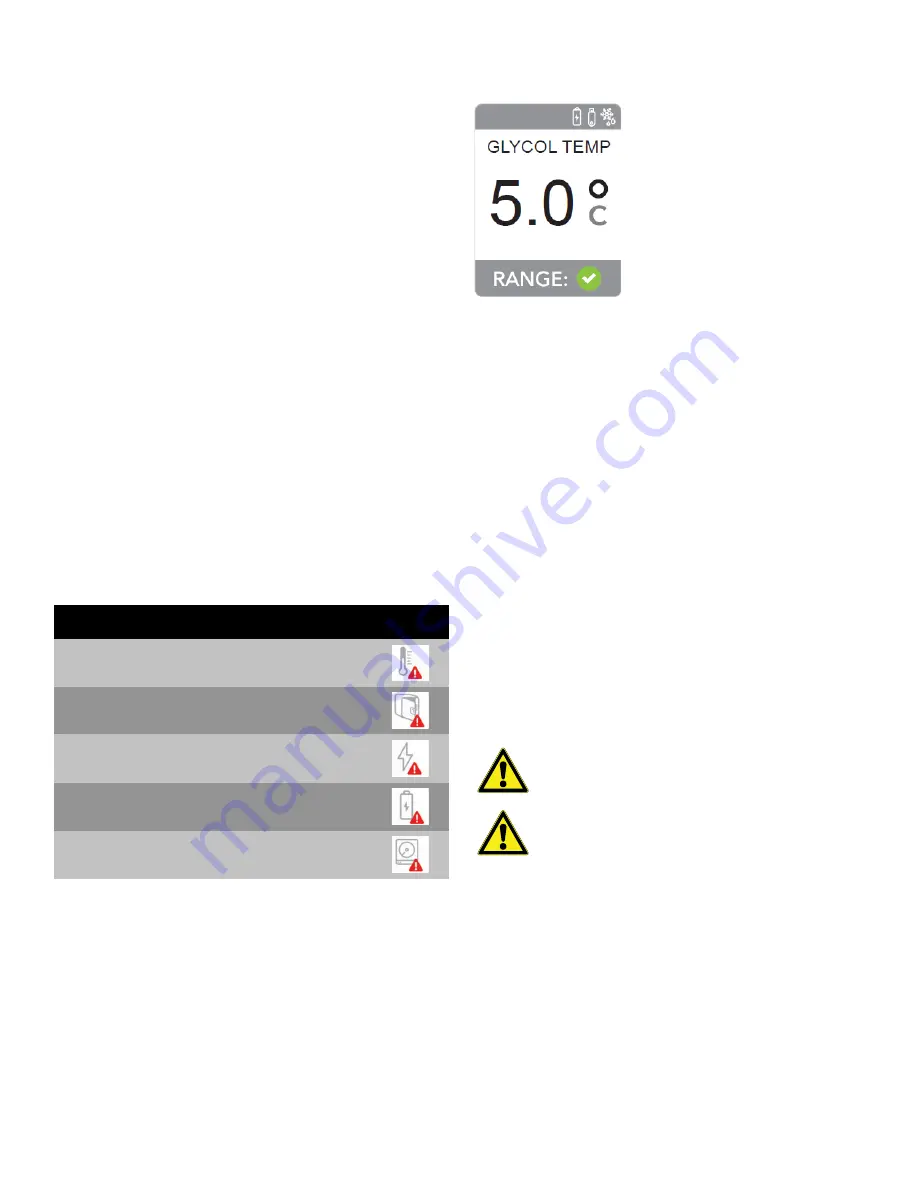
Temperature Display & Alarm

 – The display is preset to 

read the glycol sensor but can be changed to read the air 
sensor. Temperatures are detected and displayed in Celsius 
units to one tenth of a degree. For example, 5.0°C. Upper and 
lower alarm thresholds are driven by the sensor selected for 
the display. 

Set Point Temperature

 - The unit is preset to 5.0°C/

41.0°F

Upper Threshold Alarm

 - preset to 8.0°C/46.4°F

Lower Threshold Alarm

 - preset to 2.0°C/35.6°F

Local Data Collection

 – The unit is programmed to record a 

temperature reading every 15 minutes, with a capacity of 
4000 data points.

Preset alarms/alerts

The following alarms/alerts are factory preset:

Set Point Temperature

When you first turn on the unit, the fan will run and the 
refrigerator will work to reach the default set point 
temperature of 5°C. Once set point is reached, the fan speed 
will reduce to conserve energy. The unit will reach the air 
temperature setting rapidly. Reaching Glycol set point 
temperature will take longer.

Initially, the temperature range alarms are disabled until the 
unit reaches its preset temperature range of 5°C.

Loading Products for the 
First Time

After you power on your refrigerator, monitor the temperature 
display on the control panel and do not load until the default 
set point of 5°C (41°F) is reached. There are two temperature 
monitors inside the refrigerator, the glycol sensor and the air 
sensor. When you load the refrigerator, remember to provide 
some clearance around the air and glycol sensors and make 
sure the glycol sensor remains properly connected. 

Make sure that when loading products for the first time to load 
the bottom shelf first, the middle shelf second and then finish 
by loading the top shelf. 

When loading products previously stored at room 
temperature, monitor the temperature display to prevent a 
compromise. We suggest you load room temperature 
samples in small increments to help maintain a stable 
temperature. 

Tips for Managing Door 
Openings

When a refrigerator door is opened, warmer ambient air 
enters and causes the interior temperature to rise. To limit this 
effect, there are a few simple steps you can follow to reduce 
the number of times the door is opened as well as the 
duration it is left opened:

Alarm

Factory Setting

Icons

Temperature Range 
Alarm

min 2°C max 8°C

Door Ajar Alarm

1 minute

No Power Alarm

Any power interruption

Battery Low Alarm

<30% remaining

Memory Full Alarm

<25% remaining

Don’t load product until the preprogrammed set 
point is reached.

Always provide adequate clearance around both 
the air and glycol sensors.

Summary of Contents for TSG Series

Page 1: ...Installation and Operation 329067H01 Revision A March 2018 1 8 cu ft Countertop Refrigerator TSG Series...

Page 2: ...med by qualified service personnel Material in this manual is for informational purposes only The contents and the product it describes are subject to change without notice Thermo Fisher Scientific ma...

Page 3: ...d in this Manual 5 Refrigerant Pressure 5 Electrical Components 5 Unpacking Your TSG205 Refrigerator 6 Inspecting for Damage 6 Lifting Carrying Locating and Unboxing 6 Identifying All Parts 6 Installa...

Page 4: ...13 Navigating TSG205 Controls 14 Reading the LCD Temperature Display 14 Interpreting System Icons 14 Interpreting System Alerts 14 Data Log 15 Downloading Data 15 Clearing the Data log After Download...

Page 5: ...Refrigerator 19 Updating Firmware 19 Editing User PIN 20 Settings 21 Adjusting the Display Settings 21 Adjusting the Set Point Temperature 21 Setting the Date Time 21 Setting Retention Values 22 Maint...

Page 6: ...heat pump refrigeration system Refrigerant R744 non flammable zero ozone depleting low toxicity Refrigerant Charge Quantity 24 1 grams Refrigerant Pressure Rating 12410 kPa Energy Consumption 0 6 kWh...

Page 7: ...e memory Access I O Ports One 3 5 mm port for expanded temperature monitoring Temperature Sensors Interior chamber air and glycol Ambient Temperature Range 32 C maximum temperature environment Humidit...

Page 8: ...ful interference to radio or television reception which can be determined by turning the equipment off and on you are encouraged to try to correct the interference by one or more of the following meas...

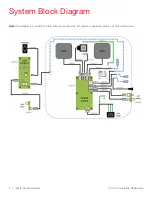
Page 9: ...4 System Block Diagram 1 8 cu ft Countertop Refrigerator System Block Diagram Note The diagram is provided for informational purposes only For repairs or operating issues call Technical Service...

Page 10: ...igerator for details on handling and moving the unit There are no user serviceable parts within the TSG205 product Used to indicate an electrical shock hazard Used when advice is given to prevent malf...

Page 11: ...treme care Follow the directions provided to unpack your new product safely and easily Lifting Carrying Locating and Unboxing We recommend that you move the box as close as possible to its final locat...

Page 12: ...est three inches of rear clearance There are two rubber bumpers on the back of your refrigerator which must remain installed to ensure a minimum clearance for adequate ventilation Powering On and Powe...

Page 13: ...allows you to monitor the internal temperature of items being stored in the refrigerator Verify 1 The cord for the sample bottle is firmly plugged into the back wall of the interior of your unit 2 The...

Page 14: ...ge alarms are disabled until the unit reaches its preset temperature range of 5 C Loading Products for the First Time After you power on your refrigerator monitor the temperature display on the contro...

Page 15: ...it used for sensitive inventory Not only is this a health hazard it also leads to more frequent opening of the door TSG205 compact refrigerators have a visible and an audible open door alarm that soun...

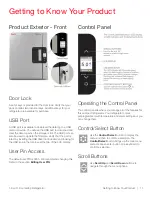
Page 16: ...the USB drive not included and looking for the USB icon in the icon bar at the top of the LCD display User Pin Access The default user PIN is 3265 We recommend changing this Refer to the section Editi...

Page 17: ...battery is shipped with a protective tab so that its power doesn t drain To activate it you must remove the red tab from the access panel Replacing the Battery 1 Remove the 2 screws securing the pass...

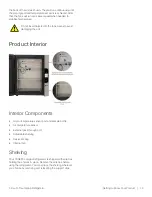
Page 18: ...or Interior Components Glycol temperature sensor port and sample bottle Air temperature sensor External pass through port Adjustable shelving Desiccant bag Internal fan Shelving Your TSG205 compact re...

Page 19: ...unctioning Range is displayed with a green checkmark If the air temperature falls outside the preset range a red alert triangle with a white exclamation will display as the first warning sign of a tem...

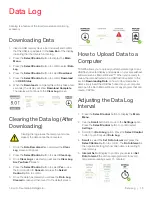
Page 20: ...m 5 Once the data has cleared you will see the Data Log Cleared screen and then revert to the default screen How to Upload Data to a Computer TSG205 allows you to upload your temperature logs to any U...

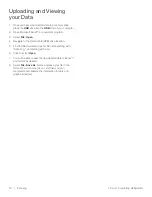
Page 21: ...m 3 Select File Open 4 Navigate to the Removable USB drive location 5 Find the file download look for file name starting with Data Log_ and ending with csv 6 Click to select Open 7 You will be able to...

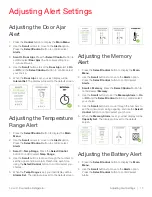
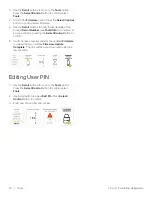
Page 22: ...the Scroll buttons to move through the numbers to set the upper and lower alarm thresholds each time using the Select Control button to confirm select your choices 5 When the Temp Range is set your l...

Page 23: ...Select Control button to confirm select your choice 6 When the Battery Alarm is set your last display will be Batt Alarm Set The display will revert to the default screen Adjusting the Power Alert 1 P...

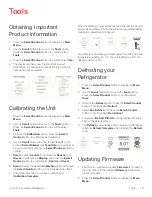
Page 24: ...Scroll to enter the desired Calibration offset and press the Select Control button to confirm select the offset 7 After a few seconds you will see confirmation of Calibration Complete When Calibratin...

Page 25: ...rial Number see Tools Info one number at a time each time pressing the Select Control button to confirm 6 It will only take a few seconds for the updated Firmware to upload them you will see Firmware...

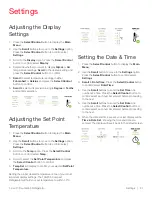
Page 26: ...e Select Control button to confirm select Temp 4 Scroll to select the Set Point Temperature and press the Select Control button to confirm 5 Temp Set will display to confirm your selected Set Point Te...

Page 27: ...s Yes Temp Upper Alarm Threshold 8 0 C Yes Yes Temp Lower Alarm Threshold 2 0 C Yes Yes Time Display Setting C Yes Yes Temp Resolution Setting 0 1 C Yes Yes Temp Display Control Glycol Glycol Yes Yes...

Page 28: ...nspect and monitor the fan area of the rear cover for dust accumulation It may be cleaned with a duster or vacuum cleaner with a dust attachment Cleaning the Catch Tray The catch tray is found on the...

Page 29: ...on the walls Condensation is completely normal in a cold wall refrigeration system Condensation occurs when humid air cools when in contact with the cold walls and excess water vapor condenses on the...

Page 30: ...there s an issue with the backup battery power running low Replace it with a CR123A battery Not Lit Power failure and no battery backup power Change the battery Solid Green Normal operation No action...

Page 31: ...along the back panel and represents the open air temperature A glycol sensor is the vial of liquid with a thermistor inserted in the liquid The glycol sensor is most representative of the typical prod...

Page 32: ...ientific freight prepaid and this warranty shall apply only if Thermo Scientific verifies the applicable defect upon examination 5 Any defects or other damages resulting from shipment of the unit are...

Page 33: ...isher Scientific finden Sie unter www thermofisher com WEEERoHS Conformit WEEE Questo prodotto deve rispondere alla direttiva dell Unione Europea 2012 19 EU in merito ai Rifiuti degli Apparecchi Elett...

Page 34: ...5826 1616 Australia 61 39757 4300 Austria 43 1 801 40 0 Belgium 32 53 73 42 41 France 33 2 2803 2180 Germany international 49 6184 90 6000 Germany national toll free 0800 1 536 376 Italy 32 02 95059 5...

Reviews: