background image

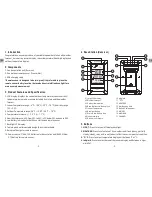
6  Temperature & HUMIDITY Trend

1.       indicates the temperature & humidity is in an increasing trend.

2.       indicates the temperature & humidity is in an no change trend. 

3.       indicates the temperature & humidity is in a decreasing trend.

7  Outdoor Remote Sensor (Transmitter)

Note:

 To access CHANNEL SELECTOR and RESET buttons, you need to unscrew 

the cover as per below Figure.

LED

Temperature
Sensor

Charging 
Socket

ON/OFF

Reset

Channel

8  Charging Remote Sensor

1. Remote sensor: A built-in rechargeable lithium battery is installed in the 
    remote sensor. Although there could be some power in the rechargeable 
    battery before the unit leaves our manufacturing facility, we always 
    recommend to fully recharge the remote sensor before use by following the 
    steps below: 

a. Note, the package does not INCLUDE a wall adapter. Simply use any cellphone 
    wall charger with USB socket to charge the battery. Connect the charging 
    cable (provided in the package contents) into your wall adapter and take the 
    other end of the plug and insert into the charging socket located on the back 
    of the remote sensor; 

b. Plug the wall charger into a standard AC outlet

c. The red light on the remote sensor will light up

d. Charge the remote sensor for at least 4 hours until the light changes from 
    red to green which indicates charging is complete.

9  Low Battery Warning

If the battery power (base station or remote sensor) is low, there will be low 
battery icon showing on the base station display. 

If the low battery icon for base station is displayed, please replace the batteries 
with new batteries.

If the low battery icon for remote sensor is displayed, please charge the remote 
sensor as soon as possible.

Wall hanging hole

-4-

-5-

EN

EN

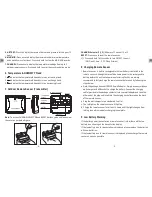
7. CHANNEL:

 Press once to display the temperature readings from up to 3 

    outdoor remote sensors; Press and hold to enter the synchronization mode. 

5. HISTORY:

 Press to display the record of barometric pressure for the past 12 

    hours.

6. MAX/MIN:

 Press once to display the maximum and minimum temperature 

    and humidity since last reset. Press and hold to clear the MAX/MIN records.

CHANNEL Selector (1,2,3): 

Slide to set Channel 1,2 or 3.

RESET: 

Press once to reset the remote sensor.


: Press and hold for 2 seconds to turn ON/OFF the unit.
  (ON: Flash 1 time ,  OFF: Flash 3 times) 

Summary of Contents for TP-67

Page 1: ...Model No TP 67 V201808 EN FR 31 Wireless Weather Station Instruction Manual English 2 Fran ais 14...

Page 2: ...0 3 below 30 and above 80 6 Low battery indication for both base station and remote sensor 7 Backlight LCD display 8 Tabletop and wall mountable design Base is detachable 9 Rain proof design for remot...

Page 3: ...socket located on the back of the remote sensor b Plug the wall charger into a standard AC outlet c The red light on the remote sensor will light up d Charge the remote sensor for at least 4 hours unt...

Page 4: ...mote channel you want displayed permanently 12 Thermometer 1 Once the remote sensor and the base station are synchronized the indoor temperature humidity and outdoor temperature will both be shown the...

Page 5: ...er forecasting is for reference and for domestic use only Do NOT rely on the weather station s weather forecast for any serious matters such as health business and financial decisions and or agricultu...

Page 6: ...by the party responsible for compliance could void the user s authority to operate the equipment NOTE This equipment has been tested and found to comply with the limits for a Class B digital device pu...

Page 7: ...Conformity Hereby the manufacturer declares that this product complies with the basic requirements and applicable regulations of the Radio Equipment Directive 2014 53 EU the EMC Directive 2014 30 EU T...

Page 8: ...lus pr cises 3 Fonctionnalit s et sp cifications du produit 1 cran LCD Affiche la temp rature ext rieure actuelle l humidit et la temp rature int rieures la pression atmosph rique y compris son histor...

Page 9: ...dit 1 indique que la temp rature et l humidit ont une tendance la hausse 2 indique que la temp rature et l humidit ont une tendance constante 3 indique que la temp rature et l humidit ont une tendance...

Page 10: ...rieure clignotera pendant 3 minutes ce qui indique que la station est en mode de synchroni sation et qu elle attend que les capteurs soient reconnus 3 Configurez le s lectionneur de canal l arri re d...

Page 11: ...e minimum enregistr es MIN est affich sur l cran c Pour effacer et r initialiser les records max min laissez appuy sur MAX MIN pendant 3 secondes 3 Tendance de temp rature et d humidit 3 types d ic ne...

Page 12: ...surface plane l int rieur ou l ext rieur Assurez vous que le capteur soit port e de la station de base avec le moins d obstructions possibles Bien que le capteur soit con u pour tre tanche il doit tou...

Page 13: ...u modifications qui ne sont pas express ment approuv s par la partie responsable de la conformit pourraient annuler l autorit des utilisateurs op rant sur l quipement REMARQUE Cet quipement a t test e...

Page 14: ...vice client par t l phone ou e mail pour savoir comment emballer et retourner le produit ThermoPro Cette garantie vous donne des droits sp cifiques l gaux et certains droits suppl mentaires selon l ta...

Reviews: