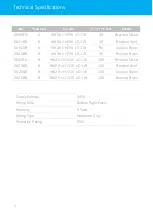
background image


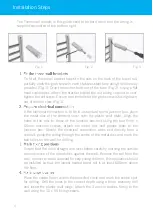
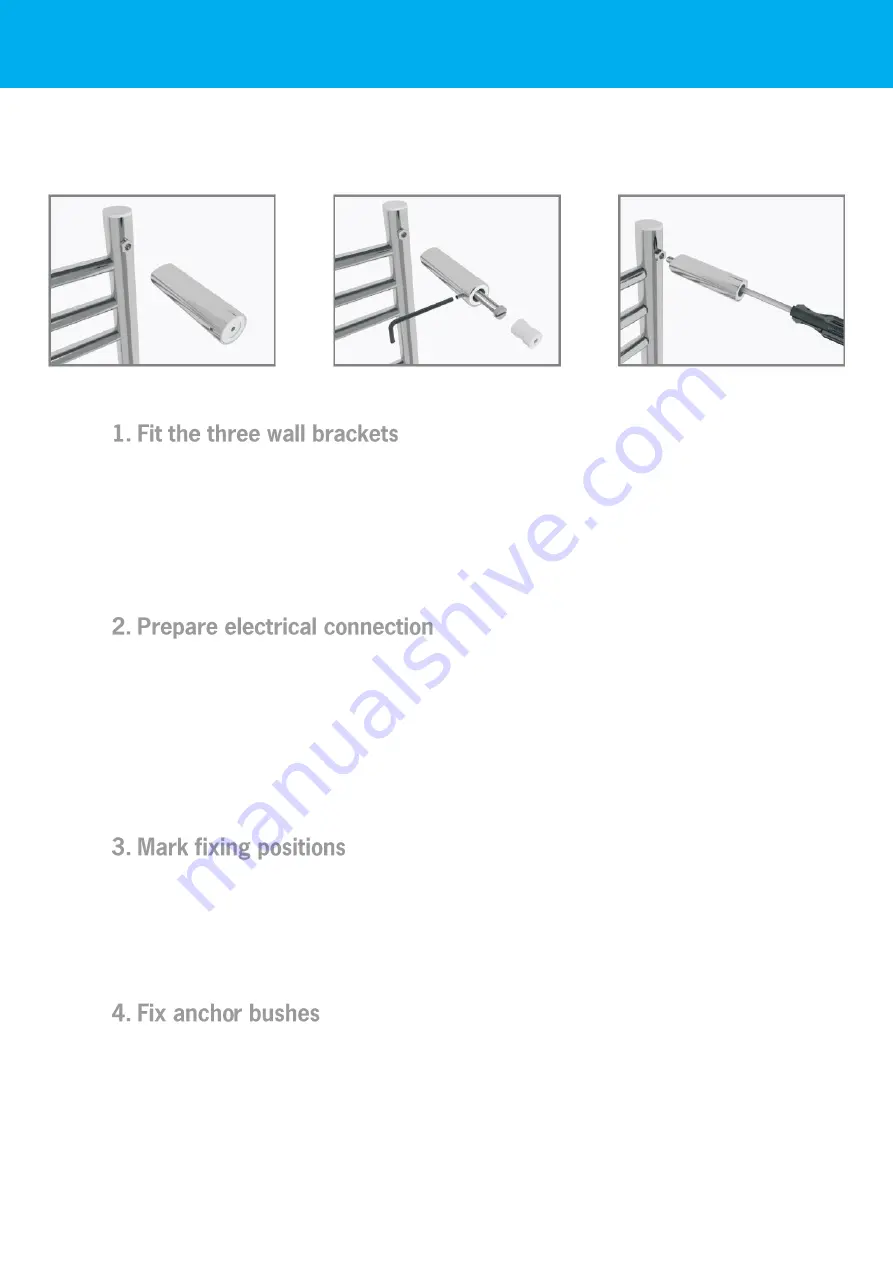
To fit all three wall bracket tubes to the nuts on the back of the towel rail, 
partially undo the grub screw in each stainless steel tube using the allan key 
provided (Fig.1). Drop the anchor bush out of the tube (Fig.2). Using a flat 
head screwdriver, attach the bracket tube to the nut taking care not to over-
tighten the set screw. Ensure that the hole for the grub screw is facing down, 
out of normal view (Fig.3). 


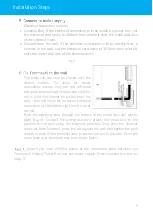
If the electrical connection is to be in a standard round junction box, place 
the metal disc of the element cover onto the plastic wall plate. Align the 
holes in the disc to those of the junction box and using the two 5mm x 
40mm  machine  screws,  attach  the  metal  disc  and  plastic  plate  to  the 
junction  box.  Should  the  electrical  connection  wires  exit  directly  from  a 
conduit, guide the wiring through the centre of the metal disc and mark the 
two holes on the wall for drilling.  


Ensure that the rail is straight and level before carefully marking the outside 
circumference of the three tubes against the wall. Remove the rail from the 
wall. In order to avoid a hazard for very young children, this appliance should 
be installed so that the lowest heated towel rail is at least 600mm above 
the floor. 


Place the centre finder within the pencilled circle and mark the centre spot 
for drilling. Drill the holes to the correct depth using a 6mm masonry drill 
and insert the plastic wall plugs. Attach the 3 anchor bushes firmly to the 
wall using the 10 x 50 fixing screws. 
 

       Installation Steps  

Fig.1 

Fig.2 

Fig.3 

The Thermorail models in this guide need to be hard wired and the wiring is 
supplied connected at the bottom right.  

Fig. 1 

Fig. 2 

Fig. 3 

Summary of Contents for S60SAB

Page 1: ...240V Liquid Filled Heated Towel Rail Installation Guide S60SBN S60SBG S60SAB S60SBB S62SBN S62SBG S62SAB S62SBB ...

Page 2: ...2 What s in the box 3 Installation Steps 4 Technical Specifications 6 Safety Care Information 7 Warranty Information 8 Warranty Registration 9 Notes 10 Contact Us 12 Contents ...

Page 3: ...ncluding 3 x Brackets Centre finder Allan key 5 x Plastic wall plugs Plastic wall plate 3 x Fixing screws for wall plugs 2 x Machine screws 2 x Self tapping screws Flat head screwdriver Pencil Spirit level Tape measure Drill bits What s in the box ...

Page 4: ...d the electrical connection wires exit directly from a conduit guide the wiring through the centre of the metal disc and mark the two holes on the wall for drilling Ensure that the rail is straight and level before carefully marking the outside circumference of the three tubes against the wall Remove the rail from the wall In order to avoid a hazard for very young children this appliance should be...

Page 5: ... key until the rail is held and cannot be pulled from the wall this will allow for an easier electrical connection at the bottom right hand side of the rail Push the electrical cord through the centres of the metal disc and plastic plate Fig 4 Connect the wiring and then attach the metal disc to the junction box or wall using the fasteners provided Only once the element cover has been fastened pre...

Page 6: ...90 x D118 90 Brushed Brass S62SBN 8 W620 x H1215 x D118 150 Brushed Nickel S62SBG 8 W620 x H1215 x D118 150 Brushed Gold S62SAB 8 W620 x H1215 x D118 150 Antique Brass S62SBB 8 W620 x H1215 x D118 150 Brushed Brass Supply Voltage 240V Wiring Side Bottom Right Hand Warranty 5 Years Wiring Type Hardwired Only Protection Rating IPX5 Technical Specifications ...

Page 7: ...rect zones according to the IP rating of the timer switch Ensure that your Thermorail is protected by a suitably rated RCD circuit Do not use the towel rail to hold towels or other articles that have been in contact with oil petroleum based products or dry cleaning fluids This appliance is intended to warm and dry towels and therefore is hot to touch When near young children or infirm persons clos...

Page 8: ...warranty repair or service the customer must provide purchase invoice receipt and completed warranty registration form If the product develops a fault within the warranty period due to normal wear and tear Thermogroup at its discretion will recognise whether it s a faulty product or not If it is impossible or not economical for the manufacturer to repair the product the manufacturer will replace t...

Page 9: ...is form correlates to the installation 240Volt Power at Connection See Page 5 0 S60SBN Example Timer Isolating Switch None TRTS 1 Timer Isolating Switch None 2 Timer Isolating Switch None 3 Timer Isolating Switch None 4 Timer Isolating Switch None 5 Timer Isolating Switch None 6 Timer Isolating Switch None 7 Timer Isolating Switch None 8 Timer Isolating Switch None 9 Timer Isolating Switch None 10...

Page 10: ...10 Notes ...

Page 11: ...11 Contact us Notes ...

Page 12: ...12 sales thermogroup com au www thermogroup com au 1300 368 631 Contact Us ...

Reviews: