background image

Installation, use and maintenance guide  

CASING CHIC 

– CHIC SUPREME 


Page 5 


ENG 


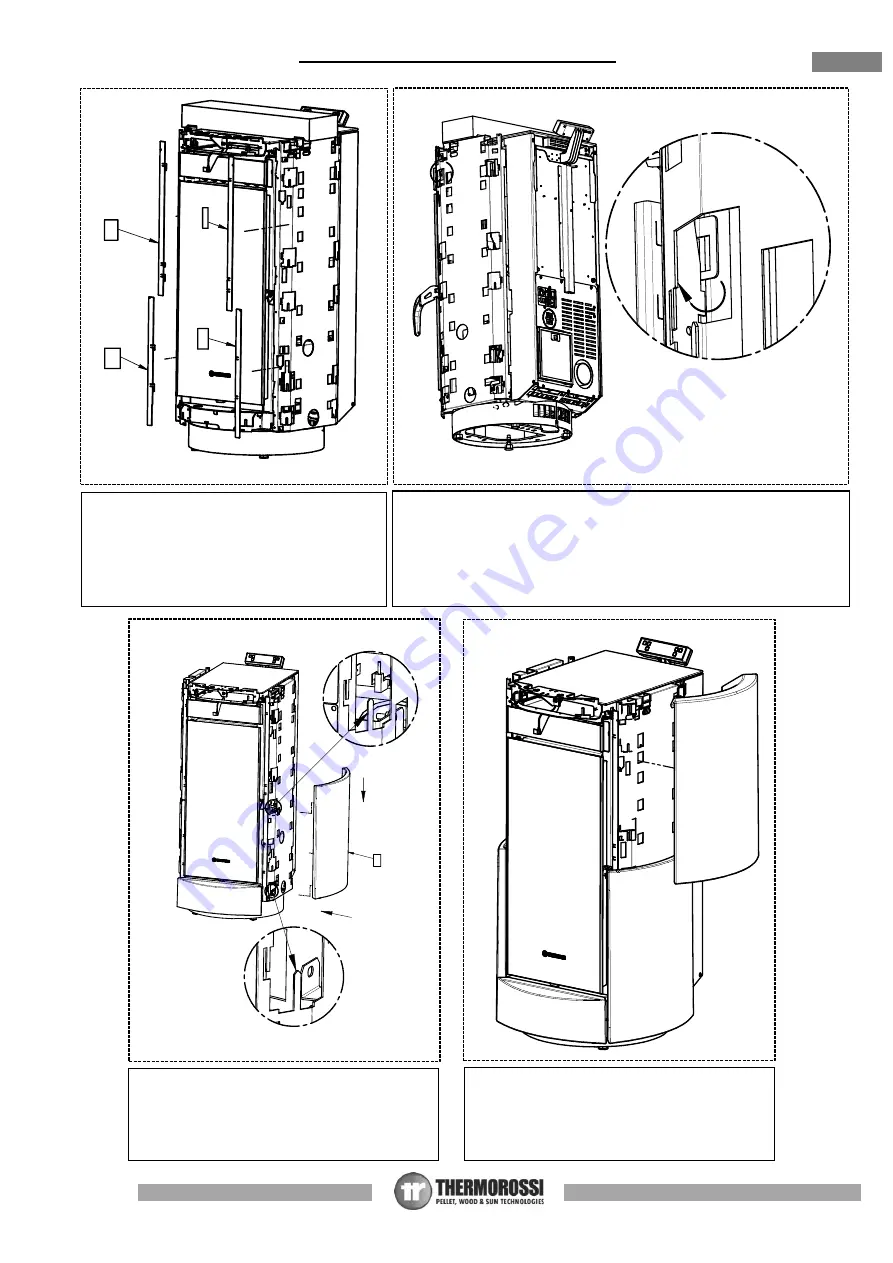
5  -  Mount  the  four  compensating  profiles,  (I-L-
M-N),  by  inserting  the  hooks  in  the  slots 
provided on the body of the appliance. In some 
cases it may be necessary to break off the last 
hook at the bottom of the upper profile. 

6  -  Detail  A  shows  the  hook  correctly  inserted  in  the  slot.  Then  use  a 
screwdriver  to  turn  the  hooks  outwards  to  firmly  secure  the 
compensating profiles to the appliance. 


7  -  Insert  the  lower  side  panel  (E)  on  the  teeth 
provided,  as  illustrated  in  details  C  and  D. 
Slightly bend the teeth so as to firmly secure the 
majolica  to  the  body.  Carry  out  the  same 
procedure on the opposite side. 

8 - Insert the upper side panel (C) on the teeth 
provided, as in the previous point. Slightly bend 
the  teeth  so  as  to  firmly  secure  the  majolica  to 
the body. Carry out the same procedure on the 
opposite side. 

C

DETTAGLIO C

D

DETTAGLIO D

F

DETTAGLIO F

0.8

N

I

M

L

A

DETTAGLIO A

B

DETTAGLIO B

E

DETTAGLIO E

E

DETTAGLIO E

G

E

C

DETTAGLIO C

D

DETTAGLIO D

Summary of Contents for CHIC

Page 1: ...CHIC CHIC SUPREME INSTALLATION GUIDE ...

Page 2: ...Installation use and maintenance guide CASING CHIC CHIC SUPREME Page 1 ENG ...

Page 3: ...de CASING CHIC CHIC SUPREME Page 2 ENG INDEX INSTRUCTIONS VALID ONLY FOR CHIC 3 1 INTRODUCTION 3 2 COMPONENTS 3 3 ASSEMBLING THE CASING 4 INSTRUCTIONS VALID ONLY FOR CHIC SUPREME 7 1 INTRODUCTION 7 2 COMPONENTS 7 3 ASSEMBLING THE CASING 8 ...

Page 4: ...d or communicated to third parties or used in any other way without the necessary authorisation 1 2 TRANSPORTATION AND STORAGE TRANSPORTATION AND HANDLING Take special care to protect all the fragile parts from mechanical impact which could damage them STORAGE The casing must be stored in a humid free environment and sheltered from the weather avoid placing the casing directly on the ground The co...

Page 5: ...O B 1 2 3 4 4 H 4 1 Fasten the support bracket H to the hole 3 using the screw 1 and nut 2 ATTENTION If your appliance has a NATURAL body do not carry out this operation start directly from the next point 4 Adjust the two teeth illustrated in the DETAIL B box to firmly secure the majolica to the bracket Lastly fasten the bracket with the majolica using the 4 screws 4 removed earlier 3 Insert the l...

Page 6: ...ver to turn the hooks outwards to firmly secure the compensating profiles to the appliance 7 Insert the lower side panel E on the teeth provided as illustrated in details C and D Slightly bend the teeth so as to firmly secure the majolica to the body Carry out the same procedure on the opposite side 8 Insert the upper side panel C on the teeth provided as in the previous point Slightly bend the te...

Page 7: ... majolica to the body ATTENTION If your appliance has a NATURAL body do not carry out this operation start directly from the next point E F 11 Insert the upper majolica F on the teeth provided Slightly bend the teeth so as to firmly secure the majolica to the body ATTENTION This operation is only to be carried out on appliances with a NATURAL body A DETTAGLIO A B DETTAGLIO B F ...

Page 8: ...to third parties or used in any other way without the necessary authorisation 1 2 TRANSPORTATION AND STORAGE TRANSPORTATION AND HANDLING Take special care to protect all the fragile parts from mechanical impact which could damage them STORAGE The casing must be stored in a humid free environment and sheltered from the weather avoid placing the casing directly on the ground The company is not respo...

Page 9: ... the teeth provided Slightly bend the teeth so as to firmly secure the majolica to the body ATTENTION If your appliance has a NATURAL body do not carry out this operation start directly from the next point 2 Undo the 4 screws 2 and remove the majolica support bracket Insert the lower majolica B on the bracket that you have just removed Lastly fasten the bracket with the majolica using the 4 screws...

Page 10: ...he appliance body is deeper than the central majolica F in order to close the remaining gap 5 Insert the lower side panel D on the teeth provided Slightly bend the teeth so as to firmly secure the majolica to the body Carry out the same procedure on the opposite side 6 Insert the upper side panel E on the teeth provided as in the previous point Slightly bend the teeth so as to firmly secure the ma...

Page 11: ...Installation use and maintenance guide CASING CHIC CHIC SUPREME Page 10 ENG ...

Page 12: ...ation use and maintenance guide CASING CHIC CHIC SUPREME Page 11 ENG Via Grumolo 4 Z I 36011 Arsiero VI ITALY Fax 0445 741657 www thermorossi com info thermorossi it F ireL o v e rs Code 70030785 Rev A 11 2020 ...

Reviews: