pg. 10
28
27
26
21
25
29
23
24
22
20
5.1.4 HEA
5.1.4 HEA
5.1.4 HEA
5.1.4 HEA
5.1.4 HEATER REAR P
TER REAR P
TER REAR P
TER REAR P
TER REAR PANEL
ANEL
ANEL
ANEL
ANEL
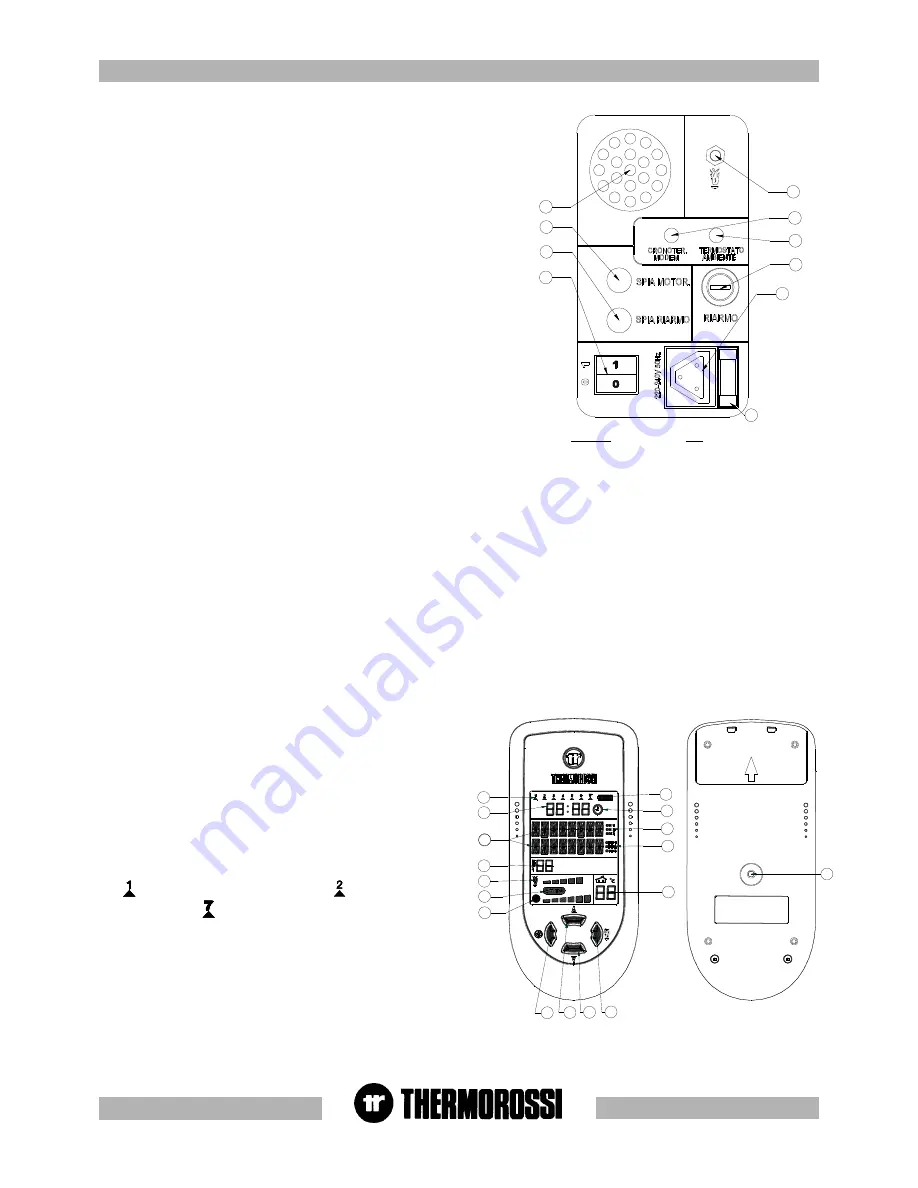
The rear panel integrates the radio control.
A description of the functions of the buttons and LEDs on the rear panel of the
heater:
(20) Insert on/off and flame adjustment button
By pressing this button you can use the heater even without the radio control.
Press button (20) repeatedly to increase the combustion power, whereas the
ventilation level is adjusted automatically according to the selected combustion
power. One or more acoustic signals correspond to each power step
selected:
-1 power bar
-- 1 acoustic signal
-2 power bars
-- 2 acoustic signals
-........................................................................
-5 power bars
-- 5 acoustic signals
If you press once again the acoustic signals will not sound: this means that
after 5 seconds the heater will set itself in OFF mode and consequently shut
down. It is not possible to select the AUTO cycle.
21 Loudspeaker for voice alarms/information: the heater gives
information on its status and any active alarms through this loudspeaker.
22 Power outlet for additional room temperature connection.(see
para. 7.1)
(additional room temperature thermostat not supplied)
23 Power outlet for additional chronothermostat connection.(see
para. 7.2)
(additional chronothermostat not supplied)
24 Overtemperature thermostat button cap
In the event of overtemperature this safety thermostat stops the loading of pellets. When it is activated LED 27 comes on. To restart the
heater you need to wait until it cools down, then verify the cause for the overheating, remove the cause, unscrew the protective cap and
press the button (24) .
25 Electrical power outlet 220-240V 50Hz
26 Loading motor test LED.
The light must come on when the pellet screw feeder starts .
27 Reset thermostat tripped indicator light. This LED comes on when the reset thermostat is activated.
28 Main switch 0-1
29 General fuse 3.15 A
19
3
4
2
1
10
9
8
7
6
12
11
16
5
15
14
13
5.2 D
5.2 D
5.2 D
5.2 D
5.2 DA
A
A
A
AY
Y
Y
Y
Y AND
AND
AND
AND
AND TIME SETTING
TIME SETTING
TIME SETTING
TIME SETTING
TIME SETTING
The heater must be energised and the switch at the back turned to
position "1"(see image in top right corner).
To set the clock and the day of the week carry out the procedures
described below. Press the button (19) on the back of the radio
control repeatedly until the word TIME appears.
To set the day press the button (2) . The word DAYS will appear on
the display, and the indicator (12) will start to blink. Press the button
(3) and/or (4) to set the number that corresponds to the current day.
The
symbol corresponds to Monday , the
symbol to Tuesday
..... and the symbol
to Sunday. To confirm the selection press the
button (1). Next the word HOUR will appear on the display, and the
hour indicator (11) will start to blink. Press button (3) and/or (4) to set
the current time. To confirm the selection press the button (1). Next
the word MINUTES will appear on the display and the minute
indicator (11) will start to blink. Press buttons (3) and/or (4) to set the
current minutes . To confirm the selection press the button (1). The
day and time setting is now completed : at this point the heater
operating status will appear on the display.
KEY
Room temperature thermostat
Chronothermostat - modem
Motor LED
Reset LED
Reset
LEGENDA
Termostato ambiente
Cronotermostato - modem
Spia Motor
Spia riarmo
Riarmo


