2
Setting up your ThermaData WiFi Logger
STEP 1 - Optional Method
Connecting the device to your network using a smartphone or tablet.
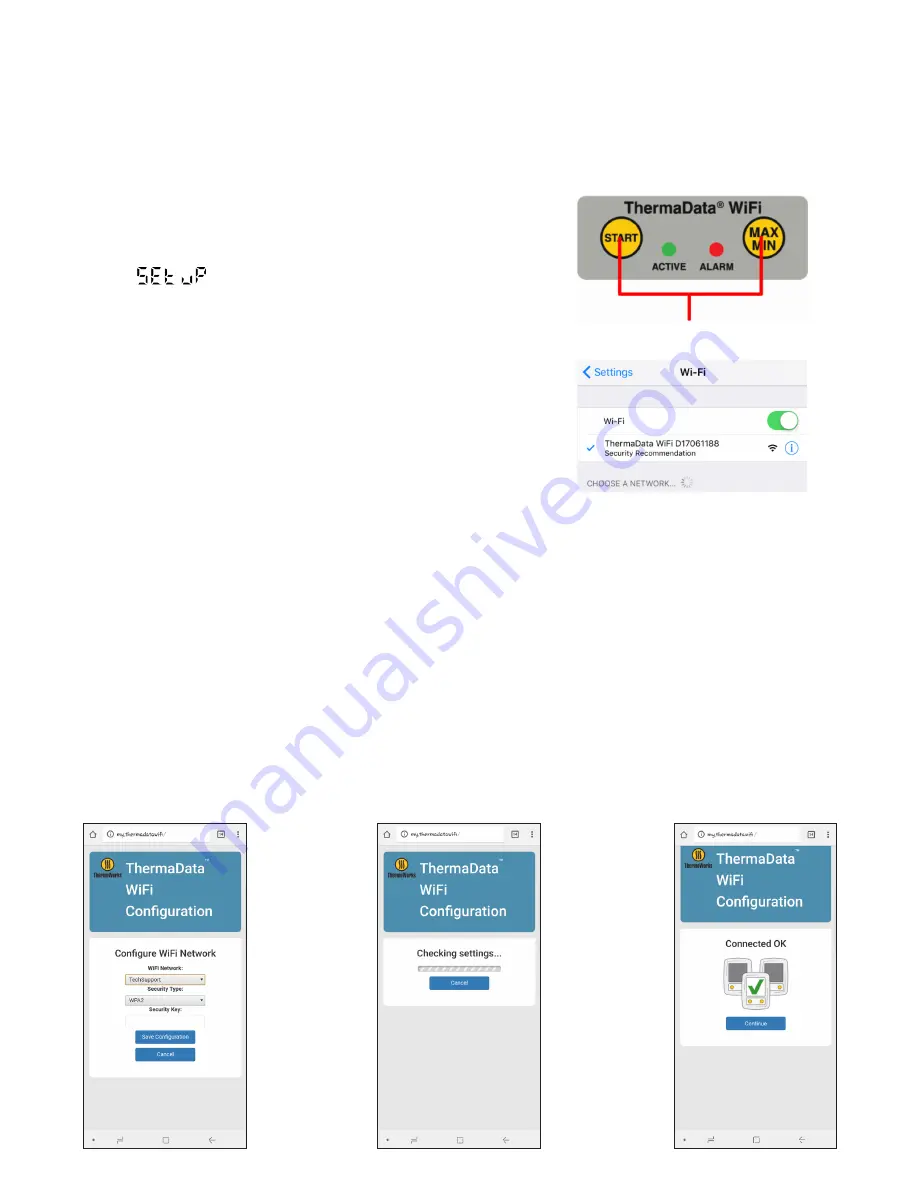
• Hold ‘Start’ and ‘Max/Min’ buttons on the ThermaData WiFi logger until the
LCD displays . (Approx. 5 seconds.)
NOTE: If you successfully connected your logger to the Wi-Fi network on
page 1, skip to page 3.
• Go to Wi-Fi settings within your smartphone or tablet and ‘Scan for available networks.’
• Locate the ‘network’ that corresponds to your ThermaData WiFi logger. It will contain
the serial number printed so the rear label of your device. (For example: ThermaData WiFi
D17061188)
NOTE: This is a temporary connection that enables you to connect the
ThermaData WiFi logger to your Wi-Fi network as described below.
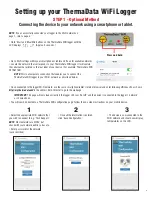
• Select the appropriate Wi-Fi network that
you wish to connect to e.g. ‘Tech Support.’
NOTE: Most networks are WPA2, but
check with your network admin to be sure.
• Enter password for the network
(case sensitive).
1
2
3
• Once all the information is entered,
click ‘Save Configuration.’
• The device is now connected to the
Wi-Fi network and should now display
temperatures on the LCD.
• Once connected to the logger Wi-Fi network, use the same smartphone/tablet’s internet browser and enter following URL exactly as shown
http://my.thermadatawifi in the address field. Hit enter to go to the webpage.
IMPORTANT: This page will only load correctly if the logger still says ‘Set UP’ and the device is connected to the logger’s ‘network’
as shown above.
• You will now be directed to a ThermaData WiFi configuration page. Follow the on-screen instructions on your mobile device.
Press and hold


