background image

FCC Statement

This device complies with Part 15 of the FCC Rules. Operation is subject to the following two 
conditions: (1) This device may not cause harmful interference, and (2) this device must accept any 
interference received, including interference that may cause undesired operation.

This equipment has been tested and found to comply with the limits for a Class A digital device, 
pursuant to Part 15 of the FCC Rules. These limits are designed to provide reasonable protection 
against harmful interference in a residential installation. This equipment generates, uses and can 
radiate radio frequency energy and, if not installed and used in accordance with the instructions, may 
cause harmful interference to radio communications. However, there is no guarantee that interference 
will not occur in a particular installation. If this equipment does cause harmful interference to radio 
or television reception, which can be determined by turning the equipment off and on, the user is 
encouraged to try to correct the interference by one or more of the following measures:

Reorient or relocate the receiving antenna.

Increase the separation between the equipment and receiver.

Connect the equipment to an outlet on a circuit different from that to which the receiver is
connected.

Consult the dealer or an experienced radio/TV technician for help.

FCC CAUTION

: Any changes or modifications to the equipment not expressly approved by the party 

responsible for compliance could void your authority to operate the equipment.

This Class A digital apparatus complies with Canadian ICES-003.

Summary of Contents for DC-E1-FG

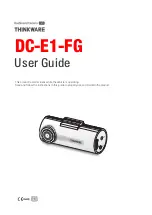
Page 1: ...This product records videos while the vehicle is operating Read and follow the instructions in this guide to properly use and maintain the product User Guide DC E1 FG...

Page 2: ...uct s performance or features About the user guide The information provided in the guide may change when the manufacturer updates its service policy This user guide is intended for THINKWARE DC E1 FG...

Page 3: ...ful interference to radio communications However there is no guarantee that interference will not occur in a particular installation If this equipment does cause harmful interference to radio or telev...

Page 4: ...Managing the memory card 23 5 1 1 Partitioning the memory card 23 5 1 2 Formatting the memory card 23 5 1 3 Configuring the video overwriting function 23 5 2 Setting the camera 24 5 2 1 Setting the b...

Page 5: ...Provides useful information to help users better utilize the product s features Safety information for proper use Driving and product operation Do not operate the product while driving a vehicle Distr...

Page 6: ...not place heavy objects on the power cable or pull insert or bend the power cable using excessive force Doing so may result in electrical fire or electrocution Use only genuine accessories from THINK...

Page 7: ...care If you drop mishandle or expose the product to external shocks it may cause damage and or result in the malfunction of the product Do not attempt to insert foreign objects into the device Avoid e...

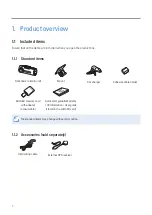
Page 8: ...Front camera main unit Mount Car charger Adhesive cable holder MicroSD memory card with adapter consumable Quick start guide Warranty CS information User guide stored in the microSD card The standard...

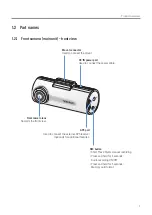
Page 9: ...able Mount connector Used to connect the mount Front camera lens Records the front view GPS port Used to connect the external GPS receiver optional for additional features REC button Short Press Start...

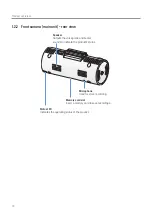
Page 10: ...it rear view Status LED Indicates the operating status of the product Speaker Outputs the voice guide and buzzer sounds to indicate the product s status Memory card slot Insert a memory card to save r...

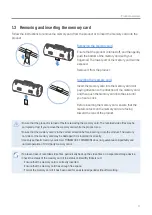
Page 11: ...d the lens of the product Ensure that the product is turned off before removing the memory card The recorded video files may be corrupted or lost if you remove the memory card while the product is on...

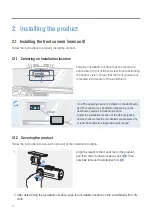
Page 12: ...on the dashboard its GPS reception may be affected depending on the dashboard camera s installation location Adjust the installation location of the GPS navigating device to ensure that the two device...

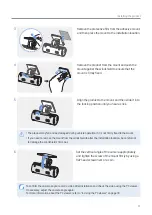
Page 13: ...nd be damaged during vehicle operation if it is not firmly fixed to the mount If you need to remove the mount from the windshield to alter the installation location be careful not to damage the windsh...

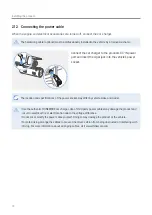
Page 14: ...wer socket The location and specifications of the power socket may differ by vehicle make and model Use the authentic THINKWARE car charger Use of third party power cables may damage the product and r...

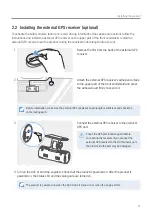
Page 15: ...e to the upper part of the front windshield and press the adhesive part firmly to secure it Before installation make sure the external GPS receiver s cable length is sufficient and check the cable rou...

Page 16: ...es may be lost 3 3 Using the continuous recording feature Connect the power cable to the product s DC IN power port and then turn on the vehicle s electrical accessories or start the engine The status...

Page 17: ...hardwiring cable optional the operating mode is switched to parking mode with the voice guide after the engine or electrical accessories are turned off Parking mode operates only when the hardwiring c...

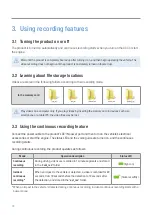
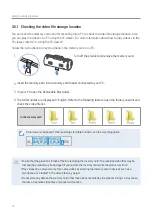
Page 18: ...folder names are displayed in English Refer to the following table to open the folder you want and check the video file list In the memory card A file name is composed of the recording start date and...

Page 19: ...n operating system other than those listed in the system requirements 4 2 Installing the PC viewer You can download the latest PC viewer software from the THINKWARE website http www thinkware com Supp...

Page 20: ...e dashcam settings and set the language for the PC viewer Open a file or save a video with a different name Displays the current and total running time of the current video Indicates the vehicle s dri...

Page 21: ...automatically added to the playlist in the bottom right corner of the PC viewer screen The playlist section layout is as follows Select a folder Displays a list of videos in the selected folder 4 Dou...

Page 22: ...cted video file Stop Stop playing the current video The progress bar will move to the beginning of the video Skip forward by 10 sec Fast forward the video by 10 sec Play the next file Play the next fi...

Page 23: ...ormat the memory card that is inserted in the product Refer to the following instructions to format the memory card 1 From the PC Viewer click Settings Dash Cam Settings Memory Card Settings and click...

Page 24: ...eatures You can set and adjust various features for recording including the detection sensitivity for recording when the product detects an impact during continuous recording 5 3 1 Setting the continu...

Page 25: ...window and click Confirm 4 Click Save 5 3 3 Setting the impact sensitivity for parking mode You can set the detection sensitivity for recording when impact is detected while parking Refer to the foll...

Page 26: ...ehicle is parked If you record in parking mode for an extended period the vehicle s battery may be depleted and you may not be able to start the vehicle If you have installed the hardwiring cable to r...

Page 27: ...g the 24 V battery trucks and commercial vehicles adjust the 24V setting 3 Click Save If the Off voltage value is too low the product may consume the battery completely depending on the conditions lik...

Page 28: ...Save 5 4 2 Setting the mobile zone alert Follow the instructions to turn on or off the mobile zone alert 1 From the PC Viewer click Settings Dash Cam Settings Road Safety Settings 2 From Mobile Zone...

Page 29: ...ettings System Settings 2 From Language select the desired language 3 Click Save 5 5 2 Adjusting the system volume This menu allows you to adjust the voice guidance volume Follow the instructions to a...

Page 30: ...Speed Unit select km h or mph 3 Click Save 5 5 6 Setting the speed stamp Follow the instructions to turn on or off the speed stamp feature 1 From the PC Viewer click Settings Dash Cam Settings System...

Page 31: ...e firmware upgrade file to the root folder of the memory card 6 While the power is disconnected from the product insert the memory card into the memory card slot on the product 7 Connect the power cab...

Page 32: ...n inserted in the correct direction Before inserting the memory card ensure that the metal contacts on the memory card are facing toward the lens of the product Turn off the power remove the memory ca...

Page 33: ...1 2 7 CMOS 1080P Angle of view Approximately 140 diagonally Video FHD 1920 X 1080 H 264 file extension MP4 Frame rate Maximum 30 fps Audio PCM pulse code modulation Acceleration sensor Triaxial accele...

Page 34: ...tored in the memory card The data in the memory card may be deleted during repair Every product requested for repair is regarded as a device that has had its data backed up The customer service center...

Page 35: ...http www thinkware com Ver 1 0 Mar 2018...

Reviews: