background image

58

ⓒ 

this is engineering Inc. All Rights Reserved.

Firmware Updates to Aircraft

Firmware updates are provided to optimize the performance of SHIFT RED. Update 
the aircraft to the latest firmware by following the procedure below:

1.   From the download page (www.thisiseng.com/support/download/) of the this is 

engineering website, download the firmware to the root directory of a micro SD 

card. Do not change the file name or extension.

2.  With the aircraft powered off, remove the battery and insert the micro SD card 

into the micro SD slot.

3.  When the aircraft is powered on after inserting the battery, the firmware update 

begins automatically and the front LED blinks.

4.  The firmware update takes approximately two minutes. Do not remove the 

battery or turn off the aircraft while updating.

5.  Upon the completion of the firmware update, the aircraft is automatically powered 

off, and the firmware file in the micro SD card is deleted. 

6.  For the best flight experience, this is engineering recommends users to update to 

the latest firmware versions.

07

FIRMWARE UPDATES

Before starting the firmware update, make sure that the battery is charged more than a half. The battery 

condition can be checked in the ‘SHIFT Drone’ application.

Summary of Contents for Shift Red

Page 1: ...SHIFT RED User Manual Ver 3 0...

Page 2: ...se charge the batteries of drone and controller before first use After Charging the battery disconnect and store it from the aircraft For comfortable use of SHIFT RED check out the tutorial videos on...

Page 3: ...fore using the SHIFT RED this is engineering Inc shall not be included in any legal action or held liable for any direct or indirect damage resulting from the use of the product All information in thi...

Page 4: ...troller Controller Powering On Pairing with the Aircraft Aircraft Powering O Controller Powering O Taking O Flight Control Flight Mode 19 21 20 23 24 27 33 Landing Emergency Measures 34 35 02_PRECAUTI...

Page 5: ...ndication 49 04_USING THE MOBILE APPLICATION Installation and Execution Using Free Flight Modes Recording Preference Settings Sensor Calibration 37 39 43 44 06_HANDLING THE CONTROLLER Charging Prefere...

Page 6: ...copter equipped with software gimbal vision recognition and hyper sensor fusion technology Anti shake FHD video shooting and real time video transmission functionality offer you a stable yet dynamic d...

Page 7: ...omponents To find details of the components of the HI LITE package refer to 8p Controller with control Ring Aircraft with propellers Protectors Battery USB Type C cable including adapter 1 2 3 4 5 6 7...

Page 8: ...LITE STANDARD Aircraft 1 pc 1 pc Controller 1 pc 1 pc Control Ring 1 pc 1 pc Battery 1 pc 1 pc Protectors 2 pcs Spare Propellers CCW CW 2 pcs Removal Wrench 1 pc Micro SD Card 1 pc Fit Band 1 pc USB T...

Page 9: ...raft Parts Protectors Propellers CCW Propellers CW Motors Motor housings Arms Vision camera Front LED Integrated 3D sensing system Micro SD slot inside Battery USB port Type C Power button LED Landing...

Page 10: ...reaming HD 720 p 30 fps Max Video Recording FHD 1080 p 30 fps Camera Sensor 5 M CMOS Lens Shooting Range 40 cm to Photo Filename Extension JPG Video Filename Extension MP4 Battery Li Po 3 7 V 1100 mAh...

Page 11: ...Manual this is engineering Inc All Rights Reserved Controller Parts Control ring Control pad Power setting Control stick LED indicators Jog button USB port Type C Reset hole 1 5 2 6 3 7 4 8 Back Botto...

Page 12: ...300 m Max Operation Time 60 min Max Operating Temp 0 40 Battery Li Po 3 7 V 300 mAh DC Input 5 V 400 mA Charging Type USB Type C Charging Time 60 min The maximum control range maximum flight distance...

Page 13: ...rone 02 PRECAUTIONS Age Recommendation Compliance with Relevant Laws Precautions When flying unmanned aerial vehicles UAVs you must observe the rules and regulations of the authorities having jurisdic...

Page 14: ...t the intelligent vision camera on the front side of the drone and the lenses and sensors of the bottom sensor system are clean and free of stains Pre flight Inspection Pay special attention to the ba...

Page 15: ...t use together with propellers of other brands Do not attempt to grab or touch propellers that are in operation Doing so may result in serious injury Keep a safe distance away from the drone The dista...

Page 16: ...extremely bright over 100 000 lux direct sunlight surface or toward a bright light source its flight performance may be affected Check the surrounding brightness before operating the drone The drone m...

Page 17: ...oisture or direct sunlight Do not charge the drone immediately after flight as the battery temperature may be too high Wait for the battery to cool to a temperature similar to room temperature before...

Page 18: ...ized changes to the drone or controller by the user Where an unauthorized change has been made the product shall not be covered by the warranty policy Repairs may be denied or performed for a fee Unau...

Page 19: ...t inspection 14p and Precautions during flight 15p subsections under Section 02 Precautions The drone has a flight altitude limit of 25 m 82 ft and the maximum flight distance maximum control range ma...

Page 20: ...when it has safely landed Using the power button while the aircraft is still in flight may result in accidents Data loss may occur if the battery is removed without turning off the aircraft Turn off...

Page 21: ...er the user moves to a different location to operate the drone 1 Before turning on place the control ring at least 30 cm 1 0 ft away from the controller When turning on the Controller ensure that ther...

Page 22: ...me ceremony melody 3 When the aircraft and controller are ready for flight they are automatically paired and the controller s LED indicator turns solid white For how to turn on the aircraft see Contro...

Page 23: ...utton for at least two seconds to turn off the controller If the controller does not turn off properly use the reset hole on the bottom Force the controller to shut down by pressing the reset hole wit...

Page 24: ...d in a bright environment not placed on a flat surface or does not have enough battery If this case the drone only tests its propeller s condition and will fail to take off Take note if the front side...

Page 25: ...nc All Rights Reserved 3 Touch the center of the control pad with the control ring 4 Maintain the contact with the pad for over one second and the drone will take off while playing a takeoff melody Af...

Page 26: ...tic landing Takeoff Restrictions Warning Place the camera lens facing forward and prepare for takeoff When the correct takeoff conditions are not met SHIFT RED will indicate by making the following pr...

Page 27: ...ler and place your index finger on the jog button Flight Control The control ring is ergonomically designed with different shapes at the top and bottom insert your thumb through the wider opening so t...

Page 28: ...While in hovering mode after takeoff automatic control switching using the control ring allows the drone to switch to free flight mode While the drone is hovering place the control ring above the cent...

Page 29: ...this is engineering Inc All Rights Reserved 3 The drone flies by mirroring the movement of the control ring Move your control ring wearing thumb in the desired direction of flight and the drone will f...

Page 30: ...an adequate height above the controller pad to allow better control over the flight altitude The degree of acceleration or deceleration can be set proportionately to the distance moved by the control...

Page 31: ...ad of the aircraft to the desired direction turn the jog button accordingly 5 If you press the jog button during flight the controller vibrates once and the drone switches to hovering The automatic mo...

Page 32: ...the controller warns the user by vibrating at different levels as the control ring approaches the detection limit The controller s range of control ring detection may change unpredictably depending on...

Page 33: ...o under stable conditions When switched to stable shooting mode the drone maintains the previous flight altitude which may be adjusted by moving the control ring up or down Note that there is no vibra...

Page 34: ...ring for over one second to initiate automatic landing During automatic landing you cannot control the drone by moving the control ring 2 Once the drone comes to a complete stop the controller vibrate...

Page 35: ...ches to self stopping the front LED and power button on the aircraft blink twice repeatedly and the controller vibrates and sounds to declare an emergency At this point you should perform a safe landi...

Page 36: ...nks its front LED and power button three times repeatedly before automatically landing Before the controller is powered off make sure the aircraft is positioned in a safe place or landed Self stopping...

Page 37: ...n Google Play or App Store and download the app to your smartphone 3 Turn on the drone connect to SHIFT DRONE XXXXXXXX from your smartphone s Wi Fi settings and run the application The initial passwor...

Page 38: ...Setting menu Lezero Pilot mode Wi Fi setting Sensor calibration Version information Take video photo Change video photo mode Notice Video quality frame settings 1 5 2 6 3 4 7 8 9 10 11 12 The screens...

Page 39: ...hotos Exercise caution against collisions when in a flight mode Maintain a distance of at least 2 m 6 6 ft away from the drone during operations Visit the this is engineering website www thisiseng com...

Page 40: ...Following The drone flies while following the target Horizontal Tracking The drone tracks the target while in horizontal flight Yaw Tracking The drone performs a yaw rotation toward the target while...

Page 41: ...41 SHIFT RED User Manual this is engineering Inc All Rights Reserved 3 Long press the screen to begin free flight in the selected mode While flying in the selected mode you can take photos or videos...

Page 42: ...lly detected The drone switches to hovering if the target is moving too fast or if tracking has failed due to obstacles If the target falls inside the red drag box while maintaining a distance similar...

Page 43: ...e photo video quality settings tap on the button indicated below 2 Set the desired photo video quality while referring to the following description Setting menu Select Video Quality Low Mid High Selec...

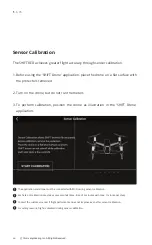
Page 44: ...rone but do not run the motors 3 To perform calibration position the drone as illustration in the SHIFT Drone application The application and drone must be connected with Wi Fi during sensor calibrati...

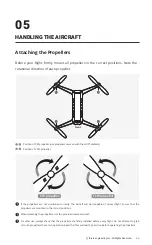
Page 45: ...pellers are not positioned correctly the aircraft will be incapable of normal flight Ensure that the propellers are mounted in the correct positions Position of CW propeller use propellers marked with...

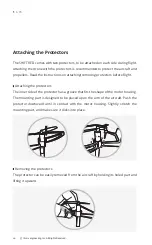
Page 46: ...removing protectors before flight Attaching the protectors The inner side of the protector has a groove that fits the shape of the motor housing The mounting part is designed to be placed upon the ar...

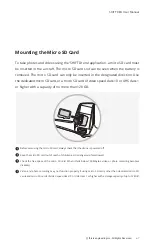
Page 47: ...rd of video speed class 10 or UHS class 1 or higher with a capacity of no more than 128 GB Before removing the micro SD card always check that the drone is powered off Keep the micro SD card out of re...

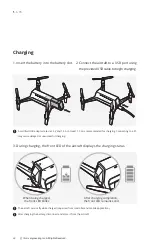
Page 48: ...d USB cable to begin charging A certified USB adapter rated at 5 V and 1 5 A At least 1 5 A is recommended for charging Connecting to a PC may cause delayed or unsuccessful charging The aircraft canno...

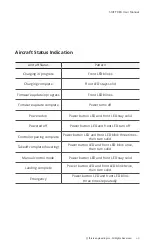
Page 49: ...ered on Power button LED and front LED stay solid Powered off Power button LED and front LED turn off Controller pairing complete Power button LED and front LED blink three times then turn solid Takeo...

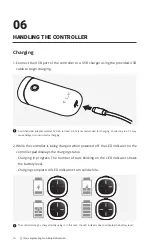
Page 50: ...y level Charging complete All LED indicators turn solid white Charging 1 Connect the USB port of the controller to a USB charger using the provided USB cable to begin charging A certified USB adapter...

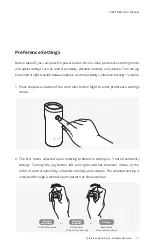
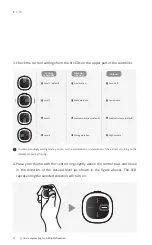
Page 51: ...nsity volume 1 Press the power button of the controller before flight to enter preference settings mode 2 The first menu selected upon entering preference settings is control sensitivity setting Turni...

Page 52: ...turn on 3 Check the current settings from the lit LEDs on the upper pad of the controller Level 1 default Level 2 Level 3 Level 4 No vibration Weak vibration Medium vibration default Strong vibration...

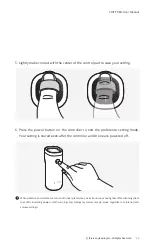
Page 53: ...button on the controller to end the preference setting mode Your setting is stored even after the controller and drone are powered off When vibration and volume are turned off under preferences be ext...

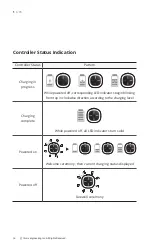
Page 54: ...ging in progress While powered off corresponding LED indicators begin blinking from top in clockwise direction according to the charging level Charging complete While powered off all LED indicators tu...

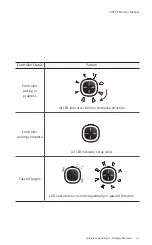
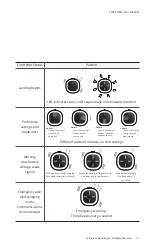
Page 55: ...Rights Reserved Controller Status Pattern Controller pairing in progress All LED indicators blink in clockwise direction Controller pairing complete All LED indicators stay solid Takeoff begins LED in...

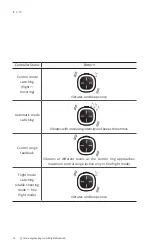
Page 56: ...s and beeps once Automatic mode switching Vibrates with increasing intensity and beeps three times Control range feedback Vibrates at different levels as the control ring approaches maximum control ra...

Page 57: ...cy alert Self stopping mode communications disconnected Emergency warning Three beeps every a second Level 1 Control sensitivity 1 Vibration off Volume off Level 2 Control sensitivity 2 Weak vibration...

Page 58: ...into the micro SD slot 3 When the aircraft is powered on after inserting the battery the firmware update begins automatically and the front LED blinks 4 The firmware update takes approximately two min...

Page 59: ...cable directly to the computer and connect the controller with the Jog button pressed down Refrain from using a USB hub and directly connect the USB cable with the computer 4 The SHIFT Updater will i...

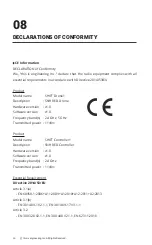
Page 60: ...n Shift RED Drone Hardware version v1 0 Software version v1 0 Frequency band s 2 4 GHz 5 GHz Transmitted power 11 m Product Model name SHIFT Controller1 Description Shift RED Controller Hardware versi...

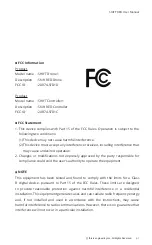
Page 61: ...use undesired operation 2 Changes or modifications not expressly approved by the party responsible for compliance could void the user s authority to operate the equipment NOTE This equipment has been...

Page 62: ...radiation exposure limits set forth for an uncontrolled environment This equipment should be installed and operated with minimum distance 20cm between the radiator and your body RoHS Information RoHS...

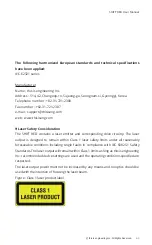
Page 63: ...ration The SHIFT RED contains a laser emitter and corresponding drive circuitry The laser output is designed to remain within Class 1 laser safety limits under all reasonably foreseeable conditions in...

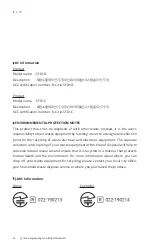
Page 64: ...t by handing it over to a designated collection point for the recycling of waste electrical and electronic equipment The separate collection and recycling of your waste equipment at the time of dispos...

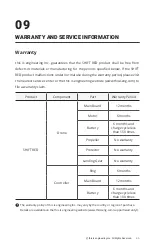
Page 65: ...hisiseng com to file a warranty claim Product Component Part Warranty Period SHIFT RED Drone Main Board 12 months Motor 6 months Battery 6 months and charge cycle less than 150 times Propeller No warr...

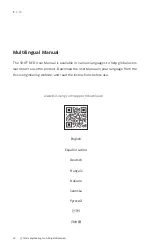
Page 66: ...ious languages to help global users learn how to use the product Download the User Manual in your language from the this is engineering website and read the instructions before use Multilingual Manual...

Page 67: ...67 SHIFT RED User Manual this is engineering Inc All Rights Reserved...

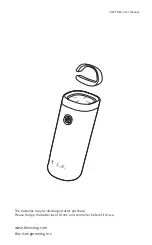
Page 68: ...www thisiseng com this is engineering Inc SHIFT RED User Manual The batteries may be discharged after purchase Please charge the batteries of drone and controller before first use...

Reviews: