background image

1.

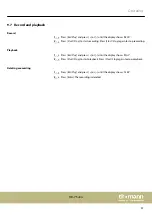
Press 

[Song]

 to call up the song list. The display shows 

‘S001’

.

2.

Press 

[Enter]

 and press 

[ +]

 or 

[–]

 repeatedly until the display shows 

‘DVOL’

.

3.

Press 

[Enter]

 and use 

[ +]

 or 

[–]

 to adapt the drum track volume. Simultaneously

press 

[ +]

 and 

[–]

 to reset the volume of the drum track to factory settings

(value 028). Confirm the selection with 

[Enter]

.

When power is turned off, the drum track volume is automatically reset to factory

setting.

The volume of the accompaniment instruments in the preinstalled songs can be set

separately.
1.

Press 

[Song]

 to call up the song list. The display shows 

‘S001’

.

2.

Press 

[Enter]

 and press 

[ +]

 or 

[–]

 repeatedly until the display shows 

‘ACCV’

.

3.

Press 

[Enter]

 and use 

[ +]

 or 

[–]

 to adapt the volume of the accompaniment

instruments. Simultaneously press 

[ +]

 and 

[–]

 to reset the volume of the

accompaniment instruments to factory settings (value 028). Confirm the selec‐

tion with 

[Enter]

.

When power is turned off, the accompaniment instruments volume is automatically

reset to factory setting.

1.

Press 

[Song]

 to call up the song list. The display shows 

‘S001’

.

2.

Press 

[Enter]

 and press 

[ +]

 or 

[–]

 repeatedly until the display shows 

‘RSET’

.

3.

Press 

[Enter]

.

ð

The display shows 

‘DONE’

. The values for the drum track and the accompa‐

nying instruments are reset to factory settings.

9.5  Metronome

1.

Simultaneously press 

[Tempo/Tap]

 and 

[Click]

 to call up the menu for editing

the metronome.

2.

Press 

[Enter]

 and press 

[ +]

 or 

[–]

 repeatedly until the display shows 

‘LEVL’

.

3.

Press 

[Enter]

 and use 

[ +]

 or 

[–]

 to adapt the volume of the metronome. Simulta‐

neously press 

[ +]

 and 

[–]

 to reset the metronome volume to factory settings

(value 020). Confirm the selection with 

[Enter]

.

Setting the accompaniment instru‐

ments volume

Resetting drum track and accompa‐

nying instruments to factory defaults

Setting the metronome volume

Operating


HD-7 Sonic

27

Summary of Contents for Hitman HD-7 Sonic

Page 1: ...HD 7 Sonic e drum set user manual...

Page 2: ...Musikhaus Thomann Thomann GmbH Hans Thomann Stra e 1 96138 Burgebrach Germany Telephone 49 0 9546 9223 0 E mail info thomann de Internet www thomann de 08 01 2019 ID 429325...

Page 3: ...assembly option 14 7 Installation 15 8 Connections and controls 17 9 Operating 20 9 1 Functions 20 9 2 Drum kits 20 9 3 Setup 24 9 4 Songs 26 9 5 Metronome 27 9 6 Tempo 28 9 7 Record and playback 29...

Page 4: ...ual is also available as PDF file for you to download Keyword search Use the search function in the electronic version to find the topics of interest for you quickly Online guides Our online guides pr...

Page 5: ...is section you will find an overview of the meaning of symbols and signal words that are used in this manual Signal word Meaning DANGER This combination of symbol and signal word indicates an immediat...

Page 6: ...ildren Ensure that plastic bags packaging etc are disposed of properly and are not within reach of babies and young children Choking hazard Ensure that children do not detach any small parts e g knobs...

Page 7: ...oltage rating of the device and that the AC outlet is pro tected by a residual current circuit breaker Failure to do so could result in damage to the device and possibly the user Unplug the external p...

Page 8: ...ts n 30 songs n 4 8 snare and tom pads 3 10 crash ride and hi hat cymbal pads n 2 pedals for bass drum and hi hat n Metronome n Record and playback function n Flexible assignment of pad sounds n Headp...

Page 9: ...lete according to the following list n Frame with 3 stand tube n 3 cymbal holder n 3 tom drum n 3 cymbal ride crash and hi hat n Snare drum n Sound module n Hi hat controller pedal n Bass drum pedal n...

Page 10: ...before sticking the tubes together Mount the var ious elements in the specified sequence as shown in the illustration below 1 Attach the cymbal holders to the frame as shown 2 Attach the cymbal to th...

Page 11: ...of the snare drum pad and the three tom drum pads as shown into the holders on the stand tubes and tighten the wing nuts 4 Attach the pads to the frame on the locations shown in the illustration Assem...

Page 12: ...ler pedal on the left side and the bass drum pedal on the right side 7 Connect the wiring harness to the interface on the rear panel of the sound module Now connect the marked cables to the correspond...

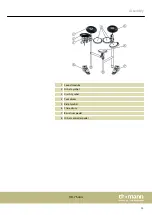
Page 13: ...1 Sound module 2 Hi hat cymbal 3 Crash Cymbal 4 Tom drums 5 Ride Cymbal 6 Snare drum 7 Bass drum pedal 8 Hi hat controller pedal Assembly HD 7 Sonic 13...

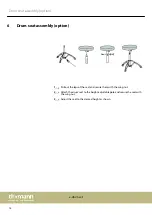
Page 14: ...t the legs of the seat and secure them with the wing nut 2 Attach the drum seat to the height adjustable pole and secure the seat with the wing nut 3 Adjust the seat to the desired height as shown Dru...

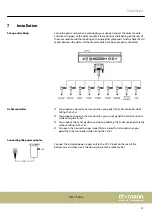
Page 15: ...er while hitting the hi hat n You produce an open hi hat sound when you do not pedal the hi hat controller while hitting the hi hat n You produce the hi hat pedal sound when pedalling the hi hat contr...

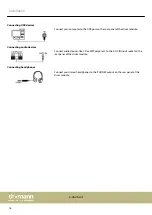
Page 16: ...io devices like CD or MP3 player etc to the AUX IN input socket on the rear panel of the drum module Connect your stereo headphones to the PHONES output on the rear panel of the drum module Connecting...

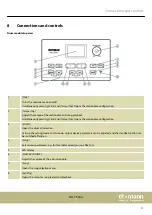
Page 17: ...uration 3 Kit Edit Opens the drum kit selection Calls up the setting mode In this mode various device parameters can be adjusted and the standby function can be switched off and on 4 Setup Sets variou...

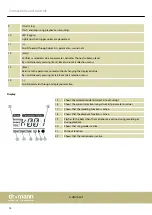
Page 18: ...nging the displayed value By simultaneously pressing Enter Back to kit selection menu 14 Scrolls backwards through a displayed selection 15 Shows the selected mode kit select kit edit setup 16 Shows t...

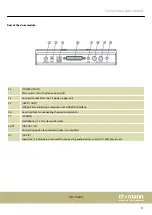
Page 19: ...th USB MIDI interface 26 Serial interface for connecting the pads and cymbals 27 PHONES Headphones 3 5 mm stereo mini jack 28 29 LINE OUT L R Connecting option for powered speakers or amplifiers 30 AU...

Page 20: ...using the main switch POWER ON OFF 2 Simultaneously press and while turning the device back on again using the main switch POWER ON OFF The display shows RSET All parameters of the drum module are res...

Page 21: ...top 5 Press again Enter to save the selection Use Back to return to the previous menu level without saving the settings 6 Simultaneously press and to restore the factory settings 1 Press Kit Edit to c...

Page 22: ...4 Press again Enter to save the selection With Back to return to the previous menu level without saving the settings 1 Press Kit Edit to call up the menu for editing the drum kits The display shows IN...

Page 23: ...h the selected drum kit 5 Press Back to return to the previous menu level without saving the settings You can separately reset the drum kit s instruments and effects to factory settings To reset the i...

Page 24: ...define the type of response There are four velocity curves to choose from EASY Easily play the maximum MIDI Velocity 127 NORL Even transitions with velocity changes DYN High adaptability to loud or qu...

Page 25: ...effects are to be fed in 1 Press Setup to call up the menu for editing the settings The display shows TRIG 2 Press again Setup or repeatedly until the display shows EFCT 3 Press Enter and use or to s...

Page 26: ...e Off Sleep mode is not activated 9 4 Songs 1 Press Song to call up the song list The display shows the number of the last selected song 2 Use or to select the desired song 3 Press Start Stop to start...

Page 27: ...t instruments to factory settings value 028 Confirm the selec tion with Enter When power is turned off the accompaniment instruments volume is automatically reset to factory setting 1 Press Song to ca...

Page 28: ...call up the menu for editing the metronome 2 Press or repeatedly until the display shows RSET 3 Press Enter The display shows DONE The values for the metronome are reset to fac tory settings 9 6 Tempo...

Page 29: ...tart Stop again to stop recording 1 Press Rec Play and press or until the display shows PLAY 2 Press Start Stop to start playback Press Start Stop again to stop playback 1 Press Rec Play and press or...

Page 30: ...4 phone socket 1 combined trigger connection sub D plug in con nector USB port Voices 355 Effects Reverb Chorus Drum kits 24 preset kits 16 user kits Demo and practice songs 30 preprogrammed songs Vo...

Page 31: ...re accumulation of dirt on the device parts n Clean with a soft dry cloth n Stubborn dirt can be removed with a slightly dampened cloth n Use only pH neutral solvent free and non abrasive cleaning age...

Page 32: ...the notes and markings on the packaging This product is subject to the European Waste Electrical and Electronic Equipment Directive WEEE in its currently valid version Do not dispose with your normal...

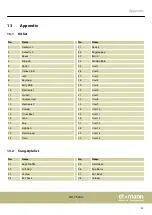
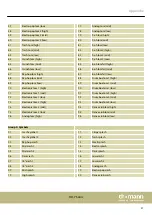
Page 33: ...B 29 User 5 10 Electronic 1 30 User 6 11 Crunch 31 User 7 12 Compressed 32 User 8 13 Electronic 2 33 User 9 14 Analog 34 User 10 15 Drum Box 1 35 User 11 16 Latin 36 User 12 17 Pop 37 User 13 18 Eight...

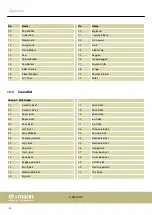
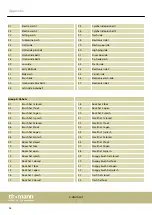
Page 34: ...1 Kick Drums 01 Acoustic kick 1 17 Rock kick 3 02 Acoustic kick_2 18 Rock kick 4 03 Room kick 1 19 Rock kick 5 04 Room kick 2 20 8 oh kick 05 Rock kick 1 21 9 oh kick 06 Jazz kick 1 22 Dance club kick...

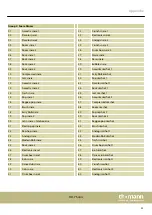
Page 35: ...snare 45 Jazz rimshot 1 15 Pop snare 1 46 Acoustic rimshot 2 16 Reggae pop snare 47 Compressed rimshot 17 Brush snare 48 Room rimshot 18 Early R B snare 49 Pop rimshot 2 19 Pop snare 2 50 Rock rimsho...

Page 36: ...gh 11 Compressed tom mid 39 Modern R B tom mid 12 Compressed tom low 40 Modern R B tom low 13 Rock tom 1 high 41 Jazz tom high 14 Rock tom 1 mid 42 Jazz tom mid 15 Rock tom 1 low 43 Jazz tom low 16 Ro...

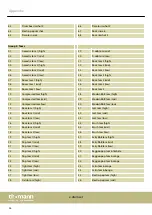
Page 37: ...box tom 1 mid 70 Electronic tom 1 high 90 Drum box tom 1 low 71 Electronic tom 1 mid 91 Drum box tom 2 high 72 Electronic tom 1 low 92 Drum box tom 2 mid 73 Electronic tom 2 high 93 Drum box tom 2 lo...

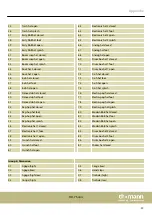
Page 38: ...hats 01 Brush hat 1 closed 18 Rock hat 2 foot 02 Brush hat 1 foot 19 Rock hat 2 open 03 Brush hat 1 open 20 Rock hat 2 splash 04 Brush hat 1 splash 21 Small hat 1 closed 05 Brush hat 2 closed 22 Small...

Page 39: ...oh hat open 75 9 oh hat splash 49 Dance club hat closed 76 Electro pop hat closed 50 Dance club hat foot 77 Electro pop hat foot 51 Dance club hat open 78 Electro pop hat open 52 Rap hop hat closed 79...

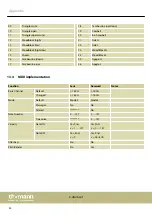
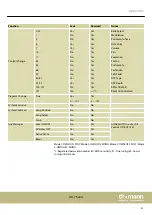
Page 40: ...k L 16 Tambourine down 25 Agogo H 17 Tambourine up 26 Agogo L 13 4 MIDI implementation Function Sent Received Notes Basic Channel Default 1 16 CH 1 16 CH Changed 1 16 CH 1 16 CH Mode Default Mode 3 Mo...

Page 41: ...al DSP Type DSP Depth RPN LSB MSB Reset All Controllers Program Change True Yes 0 127 Yes 0 127 System Exclusive No No System Common Song Position No No Song Select No No Tune No No Aux Messages Local...

Page 42: ...Notes e drum set 42...

Page 43: ......

Page 44: ...Musikhaus Thomann Hans Thomann Stra e 1 96138 Burgebrach Germany www thomann de...

Reviews: