background image

Form 405, Page 8

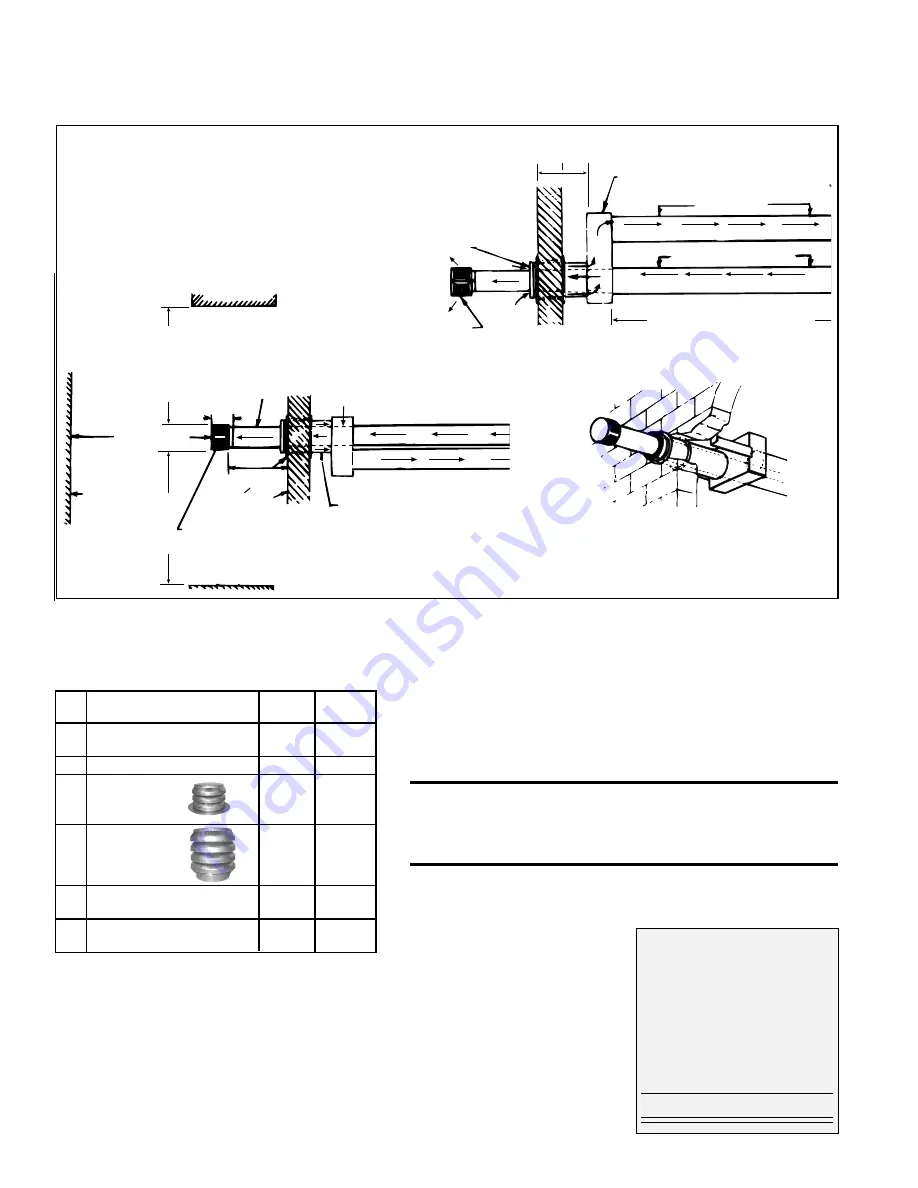
Figure 5D - Installation of a Typical Separated-
Combustion Unit with Horizontal Vent and Combustion
Air Pipes (Option CC6)

Building Overhang

3 ft (914mm)

minimum

6-15/16” (176mm)

Vent Pipe

 - PITCH

TO

DRAIN

Adjoining

Building

3 ft (914mm)

minimum

Thimble

Wall

16”(406mm)

minimum

24”(610mm)

minimum

IMPORTANT NOTE: Exhaust cap must be installed so the baffles

are positioned on horizontal and vertical centerlines.

Building Projection

6ft (1829mm)

minimum

Concentric Adapter Box

Combustion Air Pipe

(PITCH TO DRAIN)

"Through-the-Wall" View of a typical

installation of a horizontal vent/inlet air

terminal and concentric adapter

(Option CC6)

7. Venting and Combustion Air (cont'd)

7A. Venting and Combustion Air Requirements for Separated-Combustion

Installation (must use either Option CC2 or CC6) (cont'd)

Instructions and Requirements for Installing a 

Vertical Vent Terminal/Combustion Air Inlet

(Requires Concentric Adapter Kit, Option CC2)

Vertical Vent Terminal/Combustion Air Package
(Option CC2) includes:

Field-supplied installation requirements:

Thimble (a thimble is not required if wall is of non-
combustible construction)

Flashing

Vent pipes (see requirements on pages 4 and 6)

Combustion air pipes (see requirements, pages 4 and 6)

Mounting brackets for concentric adapter box (or box
may be mounted flush, depending on building construc-
tion)

Taper-type reducers as required (see requirements on
page 6)

Qty Description

150,

250,300,

200

350,400

1

Complete Vertical Vent Kit

157156

54444

(Same as Option CC2)

1

Concentric Box Assembly

155392

68404

1

Exhaust

155631

53326

Terminal

1

Combustion

155635

53330

Air Inlet

1

Rubber seal for vent pipe

164492

164493

opening in concentric adapter

1

Tube of High Temperature

53335

53335

(450°F) Silicone Sealant

Side View

Screened

Exhaust

Cap

Inlet Air

Guard

Wall

Vent (Flue Exhaust) Pipe

Seal joints; see Require-

ment No. 5 on page 6.

Combustion Air Pipe

Seal Joints

Concentric Adapter

Maximum Length (See Requirement

No. 4 on page 6.)

Minimum length is 5 ft (1.5M)

60” (1524mm) maximum

12” (305mm) minimum

Top
View

Worksheet - Determine Length of
Vent Pipe through the Box

inches m m

Heater Side (max if +

6

152

diameter changes)
Width of Box

+

6

152

Bracket Length

+

__

___

Width of Roof

+

__

___

Inlet Pipe Height

+

__

___

Terminal Side (min) +

22

559

Length of Pipe

=

2. Prepare the concentric adapter box.
2a) Determine whether field-supplied brackets are required. 
If used, attach

brackets securely; do not leave any unsealed holes in the adapter box.
If brackets are not used, when in-
stalled, the box should be tight against
the roof.

2b) Install the rubber seal    and the

vent pipe. Locate the vent pipe open-
ing and place the rubber seal around
and over the edge of the metal.
Determine the length of the section of
vent pipe by adding the requirements.
On the heater side of all Sizes except
CAUA 250, the vent pipe must ex-
tend no more than 6" (152mm) (length
limit does not apply to Size 250 be-

Installation Instructions for Option CC2

1. Determine the location for the vent terminal on the roof, allowing room for the
concentric adapter box inside. A thimble may or may not be required depending
on building construction and/or local codes. Prepare a hole through the roof for
the combustion air pipe (Sizes 150 and 200, pipe is 6"; Sizes 250-400, pipe is 8").
The air inlet pipe must be flashed or sealed to the roof. Flashing is to be supplied
by the installer as required by roof construction and/or codes.

WARNING: All vent terminals must be positioned or
located away from fresh air intakes, doors and windows to
preclude combustion products from entering occupied
space. See Hazard Levels, Page 2.

Summary of Contents for CAUA 150

Page 1: ...rtment WARNING Improper installation adjustment alteration service or maintenance can cause property damage injury or death Refer to this manual For assistance or additional information consult a qualified installer service agency or the gas supplier WARNING Gas fired appliances are not designed for use in hazardous atmospheres containingflammablevaporsorcombustibledust See Hazard Levels page 2 GE...

Page 2: ...eNetWeight lbs Size 150 200 250 300 350 400 Weight lbs 288 300 380 394 445 460 WARNING Unit must be level for proper operation Do not place or add additional weight to the heater See Hazard Levels page 2 Determine the position of the heater with regard to venting combus tion air gas supply connection electrical supply connection and inlet air opening Either cut out the inlet air opening requires t...

Page 3: ... P 150 965 883 914 533 184 95 318 610 838 787 483 864 117 200 965 883 914 533 184 95 318 610 838 787 483 864 117 250 1270 883 1219 533 184 111 324 692 1143 787 406 1168 121 300 1270 883 1219 533 184 111 324 692 1143 787 406 1168 121 350 1270 1238 1219 864 178 111 359 679 1143 1118 813 1168 124 400 1270 1238 1219 864 178 111 359 679 1143 1118 813 1168 124 Air Opening Dimensions Supply Air Discharge...

Page 4: ... all metals including 300 grade stainless steel Care should be taken to separate these vapors from the combustion process This may be done by installing a separated combustion sys tem and or wise location of the furnace with regard to exhausters or prevailing wind direction Chlorine is heavier than air This fact should be kept in mind when determining installation locations of heating equip ment a...

Page 5: ... the specific requirements and instructions in the following paragraphs and illustrations 1 Combustion Air Inlet Diameter is 5 for Sizes 150 and 200 and 6 for Sizes 250 300 350 and 400 Use tin snips or aviation shears to cut out the hole in the top of the heater See Figure 2 Insert the pipe through the hole and attach it to the collar inside the heater Seal the joint Larger size heaters have oval ...

Page 6: ...lation Instructions for Option CC6 1 Determine the location on the outside wall for the vent terminal Applies to all horizontal vent kits In most applications the terminal would be on a level with the heater mounting height Allow 1 4 per foot downward pitch toward the terminal for draining of condensation The distance of the termination of the horizontal vent from adjacent public walkways adjacent...

Page 7: ...ght to the entire circumference of the pipe 3c Attach the outside portion of the combustion air pipe to the box Determine the length by measuring the bracket length if brackets are used plus the wall thickness plus 2 51 mm The inlet pipe should extend beyond the outside wall approximately 2 51mm Attach the inlet air pipe to the collar of the concentric adapter with sheetmetal screws being careful ...

Page 8: ...ature 53335 53335 450 F Silicone Sealant Side View Screened Exhaust Cap Inlet Air Guard Wall Vent Flue Exhaust Pipe Seal joints see Require ment No 5 on page 6 Combustion Air Pipe Seal Joints Concentric Adapter Maximum Length See Requirement No 4 on page 6 Minimum length is 5 ft 1 5M 60 1524mm maximum 12 305mm minimum Top View Worksheet Determine Length of Vent Pipe through the Box inches mm Heate...

Page 9: ...imum 11 279mm 18 457mm minimum Wall or Adjoining Building Flashing field supplied Roof Concentric Adapter Thimble 5 ft 1524mm maximum Size according to anticipated snow depth Side View X is the length of combustion air pipe required through and above the roof X must equal roof thickness plus clearance required for anticipated snow plus ridge and or parapet clearance X must not exceed 60 1524mm 6A ...

Page 10: ...Air from outside through duct openings 1 square inch free area per 2000 BTUH See 2 in Figure 7 3 Air direct from outside openings 1 square inch free area per 4000 BTUH See 3 in Figure 7 NOTE For further details on supplying combustion air to a confined space see the National Fuel Gas Code ANSI Z223 1a latest edition Aspacewhose volume is less than 50 cubic feet per 1000 BTUH of the installed appli...

Page 11: ...tor Adjoining building or parapet 6 ft 1 8m Adjacent public walkways 7 ft 2 1m above Grade ground level 7 ft 2 1m above heater manufacturer Option CC1 or a field supplied cap If the vent cap is field supplied use a Type L Breidert Air x hauster or equivalent vent cap Type L Air x hauster is a trademark of The G C Breidert Company Use of a vent cap supplied by the pipe manufacturer is not permitted...

Page 12: ...inet 45 1 8 1146mm 16 406mm Inlet Opening Requirements and Suggestions for Connecting and Installing Ducts Type of Ductwork The type of duct installation to be used de pends in part on the type of construction of the building Ductwork Material Rectangular duct should be constructed of not lighter than No 26 U S gauge galvanized iron or No 24 B S gaugealuminum Ductwork Structure All duct sections 2...

Page 13: ...y property damage or death Manifold or Orifice Pressure Settings Measuring manifold gas pressure cannot be done until the heater is in operation It is included in the steps of the Check Test Start proce dure in Paragraph 22 The following warnings and instructions apply WARNING Manifold gas pressure must never exceed 3 5 w c for natural gas or 10 w c for propane gas For Natural Gas Manifold gas pre...

Page 14: ...ili cone tubing from the static tap Remove the left section of the burner box cover 3 Determine which side of the cabinet will be most conve nient for the drain line Remove the hole plug on that side and insert the snap bushing from the package 4 Locate the hole in the bottom center of the burner pan and remove the plug Follow the instructions in Figure 14 to install the drain Complete all steps a...

Page 15: ...ld the sensing pressure is at the most negative level and as the heater and flue system warm up the sensing pressure becomes less negative After the system has reached equilibrium about 20 minutes the sensing pressure levels off If a restriction or excessive flue length or turns cause the sensing pressure to be outside the switch setpoint the pressure switch will function to shut off the main burn...

Page 16: ...ucing blower RPM or increasing duct system static pressure The chart below can be used for sizing line wiring but should not be interpreted as the exact motor amps See the motor rating plate for exact Full Load Amps Blower Motors Open HP 1 4 1 3 1 2 3 4 1 1 1 2 2 3 5 Direct Drive Motors 230V 1PH 6 3 208V 1 PH 2 1 3 2 5 1 6 3 7 5 8 3 10 0 230V 1PH 2 3 2 8 4 4 5 5 6 5 7 5 10 2 208V 3 PH 1 1 1 4 3 0 ...

Page 17: ...G PILOT OUTLET P MAIN BL PILOT M BR C OR PV TH TR TH OR BK BY PASS GAS VALVE HONEYWELL PILOT MV PLUG PILOT OUTLET MAIN TR OR PV MV AG1 AK2 OR AK3 CL10 DIRECT DRIVE BABS CAUA SERIES 150 400 DWG B 164607 REV 1 OPERATING SEQUENCE 1 SET THERMOSTAT SYSTEM SWITCH AT OFF POSITION FAN SWITCH AT AUTO POSITION 2 TURN ON MANUAL GAS VALVE 3 TURN ON POWER TO UNIT 5 THERMOSTAT CALLS FOR HEAT ENERGIZING THE VENT...

Page 18: ...UCTIONS NOTES 1 THE FOLLOWING CONTROLS ARE FIELD INSTALLED OPTIONS THERMOSTAT 2 DOTTED WIRING AND COOL RELAY COIL INSTALLED BY OTHERS 3 CAUTION IF ANY OF THE ORIGINAL WIRING AS SUPPLIED WITH THE APPLIANCE MUST BE REPLACED IT MUST BE REPLACED WITH WIRING MATERIAL HAVING A TEMPERATURE RATING OF AT LEAST 105 C EXCEPT FOR SENSOR LEAD WIRE WHICH MUST BE 150 C 4 USE 18 GA WIRE FOR CONTROL WIRING ON THE ...

Page 19: ...120 072 120 150 090 150 180 Burner Condensate Drain When a system includes a cooling coil a burner condensate drain must be installed The parts required for the drain are shipped with the heater Instructions for installing the drain are in Paragraph 10 page 14 Electrical Connections Model Size Connections ACUA 060 072 1 7 8 Suction Line 060 1 3 8 Liquid Line 072 1 1 2 Liquid Line 090 2 7 8 Suction...

Page 20: ... 16 6000 625 6 16 x 16 400 4300 448 6 16 x 16 5000 521 6 16 x 16 6000 625 6 16 x 16 Option CW4 with 2 Pleated Filters Option CW5 with 2 Permanent Filters Option CW6 for Field Supplied Filters Attaches on Either Side of the Heater Vertical Top or Horizontal Inlet Opening V Filter Rack Arrangement Filters for Options CW8 CW9 CW10 SizeCFM FPM 2 Filters Pleated Permanent 150 1800 375 2 12 x 32 4 12 x ...

Page 21: ... the potentiometer is to be field installed it is shipped in a separate carton Option Configuration GA1 Top Outside Air Opening with Dampers Rear or Bottom Return Air Opening without Dampers GA2 Rear Outside Air Opening with Dampers Top or Bottom Return Air Opening without Dampers GA3 Bottom Outside Air Opening with Dampers Top or Rear Return Air Opening without Dampers GA4 Bottom Outside Air Open...

Page 22: ...r may re sult in a fire or explosion Do not use this appliance if any part has been under water Immediately call a qualified ser vice technician to inspect the appliance and to replace any part of the control system and any gas control which has been under water Operating Instructions and Operating Sequence 1 Set thermostat at lowest setting 2 Turn off all electric power to the appliance 3 This ap...

Page 23: ... after start up Vent System Testing Procedure Power Vent Units does not apply to separated combustion installation 1 Seal any unused openings in the venting system 2 Inspect the venting system for proper size and horizontal pitch as required in the National Fuel Gas Code ANSI Z223 1orCAN CGAB149 1andB149 2 InstallationCode for Gas Burning Appliances and Equipment and this manual Determine that the...

Page 24: ...ation All rights reserved Printed in the U S A MANUFACTURER OF HEATING COOLING AND VENTILATING SYSTEMS Trademark Note Reznor is registered in the United States and other countries 800 695 1901 www ReznorOnLine com 2 01 YL Form RZ 405 Version B ...

Reviews: