background image

8

Transporting

The Swifty can be folded for transport in the luggage area of a vehicle.

The  Swifty  has  been  successfully  impact  tested  against  international  standard 
ISO 7176/19 and ANSI/RESNA WC/Vol.1 – Section 19 6/22/99 Draft and may be used 
as a vehicle seat.

IMPORTANT:  When used as a vehicle seat the following instructions 
 

must be followed.

Preparing the Swifty for transport:

1. Remove the following (if fitted); pommel, play tray, rain hood, sun canopy, grip rail, 

accessory bag and shopping basket contents.

2. Position the pushchair correctly in the vehicle over the floor track with the front of 

the pushchair facing towards the front of the vehicle (in the direction of travel). Put 
the brakes on.

3. Always  ensure  that  the  seat  of  the  pushchair  is  in  the  most  upright  position  (not 

reclined).

Securing the Swifty in a Vehicle:

1.  The  pushchair 

must

  be  secured  in  a 

vehicle using a 4-point tie down system that 
complies with either ISO 10542 Part 2, SAE 
2249  or  DIN  75078/2.  (Such  restraints  are 
manufactured by Unwin Safety Systems and 
Q’Straint)

2.  Vehicle  operators  and/or  assistants  should 

be  fully  trained  in  the  use  of  wheelchair 
tiedown and occupant restraint systems.

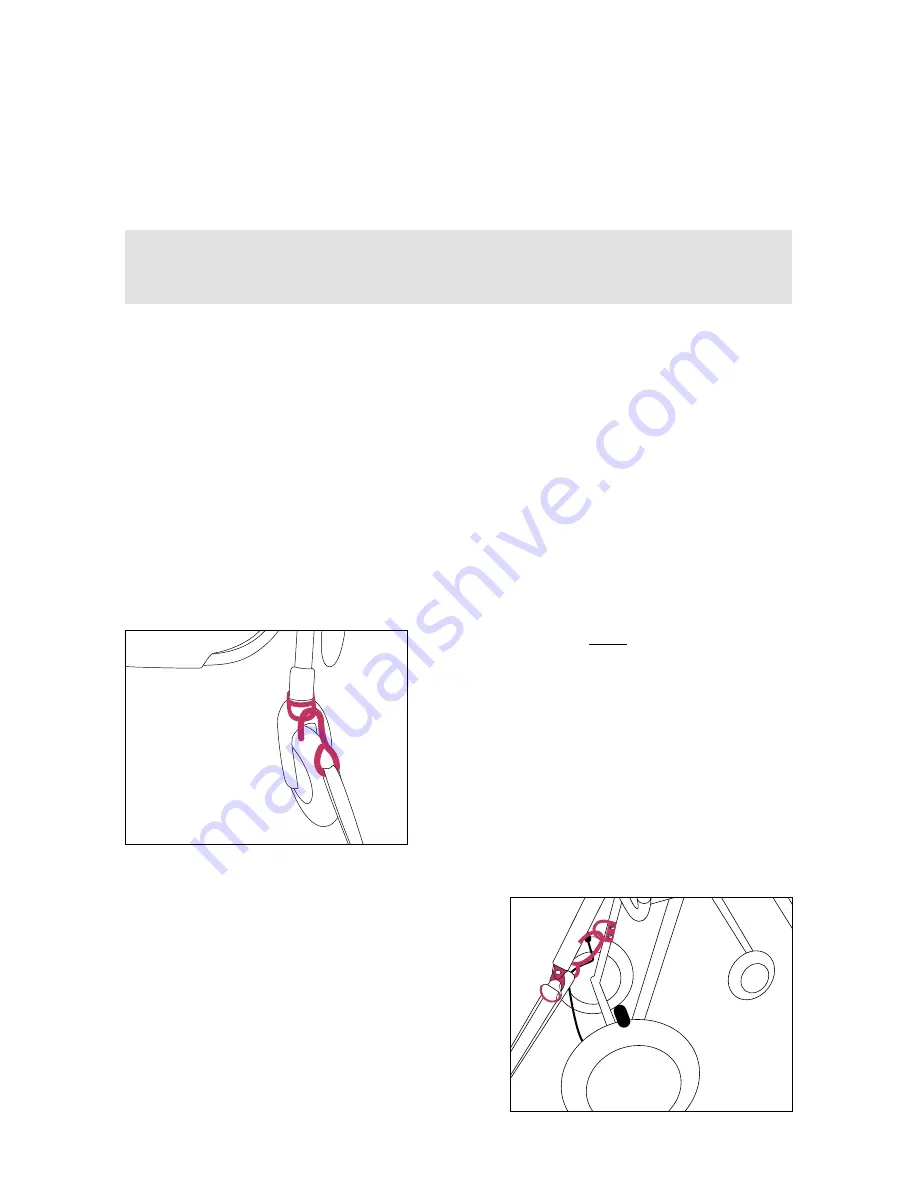
3. The two front tie-downs must be attached left 

and  right  side  to  the  steel  ring  located  on 
each front castor mounting boss as shown 
in fig. 2.

4. The two rear tie-downs must be attached to 

the two securement points located on each 
side  of  the  pushchair  frame  as  shown  in 
fig. 3.

Fig. 2

Fig. 3

Summary of Contents for EASyS Swifty

Page 1: ...Thomashilfen Kinder Reha User Manual Swifty Rehabilitation Buggy ...

Page 2: ...a good rehabilitation buggy Seat depth and lower leg length are continuously adjustable while the high quality materials and solidly built seat ensure comfort and safe handling The buggy is highly manoeuvrable thanks to its lightweight construction and front swivel wheels It can be quickly and easily folded up and packed into the boot of any car Should you have any questions or encounter any probl...

Page 3: ...ckrest 6 Adjustment options lower leg length 6 Adjustment options footrest 6 Parking brake function 6 H belt 7 Upholstery 7 Transporting Preparing 8 Transporting Securing 8 Transporting Fitting the occupant restraint system 9 Cleaning and care instructions 10 Technical specifications 10 Guarantee conditions CE mark 11 3 ...

Page 4: ...ng away è Please do not overload the Swifty rehabilitation buggy refer to the specified maximum carrying capacity see technical specifications page 7 è Take advantage of reflective clothing to make you and your child visible to other road users particularly in the dark è Attaching shopping bags or other heavy items to the buggy increases the danger of it tipping over Use the basket available as an...

Page 5: ... desired position using the buttons on the sides Folding up minimum size Release the two side plates by pulling out the locking pins to be found between the side plates and the frame see fig 1 and fold them down towards the middle of the seat Release the quick release mechanism on the back of the buggy Pull up the sliders on the left and right bars and hold onto the safety bar mounted on the right...

Page 6: ...lease the quick release mechanism on the back of the buggy using the lever set the desired hip angle using the lever on the back bar then retighten the lever Lower leg length Use the supplied Allen key 3 mm to unscrew the Allen screws on the back of the left and right footrest sliders slide the footrest along the bar to the desired position and then re tighten the Allen screws Footrest The footres...

Page 7: ...e the belts Undo the stitching on the seam of the desired height on the back upholstery Pass the belts through the slit created and screw them tight to the back plate then re attach the seat and back upholstery Removing the H belt Open the belt fasteners completely detach and fold up the seat and back upholstery Unscrew the screw fittings on the back plate and the back of the seat area using the A...

Page 8: ...he front of the vehicle in the direction of travel Put the brakes on 3 Always ensure that the seat of the pushchair is in the most upright position not reclined Securing the Swifty in a Vehicle 1 The pushchair must be secured in a vehicle using a 4 point tie down system that complies with either ISO 10542 Part 2 SAE 2249 or DIN 75078 2 Such restraints are manufactured by Unwin Safety Systems and Q...

Page 9: ...ct with the abdomen of the passenger Lap belt routing should be inside of the occupant side pad on both left and right sides of the pushchair as shown in fig 4 4 The occupant lap belt should be tightened to make a snug fit without causing discomfort to the passenger 5 If the pushchair is fitted with a harness this should only be fastened after the occupant restraint system 6 The shoulder belt of t...

Page 10: ... Push bar height 97 cm 38 2 Wheel size swivel wheels front 7 5 Wheel size rear 10 Carrying capacity 35 kg 77 2 lb Weight 12 4 kg 27 3 lb Cleaning and care instructions Hook and loop fasteners To ensure that the hook and loop fasteners continue to function efficiently clean them occasionally using a brush Always try to keep the fasteners closed during washing Chassis The powder coated aluminium fra...

Page 11: ...tandards All parts are subjected to a final inspection Thomashilfen offers you a guarantee of 3 years from the date of purchase for all chassis parts This guarantee covers all claims affecting the functionality of the product Damage due to improper use e g overloading and natural wear and tear are excluded Swifty meets the requirements of the European EN 1888 standard and carries the CE mark Enjoy...

Page 12: ...bject to technical alterations Walkmühlenstraße 1 D 27432 Bremervörde phone 49 0 4761 886 68 or 63 www thomashilfen com info thomashilfen de Member of the International Support Association for the Rehabilitation of Children and Youths e V ...

Reviews: