14
3660181C
Activating Services
Step 6: Activate the Advanced Cable Gateway
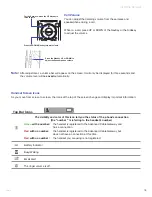
Wi-Fi Light Indicators on the Front Side of the Card
After the WiFi card is inserted and the Advanced Cable Gateway is plugged back into the power outlet, you will know
that the connection is successful when the
PWR
LED on the front of the Wi-Fi Card shows a green light.
Also
, when you first turn the Gateway back on, the
Link
LED will blink a green light -
fast
;
when the card connects to the network sucessfully, it will blink -
slowly
.
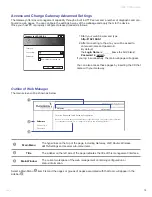
LED Label
Steady State Operation
ON
OFF
FLASH (Blinking)
Power
AC Power Good with
Good / Low / Bad Battery
AC Power Failure with
Bad Battery
AC Power Failure with
Good Battery / Low Battery
Battery
AC Power Good /
Good Battery
AC Power Good/
Bad Battery
AC Power Failure /
Good Battery/Bad Battery
AC Power Good /
Low Battery
AC Power Failure /
Low Battery
DS/US
Normal
AC Power Failure
Initialization
OR
Error (
if Blinking persists
)
Online
Normal
AC Power Failure
Initialization
OR
Error (
if Blinking persists
)
LINK
Ethernet / Wi-Fi Link
No Ethernet / Wi-Fi Link
Ethernet / Wi-Fi Traffic
Tel
All Lines Good
Telephone line(s)
not available
One or More Telephones
in use
WiFi Card LEDs
Light Indicators on the Gateway
After installation of the Gateway, each time you turn it on (
each time the modem is reconnected to the power
), it goes
through several steps before it can be used.
Each of these steps is represented by a different pattern of
flashing lights
on the front of the modem.
If DS/US, ONLINE, and LINK leds flash simultaneously it means the Gateway is automatically updating its system
software.
Please wait for the lights to stop flashing
. You cannot use your modem during this time. Do not remove
the power supply or reset the Gateway during this process.
Note
:
To activate your Gateway, please consult the activation instruction provided by your service provider.


