background image

4

操作說明

注意:裝配或拆卸部件前,請先拔掉充電器插頭

充電

將充電器的插口插入充電孔

(

1)

,再把充電器插入電源中(圖

2

),指

示燈為紅色閃爍,表示正在充電;充電

3

小時之後,指示燈變藍色,說明電

充滿了。機器可以進入工作。

當機器正常工作時,指示燈顯示藍

;當指示燈由恆亮變為閃爍,說明

色恆亮

電量過低,機器即將停止工作。當機器停止運行時,需要進行充電。

1

2

折疊手柄(圖

3

):

放下手柄:按住手柄彎折按鈕

10

,將手柄彎折放下。

3

安裝地刷(圖

4

):

將機器主體對應著地刷的轉接頭進行插入,直到按鈕發出

的聲音,地

刷固定完成

4

以下是附件用途的建議

:

各類地板

,

包括地板,地毯和瓷磚。

2

10

Summary of Contents for TM-SAV31D

Page 1: ...Model TM SAV31D Read this booklet thoroughly before using and save it for future reference 使用說明書 Instruction manual 直立手持兩用無線吸塵器 Vertical Hand Held Cordless Vacuum Cleaner 804 ...

Page 2: ...目錄 重要安全事項 1 瞭解你的吸塵器 2 預防措施 3 操作說明 4 使用說明 5 產品規格 7 故障排除 7 ...

Page 3: ...身體部位遠吸塵口和活動的部件 9 請勿吸任何正在燃燒或者可燃液體 如汽油 火柴 或在它們可能存在的地方 使用 10 請勿吸任何正在燃燒或者冒煙的物體 如香煙 火柴或熱灰燼 11 沒有塵杯或者過濾器時 請勿使用機器 12 請嚴格按照本說明書使用 請使用原裝的配件 13 手部濕潤時 請勿接觸充電器插頭和機器 14 請將吸塵器存放在乾燥的地方 15 保持您的工作區域是明亮的 16 本機器只在乾的表面上使用 不要將吸塵器在濕潤的地方使用 17 電壓的使用不當可能會導致電池的損壞 或者對用戶的傷害 正確的電壓等 級已經標出 請在正確的電壓下進行充電 18 本產品是被雙重絕緣保護 只使用相同的替換零件 參見雙層絕緣設備的維 修 19 請不要用吸塵器吸水泥 石膏粉 牆粉等等顆粒 或玩具紙團等較大物體 或玻璃渣 針等尖銳物 否則會引起吸塵堵塞 馬達燒壞等故障 20 當電源線或電池損壞時 必須到指定的維修點...

Page 4: ...如搬運跌落或外力損傷或電 壓異常 F 遇人力不可抗拒之天然災害等造成之故障 23 請留意插座是否老化鬆動 並確認電路回路耐電流數是否可承擔本商品消耗 所需電流數 僅供家庭使用 請保存好說明書 警告 為了減少移動部件的傷害 使用前請勿通電 為了減少觸電的風險 清潔或使用前請勿通電 為了減少觸電的風險 請不要在室外或潮濕的地方使用 瞭解你的吸塵器 6 地刷鎖扣按鈕 2 充電孔 1 手柄 8 開關按鈕 7 手持式 5 電動地刷 4 塵杯 3 機體 9 手持鎖扣按鈕 10 手柄彎折按鈕 1 8 10 9 8 7 6 2 3 4 5 ...

Page 5: ...如果塵杯或者地刷被堵塞 關掉吸塵器 清除阻塞物質後再次啟動裝置 注意 1 使用吸塵器時 請不要靠近加熱電器 散熱器或者煙頭 2 將充電器插頭插入牆上的插座前 確保你的手都是乾的 並將充電器插牢 3 在你開始吸塵前 確保清除大的或者尖的物體 以防損壞塵杯及濾網 4 當從牆上拔掉充電器插頭時 拉住插頭而不是拉電源線 5 請勿吸任何正在燃燒或冒煙的物體 如香煙 火柴或熱灰燼 6 沒有塵杯時請不要使用 11 滾刷蓋板 12 滾刷蓋板鎖扣 13 滾刷 在插座上 11 12 13 15 14 ...

Page 6: ...插入電源中 圖 2 指 示燈為紅色閃爍 表示正在充電 充電 3小時之後 指示燈變藍色 說明電 充滿了 機器可以進入工作 當機器正常工作時 指示燈顯示藍 當指示燈由恆亮變為閃爍 說明 色恆亮 電量過低 機器即將停止工作 當機器停止運行時 需要進行充電 圖 1 圖 2 折疊手柄 圖 3 放下手柄 按住手柄彎折按鈕 10 將手柄彎折放下 圖 3 安裝地刷 圖 4 將機器主體對應著地刷的轉接頭進行插入 直到按鈕發出 哢 的聲音 地 刷固定完成 圖 4 以下是附件用途的建議 各類地板 包括地板 地毯和瓷磚 2 10 ...

Page 7: ...示 必須保持手持式的出風口敞開 並保持沒有障礙物 否則 電機過熱 可 能會損壞 電源開關 開關按鈕 8 圖 5 按下開關按鈕 8 機器工作 LED 燈常亮藍色 再按一次 機器停止工作 圖 5 推 的用法 將手柄打開 安裝地刷 然後可以正常使用 地刷工作指示燈顯示藍色 圖 6 圖 6 手持的用法 按下機體的手持鎖扣按鈕 9 取下手持式 然後可以正常使用手持式 建議 使用手持時 可以使用小附件 圖 7 圖 7 桿 8 9 ...

Page 8: ...主體分離 然後取出塵杯 圖 8 圖 8 圖 9 2 取出過濾器 圖 9 清空塵杯裏的垃圾 1 過濾器用冷水洗淨後 風乾 24 小時 然後裝入塵杯 滾刷清理 為了使吸塵能力達到最佳 滾刷需要定時清理 1 旋開地刷蓋板鎖扣 12 打開滾刷蓋板 11 取出滾刷 13 圖 10 2 用刷子輕刷滾刷上的毛條來清理滾刷 圖 10 請注意 過濾器是可洗的 每三個月可更換一次 以確保機器的最佳性能 重要事項 在塵杯裝進機器之前 請確保過濾器必須是乾的 取下塵杯 按下塵杯鎖扣 塵 杯 過 濾 器 式 塵杯 11 13 12 ...

Page 9: ...能的解決方案 吸塵器不工作 電池電量過低 機器進行充電 吸塵器吸力減弱 1 塵杯垃圾已滿 2 過濾器需要清洗或更 換 3 電池電量不足 1 清理塵杯 2 取下除塵杯過濾器檢 查並清空風道上的灰塵 清洗或更換過濾器 3 機器進行充電 漏灰 1 塵杯垃圾已滿 2 過濾器沒有安裝正確 3 過濾器損壞 1 清理塵杯 2 閱讀過濾器安裝說明 重新進行安裝 3 更換新的過濾器 電池 變壓器輸入功率 鋰電池容量 1 110V 240V AC 50 60Hz 0 3A 變壓器輸出功率 1 8V 800mA 4 8V 2200mAh 總額定消耗電功率 75W 可使用時間 約20分鐘 集塵容量 0 5L 充電時間 3 小時 ...

Page 10: ...Contents 1 Important Safety Instructions 1 2 Getting To Know Your Vacuum 5 3 Precautionary Measures 6 4 Operation Instructions 7 5 Operation Instructions 9 6 Trouble shooting 12 ...

Page 11: ... liquids 3 Never yank the cord to disconnect it from the outlet instead grasp the plug and pull to disconnect 4 Do not allow the cord to touch any hot surfaces 5 Do not operate or place or the appliance over the cord 6 Do not operate the appliance with a damaged cord or plug or when the appliance or any other part of the appliance has been dropped or damaged To avoid the risk of electric shock do ...

Page 12: ... is burning or smoking such as cigarettes matches or hot ashes 11 Use extra care when doing cleaning on stairs 12 Do not use the vacuum without the dust cup filter in place 13 This appliance is intended only for household use Follow all user instructions in this manual 14 Do not leave the vacuum plugged in when un attended Unplug the electrical cord when not in use and before servicing 15 Do not a...

Page 13: ...ug grasp the plug not the cord 20 Do not handle the plug or vacuum with wet hand s or operate it without shoe s 21 Do not put any object into any opening Do not use the appliance with any opening blocked Keep it free of dust lint hair and anything else that may reduce air flow 22 Store your appliance indoors in a cool dry area 23 Keep your work area well lit 24 Do not immerse the vacuum into water...

Page 14: ...ion Use only identical replacement parts See instructions for Servicing of Double Insulated Appliances For Household Use Only SAVE THESE INSTRUCTIONS WARNING To reduce the risk of injury from moving parts Unplug before servicing To reduce the risk of injury of electric shock Unplug before cleaning or servicing To reduce the risk of electric shock Do not use it outdoors or on wet surfaces ...

Page 15: ...KNOW YOUR VACUUM Note Illustrations may differ from actual product 9 Power switch 4 Floor brush locker 5 Brush 7 Dust cup 8 Body 1 Handle 6 Revolving shaft for floor brush 2 Handle folding button 3 Supporting plate ...

Page 16: ... again 1 Do not operate the vacuum cleaner too close to heaters radiators or cigarette butts 2 Before inserting the power plug into the wall outlet make sure that your hands are dry 3 Before you start vacuuming make sure to remove large or sharp objects that might damage the dust cup filter 4 When pulling out the power plug from the wall outlet pull the plug not the power cord ...

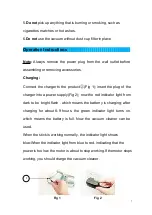
Page 17: ...plug of the charger into a power supply Fig 2 now the red indicator light from dark to be bright flash which means the batterry is charging after charging for about 8 9 hours the green indicator light turns on which means the battery is full Now the vacuum cleaner can be used When the stick is working normally the indicator light shows blue When the indicator light from blue to red indicating that...

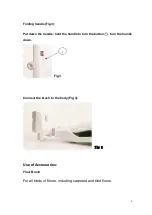
Page 18: ... 3 Put down the handle hold the handle to turn the button 1 turn the handle down Fig 3 Connect the brush to the body Fig 4 Fig 4 Use of Accessories Floor Brush For all kinds of floors including carpeted and tiled floors 1 ...

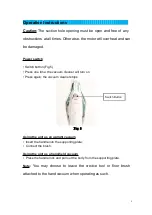
Page 19: ...time the vacuum cleaner will turn on Press again the vacuum cleaner stops Fig 5 Using the unit as an upright vacuum Insert the handle into the supporting plate Connect the brush Using the unit as a hand held vacuum Press the handle lock and pull out the body from the supporting plate Note You may choose to leave the crevice tool or floor brush attached to the hand vacuum when operating as such Swi...

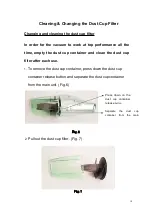
Page 20: ...ust cup container and clean the dust cup filter after each use 1 To remove the dust cup container press down the dust cup container release button and separate the dust cup container from the main unit Fig 6 Fig 6 2 Pull out the dust cup filter Fig 7 Fig 7 Press down on the dust cup container release button Separate the dust cup container from the main body ...

Page 21: ...your vacuum Important Make sure that ALL filters are completely dry before re installing it back to the vacuum Important Note DO NOT use a washing machine to clean the dust cup filter Do not use a hair dryer to dry it AIR DRY ONLY 1 Replace the dust cup filter carefully in the dust cup compartment NEVER operate the stick vacuum without the dust cup filter in place 2 Attach the dust cup container t...

Page 22: ...lter needs cleaning or replacement 3 Unit needs recharging 1 Empty dust cup container 2 Remove dust cup filter and check for object s in air duct and remove Clean or replace dust cup filter 3 Charge unit DUST ESCAPING FROM VACUUM 1 Dust cup container is full 2 Dust cup filter is not installed correctly 3 Puncture hole is dust cup filter 1 Empty dust cup container 2 Review dust cup filter installat...

Page 23: ......

Page 24: ...TM SAV31D ...

Reviews: