background image

11

Set-up

GB

GB

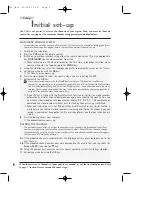
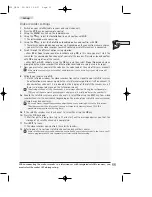
Video recorder settings

1

Switch on your satellite/cable receiver and select channel 1.

2

Press the VCR key on your remote control.

3

Using the MENU key, call up the 

SUMMARY

menu.

4

Using the 

key, select the Installation line and confirm with OK.

The 

INSTALLATION

menu comes up.

5

Using the 

key, select the Satellite and cable box line and confirm with OK.

The 

SATELLITE AND CABLE BOX

menu comes up. Depending on the connection scheme chosen,

you must tell the video recorder to which socket your satellite receiver is connected.

6

Scroll through the different options using 

C

or 

B

:

- either RF or Coax (mono sound) and validate using OK; in this case, you must start the
search for the communication channel of your satellite receiver. Press 

C

or 

B

and confirm

with OK on completion of the search;
- either AV1 or AV2; validate using the OK key, and then select None (No decoder) when
prompted by the video recorder (the other options available are rarely used in Europe).

7

Now you must enter your satellite code (see the code table at the end of this user manual). 

If the make or model of your satellite / cable receiver is not on the list, try out other model
numbers. 

8

Validate your choice using OK.

Via the infrared window, the video recorder transmits a signal to your satellite receiver.

A confirmation menu comes up while the satellite receiver positions itself on channel 12
(check whether channel 12 is indicated by the display of the satellite receiver, even if
there is no image to be seen on the television screen). 

The display of channel 12 by the decoder is not always effective. During the test (example:
TPS), you will have to watch your decoder's display until it briefly indicates the number 12. 

9a

Should the satellite receiver not use channel 12, select No using the EXIT key. Your video
recorder then starts a new search (depending on the make of your satellite receiver, several
attempts may be necessary). 

If no code works, repeat the procedure described above by entering 00 into the first screen.
The video recorder then tries out all the codes stored in its memory (about 150). This
procedure may require a fairly long time. 

9b

If the satellite receiver uses the channel 12, select Yes using the OK key.

10

Press the OK key again.

Wait for quite a long time (up to 15 minutes), until a message advises you that the

storage of all satellite channels is completed. 

11

Press EXIT to leave.

The video recorder now controls the satellite receiver. 

12

Refer to page 7 to sort your satellite channels and check their names.

Some satellite receiver models cannot be controlled by your video recorder. In that case, you'll
have to programme both sets separately for timer-controlled recording.  

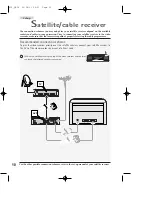
When connecting the video recorder to a television set with integrated satellite receiver, you
must select the socket AV1 during set-up.

X10_GB04  26/04/01 16:57  Page 11

Summary of Contents for VTH6250 CODE SATELLITE

Page 1: ...ion 10 cm on either side and at the rear as well as 7 cm above the top are minimum requirements The humidity of the room should not exceed 80 If you have to use the video recorder outdoors do not expose it to water from rain or splashing Moving it from a cold atmosphere into a warm one is likely to cause condensation on some components inside the video recorder Let the condensation disappear by it...

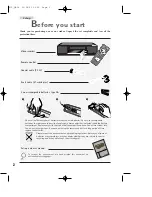
Page 2: ...order Remote control Set up and user manual Do not mix different types of batteries or new and old batteries Do not use rechargeable batteries In order to avoid any risk of explosion observe polarities indicated inside the battery compartment Replace only with the type of batteries specified above Do not throw them into fire do not recharge them If you are not using the remote control for a long p...

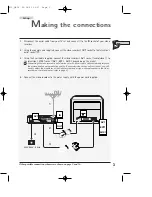
Page 3: ...1 socket audio video 1 to the television s SCART socket AV 1 EXT 1 AUX 1 depending on the make Connecting the video recorder and television set with a Scart cable will considerably improve the picture and sound reproduction quality If your television set has no Scart socket you will have to adjust the modulator of the video recorder and assign a channel number to the video recorder on the televisi...

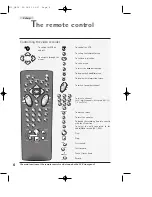
Page 4: ...el To select a channel For 2 digit channels first press 0 0 1 2 for Pr12 To mark an index To reset the counter To double the recording time of a cassette with the LP function To select the units connected to the Audio Video sockets AV1 AV2 Play Stop Fast rewind Fast forward Pause freeze frame Record To switch the VCR on and off To navigate through the menus The main functions of the remote control...

Page 5: ...e television set The codes depend on the television model Should a given code not work try another When you replace the batteries in the remote control you will have to programme it again Controlling the television set To control your TV set you have to programme the remote control as explained above Then all you have to do is to press the TV key to control the TV set and the VCR key to control ag...

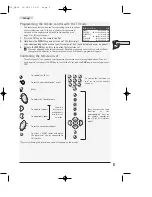
Page 6: ...ve selected the country You can view channel download on the video recorder display Pr1 Pr2 Pr3 On completion of download the video recorder switches over to standby Channel set up is achieved When your television set is not fitted with the NexTView Link or any similar feature a message tells you that your video recorder is searching and storing the channels you can receive in your region Keep pat...

Page 7: ...rol 2 Using the MENU key call up the SUMMARY menu 3 Using the key select the Installation line and confirm with OK The INSTALLATION menu comes up 4 The Manual installation line is already selected Press OK The MANUAL INSTALLATION menu comes up 5 The Standard line is already selected Press C or B to select the reception standard L France Euro BG Western Europe DK Eastern Europe 6 Select the Recepti...

Page 8: ...l that will be used for this purpose Note down the number here 6 Continue with the steps below Settings to be made to the television video channel number Take the user manual of your television and carry out the steps below 7 Switch ON your television set 8 Select an available channel number a channel which has no picture 9 Follow the instructions of your television user manual to find the video c...

Page 9: ...ggering the recording mode of the video recorder as soon as the camcorder switches over from PAUSE to PLAY The video recorder must be switched on Record Pause AV4 sockets Audio Video or Dolby Pro Logic amplifier The two cinch sockets AUDIO OUT red and white and the cinch socket VIDEO OUT yellow located at the back of the VCR enable you to connect your video recorder to an Audio Video amplifier Hi ...

Page 10: ...operly receiving the cable programmes Recommended connection scheme To give the video recorder priority over the satellite receiver connect your satellite receiver to the AV2 of the video recorder by means of a Scart cable Position the satellite receiver on top of the video recorder and see that you leave the infrared windows uncovered AV2 TV For the other possible connection schemes refer to the ...

Page 11: ...e satellite receiver positions itself on channel 12 check whether channel 12 is indicated by the display of the satellite receiver even if there is no image to be seen on the television screen The display of channel 12 by the decoder is not always effective During the test example TPS you will have to watch your decoder s display until it briefly indicates the number 12 9a Should the satellite rec...

Page 12: ...E E Variable slow motion 1 Press the PAUSE key 2 Press the REW or FWD key repeatedly to change the speed of the slow motion The video recorder display indicates S SL LO OW W Stop Press the STOP key Rewind or Fast forward 1 Press the STOP key 2 Press the REW or FWD key The video recorder display indicates R RE EW W or F FF FW WD D Ejecting the tape 1 Switch the video recorder to STOP 2 Press key ST...

Page 13: ...USE key resume it using PLAY or end it using STOP S O S record Snap On Screen recording You may start recording at any time the TV programme you are watching provided that your television set is fitted with the function NexTView Link or similar and that a tape is loaded in the video recorder 1 Press the REC key The video recorder turns on automatically changes over to the same channel as the telev...

Page 14: ...ming was successful Without the SHOWVIEW programming numbers If you don t know the SHOWVIEW programming number of the programme you wish to record use the TIMER menu 1 Display the SUMMARY menu using the MENU key 2 Select Record timer using the key 3 Confirm with OK The TIMER menu comes up showing the first available timer 4 Use the number keys to enter the channel number the PR key to select the c...

Page 15: ...error message and the overlapping programmed recordings are flashing Delete the programmed recordings using the 0000 key INCOMPLETE TIMER Check that you have completed all the requirements for the recording start and end times etc Storage of the programme numbers with the SHOWVIEW feature To spare yourself from having to enter the corresponding programme number in addition to the SHOWVIEW code the...

Page 16: ...lect the Go to remaining line using the key 2 Enter the time For example type in 135 using the number keys to position the tape at 1h35min before the end of tape 3 Confirm with OK The video recorder immediately rewinds to the required position You may then start the recording of a film that will not be incomplete due to insufficient tape length remaining Cassette type 1 Select the Cassette type li...

Page 17: ... menu and press OK 4b Adjust stability using the C or B key or restore the standard settings by pressing the 0000 key In the other modes the Tracking and Stability lines are not displayed Format Auto for automatic recognition of the 16 9 recording format 16 9 to record or play in 16 9 D2 MAC Visiopass PAL decoder digital television DVBS from the AV2 or AV1 socket the video recorder display must no...

Page 18: ... 1 and 2 one normal track for mono sound or track 1 for a bilingual telecast Depending on the actual sound type of the TV channel stereo NICAM or mono the video recorder will distribute the sound on these different tracks 1 Load a tape and press REC 2 Display the SUMMARY menu using the MENU key then select the HiFi controls line with 3 Confirm with OK The HIFI CONTROLS menu comes up 4 Select the S...

Page 19: ...ou will avoid defective recordings due to programme time shifting or programmes exceeding the scheduled time within the 10 minute limit VPS PDC Select VPS PDC to start recording at the exact beginning of the programme provided that the channel broadcasts VPS or PDC signals this information is available on the video recorder STATUS screen Some channels telecast their programmes with VPS Video Progr...

Page 20: ...f the counter to 00h00m00s 1 Load a tape 2 Press PLAY The video recorder starts playing 3 Press STATUS The STATUS menu comes up on the screen showing the counter 4 Press the 0000 key to reset the counter to 00h00m00s Continuous play recording You can permanently play or record a tape When the end of the tape is reached it is automatically rewound until the beginning and play or recording is resume...

Page 21: ...021 PIONEER 001 005 POLYTRON 020 027 029 RADIOLA 019 020 021 RADIOMARELLI 019 REX 005 SABA 001 000 005 010 019 020 SALORA 005 AKAI 008 020 AKARI 028 BANG OLUFSEN 009 019 BLAUPUNKT 023 BRANDT 001 000 010 020 BRIONVEGA 019 BLUESKY 020 CGE 016 CONTINENTAL EDISON 004 DAEWOO 020 025 ELBE 005 015 023 FERGUSON 001 003 004 000 010 020 FINLUX 020 024 019 FISHER 008 FORMENTI 019 GOLDSTAR 020 GRUNDIG 023 024...

Page 22: ... an NTSC tape on TV PAL 60Hz Reception standards LL BG DKK depending on the model Number of storable channels 99 Modulator VTH6250G VTH6250C only UHF Channel 21 to 69 Pre set at the factory on channel 52 Standards G K Remote control Infrared 33 kHz Batteries 2 x 1 5 V AA Automatic functions On using any key Play with protected tape Rewinding at the end of the tape Long Play LP Super Long Play SLP ...

Reviews: