background image


5.1 Unpacking and Handling: 

A  full  H-16CVBS-RF-MOD  agile  modulator  is  shipped  with  all  equipment  assembled,  wired,  factory  teste
packaged in an appropriate shipping container.

5.2 Mechanical Inspection 

Inspect the front and rear of the equipment for shipping damage. Make sure the equipment is clean, and no wire, cable, or 
connectors are broken, damaged or loose. 

5.3 Precautions 

Avoid heat buildup 
Ensure easy access to rack wiring 
Facilitate servicing and maintenance 
Avoid direct heating or air conditioning 
Make sure rack supports are sufficiently rigid to support racks
Beware of dripping water onto equipment form leaky roofs, waveguide roof entries and 

5.4 Damage in Shipment 

Should any damage be discovered after unpacking the unit, immediately file a claim with the carrier. A full report of the 
damage shall be made, and a copy forwarded to the Seller

6. INSTALLATION 


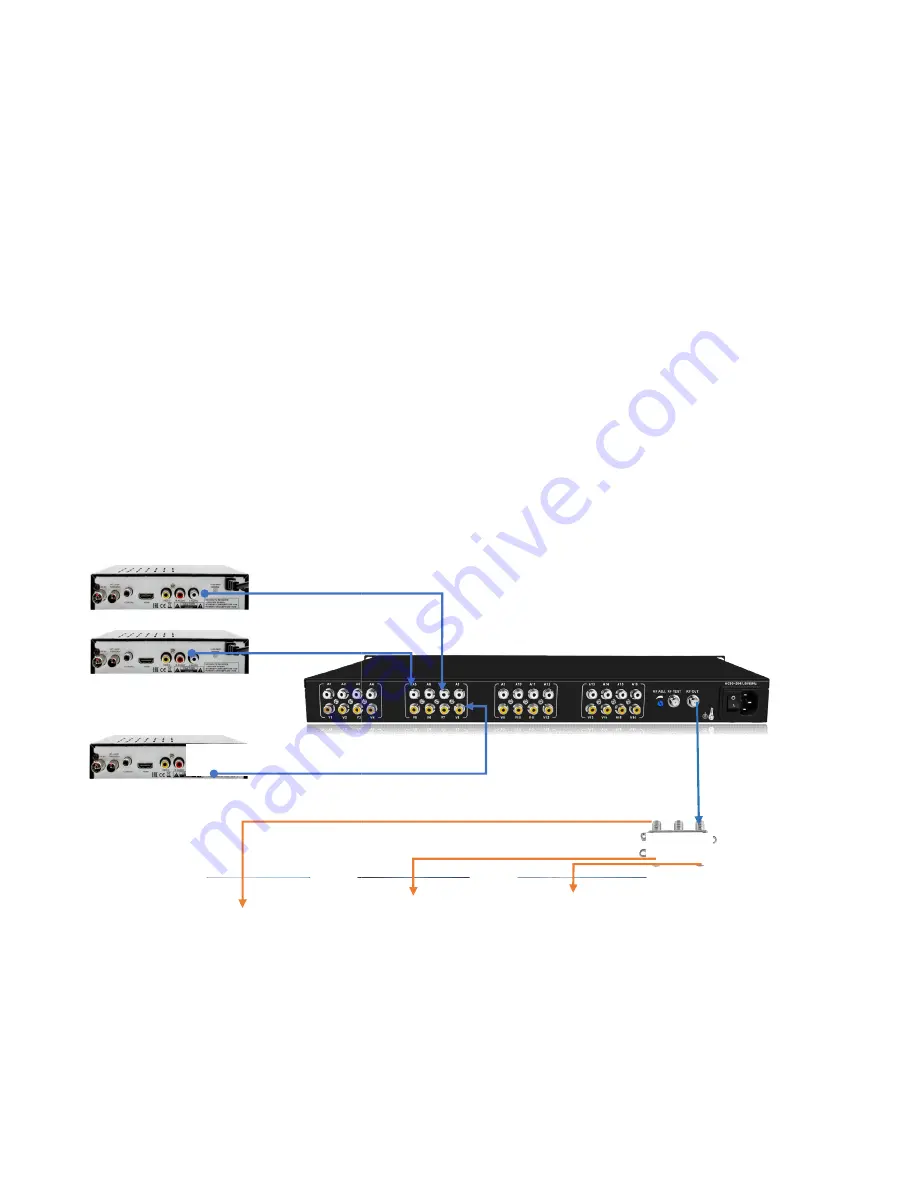
Please follow the instructions below to install the 

1. Connect the power plug to the power jack
2. Connect the video source to the H-16CVBS
3. Connect the H-16RCA-RF-MOD to the TV
4. Power up the modulator and wait for 

RCA 

RCA 

RF 

RCA 

RF


agile  modulator  is  shipped  with  all  equipment  assembled,  wired,  factory  teste

packaged in an appropriate shipping container. 

Inspect the front and rear of the equipment for shipping damage. Make sure the equipment is clean, and no wire, cable, or 

Make sure rack supports are sufficiently rigid to support racks 
Beware of dripping water onto equipment form leaky roofs, waveguide roof entries and cold-water 

Should any damage be discovered after unpacking the unit, immediately file a claim with the carrier. A full report of the 

and a copy forwarded to the Seller


Please follow the instructions below to install the H-16RCA-RF-MOD 

1. Connect the power plug to the power jack 

16CVBS-RF-MOD like DVB or STB 

to the TV 

. Power up the modulator and wait for 2 minutes to set it u

RF 

RF 

RF 

RF 

agile  modulator  is  shipped  with  all  equipment  assembled,  wired,  factory  tested,  and  then 

Inspect the front and rear of the equipment for shipping damage. Make sure the equipment is clean, and no wire, cable, or 

 pipe condensations 

Should any damage be discovered after unpacking the unit, immediately file a claim with the carrier. A full report of the 

Summary of Contents for H-16RCA-RF-MOD

Page 1: ...H 16RCA 16 CHANNELS AGILE MODULATOR User Manual 16RCA RF MOD 16 CHANNELS AGILE MODULATOR User Manual 16 CHANNELS AGILE MODULATOR ...

Page 2: ...ued progress in methodology design and manufacturing Thor shall have no liability for any error or damage of any kind resulting from the use of this document Copy Warning This document includes some confidential information Its usage is limited to the owners of the product that it is relevant to It cannot be copied modified or translated in another language without prior written authorization from...

Page 3: ...asy set up and adjustment 3 SPECIFICATION OUTPUT RF Output Connector F Connector 75Ohms Output Frequency 45 860MHz any 16 channels Output Level 113 dBµV Adj Out band Rejection 60dB A V Ratio 21 18 dB Adj Frequency Stability 5kHz Test Point 20 dB 3dB INPUT VIDEO Video Input Level 0 6 1 5Vp p 87 5 Modulation Input Connector Yellow RCA Jack Video C N 60dB AUDIO Input Level 0 8Vp p 25KHz Peak Deviatio...

Page 4: ...se hazards and will void the warranty humidity areas or expose it to water or moisture Do not place the modulator on an unstable cart bracket or table The modulator may fall causing s injury and damage to the modulator Install the modulator only in a mounting rack designed for 19 rack Do not block or cover slots and openings in the modulator These are provided for ventilation and protection from r...

Page 5: ...nnect the H 16RCA RF MOD to the TV 4 Power up the modulator and wait for RCA RCA RF RCA RF agile modulator is shipped with all equipment assembled wired factory teste packaged in an appropriate shipping container Inspect the front and rear of the equipment for shipping damage Make sure the equipment is clean and no wire cable or Make sure rack supports are sufficiently rigid to support racks Bewar...

Page 6: ... for the video input with yellow RCA connector Adjust the output level at the RF OUTPUT 20db adjustment ny turning the LCD attenuation control is per particular channel only using external in most cases Output level read at this point will be down 20dB from the actual output 16 modulated signal at 113dBμV output is provided at this port 9 POWER CORD SOCKET AND CORD 110V 220V power source and the s...

Page 7: ...em sett System Settings 1 Language Press ENTER to edit and press LEFT to switch the language 2 Restore Restore to the factory setting 3 Reboot Reboot the modulator the first page which the operator may choose to view and or configure system settings and press LEFT or RIGHT Restore Restore to the factory settings ...

Page 8: ...us here 12 3 BASIC PARAMETERS Please make sure your computer is in the same IP segment as the modulator is interface for programming and monitoring the device The user Google Chrome Firefox or Microsoft Edge accounts The best browsers The default user name and the default password are the following s working status here Please make sure your computer is in the same IP segment as the modulator is T...

Page 9: ...nd Manual Input We suggestusing the Setting from listoption to save time Setting from list Select the channels from the drop box Fig 1 Manual Input Set the channels by inputting the frequencies In the Setting from list you can select the frequency in the drop box list The used frequency will be in grey and the unused ones are in white as seen in the Fig 1 ...

Page 10: ... in the OUTPUT SETTING Enable To enable or disable the RF output When one channel is disabled its settings will be frozen Attenuation The current channel output level adjustment The range is 20dB max and the step is 1dB Frequency Input the frequency or select from the list All frequencies and channels are agile and free from 48 860MHz The Manual Input option allows you to input the frequency as ne...

Page 11: ...55 0 And it is 4 Default Gateway Set the gateway address 5 Primary DNS The default one is 8 8 8 8 And it is editable 6 Secondary DNS The default one is 202 96 134 133 And it is 7 MAC You can use the MAC to find the modulator in the router The MAC is labeled in the modulator case It is not recommended to change it The modulator will reboot automatically if any changes on the network setting is appl...

Page 12: ...t software The restore function will recover the input and output settings and the IP address to the Back up the input and output settings to your computer settings to the modulator from your computer In order to change the User Name and password you need to input the current user name and password If you forget your new User Name or new password you can use the reset button in the front panel to ...

Page 13: ... Settings 13 3 Go to Network Internet 13 4 Go to Ethernet on the left side of the menu 13 5 Go to Change adapter options 13 6 Double click on the Ethernet Source or Right Click and select Properties 13 7 Open Properties ...

Page 14: ...13 8 Go to Internet Protocol Version 4 TCP IPv4 13 9 Go to Properties 13 10 Go to Use the following IP address ...

Page 15: ...13 11 Set IP address ...

Page 16: ...Set IP address 192 168 1 10 Set Subnet mask 255 255 255 0 Set Default gateway 192 168 1 1 15 12 Save all the settings 14 Common Troubleshooting ...

Page 17: ...r of the date of purchase Prior authorization with a return authorization number issued by Thor or its representative is required for all returns The purchaser shall be responsible for all freight charges on shipment to Thor unless otherwise authorized Charges to return a unit or part to purchaser will be paid by Thor Any claim for damage that occurs in transit to the purchaser must be filed by th...

Reviews: