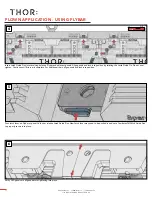
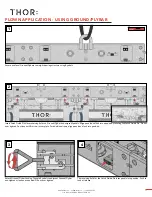
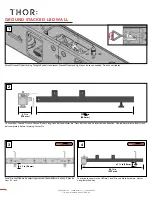
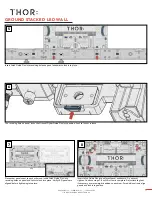
background image

www.THORav.us   |   sales@thorav.us   |   (763) 999-4253

™ & ® 2018 THOR AV. © 2022 THOR AV.

18

Attach Draw Bars to Ladder Truss columns. (Rear view)

12

GROUND STACKED LED WALL

Summary of Contents for RIDGE

Page 1: ...nce RIDGE User Guide 22v8 Distribution date August 15 2022 2018 THOR AV All rights reserved No part of this publication may be reproduced or transmitted in any form or by any means without the express written consent of the publisher ...

Page 2: ...ng walked on or pinched particularly at plugs convenience receptacles and the point where they connect to the product Do not use the unit if the electrical power cord is frayed or broken 11 THOR AV products must be used in accordance with local state federal and industry regulations The responsibility to evaluate the reliability of any rigging or mounting method for their application is solely the...

Page 3: ...ontact support thorav us to obtain an RMA number prior to returning your product to THOR AV Do not return the product to the place of purchase Write the RMA number on the outside of the shipping carton Any product sent to us without a valid RMA number will be refused Shipping Address THOR AV Attn RMA Number 8821 Zealand Ave N Ste B Brooklyn Park MN 55445 USA Include the following with the product ...

Page 4: ...ATIONS 2 ANATOMY 3 Front View 3 Rear View 4 Power Data Box 5 Parts 6 Dimensions 8 INSTALLATION REQUIREMENTS MECHANICAL 9 ELECTRICAL 9 VIDEO SYSTEM 9 INSTALL APPLICATION IMPORTANT SAFETY CONSIDERATIONS 10 FLOWN LED WALL 11 Using Flybar 11 Using Ground Flybar 13 GROUND STACKED LED WALL 14 WALL MOUNTED LED WALL 19 CONNECTION GUIDE POWER CONNECTION 23 DATA CONNECTION 24 PROCESSORS BROMPTON TECHNOLOGY ...

Page 5: ...rav us 763 999 4253 2018 THOR AV 2022 THOR AV v SERVICE MAINTENANCE REPLACING POWER DATA BOX 26 CLEANING MODULES 26 REMOVING MODULES 26 REPLACING MODULES 27 APPENDIX TROUBLESHOOTING 28 CONTACT 30 GLOSSARY 31 TABLE OF CONTENTS ...

Page 6: ...ions This LED panel series is ideal for House of Worship Fixed Installations Virtual Production and Signage 1 8mm 2 5mm and 3 7mm pixel pitches Brompton and NovaStar processing options Easy servicing from front or back Best in class on camera performance Easily visible in all levels of ambient light Ideal for churches stages corporate board rooms and lobbies and VR XR studio production INDOOR LED ...

Page 7: ...5 scan Gray Scale 16 bit 16 bit 16 bit Refresh Rate 3 840 Hz 3 840 Hz 3 840 Hz Brightness Control Brompton 1175 steps 1200 steps 1250 steps NovaStar N A 256 steps 256 steps Pixel Configuration 320 x 180 w x h 57 600 240 x 135 w x h 32 400 160 x 90 w x h 14 400 Module Configuration 2 x 1 2 x 1 2 x 1 Chassis Straight Standard Standard Standard Operating Temperature 30 to 50 C 30 to 50 C 30 to 50 C O...

Page 8: ...www THORav us sales thorav us 763 999 4253 2018 THOR AV 2022 THOR AV 3 LED MODULES MODULE GUIDE POSTS MODULES CONNECTOR MODULES HANDLE FRONT VIEW ...

Page 9: ...Rav us sales thorav us 763 999 4253 2018 THOR AV 2022 THOR AV 4 LATCH LOCKS LOCKING CLAMP SOCKET WALL MOUNT SCREW HOLE GUIDE PIN LATCH LED MODULE SAFETY SCREWS CHASSIS HANDLE REMOVABLE POWER DATA BOX REAR VIEW ...

Page 10: ...www THORav us sales thorav us 763 999 4253 2018 THOR AV 2022 THOR AV 5 DATA IN OUT DATA IN OUT PowerCON IN PowerCON OUT POWER TEST PATTERN BUTTON POWER SUPPLY THUMB SCREWS POWER DATA BOX ...

Page 11: ... 75mm x 10mm 3 x 2 15 15 16 16 x 39 18 kg 34 lbs 75mm x 48mm x 10mm 2 15 15 16 16 x 1 x 09 kg 12 lbs 1800mm x 38 1mm x 25 4mm 70 x 1 x 1 2 45 kg 5 4 lbs 2400mm x 38 1mm x 25 4mm 94 x 1 x 1 1 8 kg 4 lbs 114 3mm x 63 5mm x 38 1mm 4 x 2 x 1 36 kg 8 lbs Flybar 600mm Wall Mount 1800mm Track Flybar 1200mm Wall Mount 2400mm Track Flybar Bracket Wall XYZ Mount Flybar Endcap Flown Install Wall Mount Instal...

Page 12: ...mm 26 9 9 16 16 x 9 7 7 16 16 x 1 15 15 16 16 2 5 kg 5 5 lbs 1010mm x 240mm x 50mm 39 x 9 7 7 16 16 x 1 15 15 16 16 3 18 kg 7 lbs 240mm x 105mm x 116mm 9 7 7 16 16 x 4 x 4 9 9 16 16 64 kg 1 4 lbs 1200mm x 50mm x 30mm 47 x 1 15 15 16 16 x 1 3 3 16 16 1 81 kg 4 lbs Ground Flybar 600mm Ground Flybar 1200mm Ladder Truss 1010mm Locking Clamp Rear Drawbar 1200mm Ground Stack Install Rear Ground Truss 85...

Page 13: ...www THORav us sales thorav us 763 999 4253 2018 THOR AV 2022 THOR AV 8 DIMENSIONS 23 600mm 2 5 5 16 16 58mm 13 5 5 16 16 337 5mm M5 M3 ...

Page 14: ...t Safety Considerations on page 10 STRUCTURAL ELECTRICAL Ground Stack LED walls require ballasting a percentage of the total weight Ballast the LED wall by distributing evenly on the Rear Ground Bars Ballast Weight Calculator Wall Height 1 3 meters 50 of wall weight Wall Height 4 meters 75 of wall weight Wall Height 5 meters 100 of wall weight Wall Height 6 meters 100 of wall weight If a wall weig...

Page 15: ...CT Inspect all products and perform safety related checks before deployment Heed all warnings and precautions in this manual and notices marked on the product Protect the power cord from being walked on or pinched particularly at plugs convenience receptacles and the point where they connect to the product Do not use the unit if the electrical power cord is frayed or broken INSTALLATION GUIDELINES...

Page 16: ...ng structure using Eyebolt Eyebolts are removable Use a thin wall 1 5 32 socket on under side of Flybar LEVEL 1 in 4 5 cm Loosely secure Flybars together with Flybar Bracket Use large Phillips screwdriver and spare screws on Flybar Attach aesthetic End Cap to either end of Flybar assembly FLOWN APPLICATION USING FLYBAR ...

Page 17: ...uide Pin Do not over tighten Continue until first row is complete For additional rows align panels and lock into position Push latch lever on Flybar or panel to lock or release Latch Guide Pins New Latch lever may need to be pushed in and out a few times for Latch Guide Pins to properly secure into place Verify LED panels are aligned before tightening into place LEVEL 4 6 5 FLOWN APPLICATION USING...

Page 18: ...Align panels and lock into position by twisting the Latch Guide Pin Do not over tighten Continue until first row is complete For additional rows align panels and lock into position Attach Ground Flybar Locking Triangle Eyebolt to adjacent Ground Flybar and tighten or loosen as needed Do not over tighten The receiving hole for the Latch Guide Pin locks panels into position Push to lock or release 4...

Page 19: ... before inserting Cotter Pin To eliminate seams in the LED wall level Ground Stack hardware Adjust using 8mm hex key Attach Ground Flybar Locking Triangle Eyebolt to adjacent Ground Flybar and tighten or loosen as needed Do not over tighten Level Ground Flybars by adjusting attached feet with 8mm hex key Extends from 0 1 inch LEVEL LEVEL 1 4 3 2 36 in 933 mm 4 in 120 mm 33 15 15 32 32 in 850 mm 1 ...

Page 20: ... holes on panel and twist to lock into place Verify LED panels are aligned before tightening into place Insert Latch Guide Pins into adjacent panel and secure Do not over tighten Continue steps 7 8 until first row is complete Adjust leveling feet if necessary as more weight is added to each row For additional rows align panels and lock into position The receiving hole on panel locks the Ground Fly...

Page 21: ... Ground Truss holes Holes are tapered Ridge Ladder Truss Triple Reference A Loosely attach Locking Clamp to Ladder Truss Reference B Align and insert Locking Clamp with locking clamp socket on panel Reference C Use handle to twist and lock into position Reference D Tighten Locking Clamp to Ladder Truss Add ballasting or anchoring Reference E 9 10 36 in 933 mm 36 in 933 mm A B D C E ...

Page 22: ... thorav us 763 999 4253 2018 THOR AV 2022 THOR AV 17 Repeat steps 9 10 for each Ground Flybar section Ridge Ladder Truss Triple Reference A Ridge Ladder Truss Double Reference B 11 A B GROUND STACKED LED WALL 4 in 100 mm ...

Page 23: ...www THORav us sales thorav us 763 999 4253 2018 THOR AV 2022 THOR AV 18 Attach Draw Bars to Ladder Truss columns Rear view 12 GROUND STACKED LED WALL ...

Page 24: ...emoval tool or firmly push on rear side of module Set aside 8 in 223 mm Add two XYZ Mounts to the top wall mount track for first panel Each XYZ Mount supports four LED panels The XYZ Mount is added for every other panel Adjust XYZ Mount with 3 16 hex key The Y adjusts up to 1 vertically The Z adjusts forward and backwards Set Screw and X adjustment Z adjustment Y adjustment LEVEL LEVEL 1 4 3 2 WAL...

Page 25: ... chassis forward or backward Adjust as needed LEVEL 8 7 Each XYZ Mount supports four panels Add additional XYZ Mounts as needed and continue adding panels to complete top two rows Repeat with additional rows The receiving hole on the panel locks the Latch Guide Pins into position Push to lock or release 9 10 Front view 11 ...

Page 26: ...ugh to the next Power Data Box Repeat as necessary Each module has arrows pointing up to indicate proper installation onto panel chassis Four magnets hold each module in place If needed magnets are adjustable for additional alignment purposes Carefully align modules with panels Reattach safety cable and verify area is clear for attaching module 15 13 12 14 ...

Page 27: ...www THORav us sales thorav us 763 999 4253 2018 THOR AV 2022 THOR AV 22 WALL MOUNTED LED WALL Front view 16 First Panel 8 223 mm 2 2 675 mm ...

Page 28: ...er cable to first LED panel See data sheet pg 2 for load capacity LED panels chain together both horizontally or vertically Power enters from Left Side facing rear or Right Side facing front For LED panels chained power enters from Left Side facing rear or Right Side facing front Insert power cable and twist clockwise To disconnect power cable pull back release button on the connector twist counte...

Page 29: ...C laptop via the Ethernet USB port to the processor Connect a video source to the processor s video input Data Redundancy LED panels have two data ports Redundancy auto switches to receive data from a secondary port on the processor to ensure data connectivity One port is required for the primary data feed and an additional port is required for the secondary data feed Verify LED wall configuration...

Page 30: ...AV partners with Brompton Technology and Novastar processor manufacturers NOVASTAR For more information on LED wall setup using Novastar processors refer to www novastar tech BROMPTON TECHNOLOGY For more information on LED wall setup using Brompton processors refer to www bromptontech com ...

Page 31: ... Using some force pull the module toward you Disconnect Safety Carabiner from module While holding the Module Handle push module to separate it from the panel chassis magnets Apply some force Disconnect Safety Carabiner from module Position vacuum onto module Turn on and wait for suction to build Carefully pull module toward you Disconnect Safety Carabiner from module CLEANING MODULES REPLACING PO...

Page 32: ...ndles Align module with PDB Module will snap into place Connect Safety Carabiner to module Brompton Product Depending on PDB firmware power cycle may be required Contact your THOR dealer for support NovaStar Product Depending on PDB firmware power cycle and or module flash may be required Contact your THOR dealer for support REPLACING MODULES 27 SERVICE MAINTENANCE ...

Page 33: ... lines Moiré is an image artifact that appears when two fine patterns overlap at an angle One of the easiest ways to reduce the moiré effect is to soften its direct focus by focusing on something else like an individual Slightly soften the focus on the screen itself to reduce the on camera moiré effect with LED screens Focus points matter when using cameras Focusing on the LED wall creates moiré n...

Page 34: ...tion settings How do I remove a module if there are faulty pixels Each module on an LED panel has magnets to keep them in the proper position Use the included RIDGE Module Removal Tool RIDGE LED panels Verify that the module s safety cable is detached Carefully insert the module removal tool into the top front of the module via the thin slots and then slide the tool upwards to secure While holding...

Page 35: ...n repairs is generally ten business days If you live outside of the United States please contact your local distributor for warranty service WARRANTY SERVICE You will be responsible for shipping charges to THOR AV and the product will be returned by THOR AV We reserve the right to inspect any product that may be the subject of any warranty claim before repair is carried out To qualify for warranty...

Page 36: ...Certification Certifications ensure that an LED wall has been tested and complies with emissions power and safety regulations Look for the following certifications to ensure your LED walls comply with regulations FCC This mark ensures the LED panels will not interfere with audio or radio signals ETL Proves compliance with power safety standards EMC This mark shows compliance with electromagnetic e...

Page 37: ...al of 4096 colors 212 A 14 bit gray scale will have a potential of 214 color or 16 384 A 16 bit gray scale offers a 216 color potential or 65 536 colors HDR High Dynamic Range HDR is a series of technologies that improve the range of color and contrast in a video image By offering higher brightness wider color ranges more detail and higher headroom HDR provides more lifelike depth and image qualit...

Page 38: ...sy chain configuration Power enters the wall at one of the LED panel s Power Data Boxes and then each subsequent panel receives power from the panel before it Processor The Processor takes your video image applies filters and adjustments and outputs to the video wall The processor also formats the output so that it displays correctly across multiple LED panels Receiving Card The receiving card is ...

Page 39: ...uts a channel of video content to the receiving card on the back of the LED panel Each processor can have multiple sending cards to output multiple channels of content Viewing Angle The viewing angle specifies the maximum angle an LED panel is viewable with 90 being a front view and 180º being parallel with the LED panel on either side ...

Page 40: ...8821 Zealand Ave N Ste B Brooklyn Park MN 55445 USA Phone 763 999 4253 Website www THORav us Email sales thorav us THOR AV ...

Reviews: