USERS MANUAL NOVA SERIES
DONGGUAN THUNDER LASER EQUIPMENT CO.,LTD
Shatian Town, Shatian Dadao, Mintian
Tel :(86)769 826653
Dongguan City, Guangdong Province, China
56
the alarm system will be active, the warning light alarms and the machine stops
working immediately;
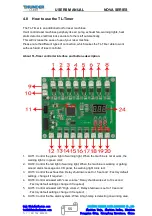
7. OUT7: Control the power for rotary device;
8. OUT8: Spare interface;
9. 5V DC Voltage Power Output 1, control the power for red light pointer.
10. 5V DC Voltage Power Output 2, spare interface;
11. Upgrade interface;
12. 24V DC Voltage Power Input;
13. In1:
“Working state” interface
14. In2: Spare interface;
15. In3: Air-assist mode selection;
16. In4:
Control air assist with “Low volume”;
17. In5:
Control air assist with “High volume”;
18. In6: Temperature detection
19. In7: Rotary connection state detection
20. In8: Spare interface
21.
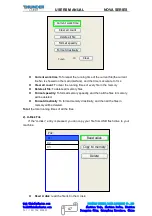
”Set” button, select each ”OUT” interface and confirm the setting;
22.
”DOWN” button, reduce time of delay shutdown;
23.
”UP” button, increase time of delay shutdown
24. LED lights display, set the delay time for viewing each interface and enter
25. Auto and manual mode switch;
The TL-Timer is installed inside the lower right hand door panel, see below.
Operation:
Normal use:
The TL-Timer is selected Auto mode as factory setting.
Under Auto mode, when the laser is not at work, air assist and exhaust fan won’t be on;
When the laser is working, the air assist and exhaust fan starts, after the job finished, the
air assist will stop after 10 second, exhaust fan will stop after 15 second.
Under Manual mode, when the laser is powered on, the air assist and exhaust fan will be
on all the time
Each “OUT” interface has a freely adjustable delay time from 0-99 seconds.
Set up delay time:
Generally, there’s only need to set up the delay time for air assist and exhaust fan, so they
can be delay to shutdown according to your need. The default for air assist is 10 second,
and for exhaust fan is 15 second.
Click “Set” button to select from OUT1 to OUT8 interface and the LED light display will
show you the delay time in second for each interface. On each interface, click “down” or
“up” button you can change the value, then click “Set” button to confirm and go into the
next interface. On the OUT8 interface, click again the “Set” button, the display will be off
and exit the delay time setup.

