-18-
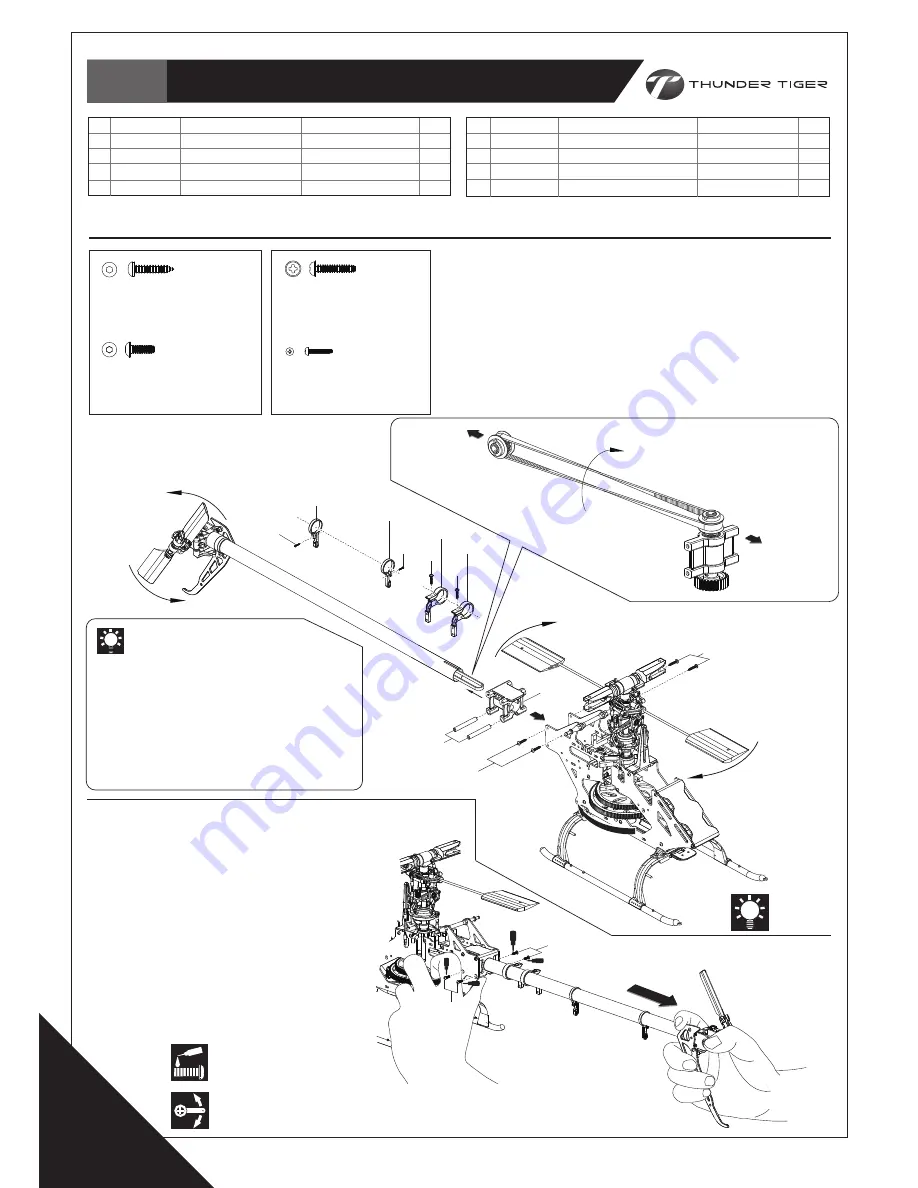
TAIL UNIT-BELT-DRIVEN /
尾部總成組裝-皮帶版
Bag M
HNX2-10B
SOCKET BUTTON HEAD SELF TAPPING SCREW, M2×10
半圓頭內六角自攻螺絲 M2×10
HSA2-6
BUTTON HEAD SOCKET SCREW, M2X6
半圓頭內六角螺絲
M2X6
Ensure the leading edge of the blades
rotate this way as drawing. (Turn the Main
Gear clockwise, the main rotor grips turns
clockwise and the Tail Blades turn counter
clockwise.)
請注意旋翼轉動方向應與圖示相同。
(順時針方向撥動主齒盤時,主旋翼頭夾座順
時針、尾旋翼逆時針轉動。)
Tail pulley
皮帶輪
Tail / 機尾
Nose / 機頭
Drive Gear Set
尾驅動輪組
(1)
(6)
(5)
Step 1 /
步驟一
1. Remove the tap from the end of the belt. Insert the tail unit
into the main frame set, twist the belt toward right for 90°
and then warp around the pulley.
2. First tighten the 4 upper Tapping Screws(HNN2-10B,#1)to
attach the Tail Bracket on the main frame set.
1. 移除皮帶末端膠帶。將尾部套入主側板組中,同時將皮帶向右扭轉
90度後,繞過皮帶輪。
2. 先緊鎖上方的兩側4顆螺絲,將尾管固定座固定在主側板組上。
(2)
(1)
Step 2 /
步驟二
1. Pull the Tail Boom out slightly by grasping
the Tail Unit with one hand and the main
frame set with the other. Adjust until the
belt deflects by about 0.2mm (0.08”).
2. Tighten the 4 lower Tapping Screws(
HSA2-6B,#2)to fix the Tail Bracket on the
main frame set.
1. 一手固定主側板組,另一手握住尾部將尾管向外
拉,使皮帶拉緊。適當的皮帶緊度應於推壓皮
帶時陷下少於0.2mm(0.08”)。
2. 將下方的兩側4 顆螺絲螺緊,將尾管固定座固
定於主側板組。
90°
(2)
Apply threadlocker
使用螺絲防鬆膠
HMJ12-6B
TAPPING SCREW M1.2×6
圓頭十字自攻螺絲
M1.2×6
HNN2-10B
TAPPING SCREW(W/WASHER) M2×10
圓頭墊圈自攻螺絲
M2×10
No.
1
2
3
4
Qty
2
2
2
2
Material No.
BK1082
HMJ12-6B
BK0923
HNN2-10B
Description
ROD GUIDE
TAPPING SCREW M1.2×6
TAIL SERVO TRAY
TAPPING SCREW(W/WASHER) M2×10
名稱
固定環
圓頭十字自攻螺絲
M1.2×6
尾伺服機座
圓頭墊圈自攻螺絲
M2×10
No.
5
6
7
8
Qty
1
2
4
4
Material No.
BK2610
BK1886
HNX2-10B
HSA2-6
Description
TAIL BOOM BRACKET
BRACKET SPACER
SOCKET BUTTON HEAD SELF TAPPING SCREW, M2×10
BUTTON HEAD SOCKET SCREW, M2X6
名稱
尾管固定座
固定座支柱
半圓頭內六角自攻螺絲 M2×10
半圓頭內六角螺絲
M2X6
(4)
(4)
(2)
(2)
(1)
(3)
(3)
(1)
Hint
組裝提示
BELT-DRIVEN
T22
Ensure smooth, non-binding movement when assembling
確認組件靈活度


