background image


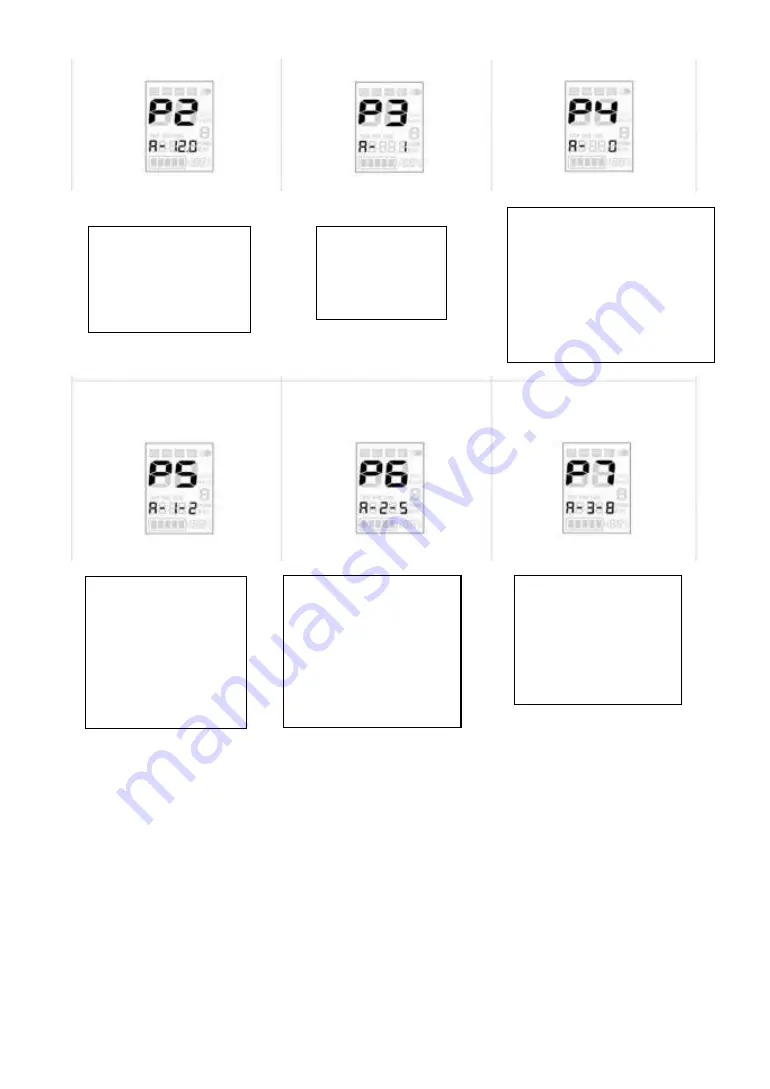
6. P4: Limited Speed Setting Enter into 

set “P4”, change the numerical value 

in  the  display.  0-100,  set  the  speed 

limit percentage, set “50” is the speed 

limit of 50%; “0” or “100” is  no limit 

speed.   

5.  P3:  Magnetic  Steel 

Number Setting. 

4.  P2:  Wheel  Diameter 

setting  enter  into  set  “P2”, 

change  the  numerical  value 

in the display.   

7. P5: Grade Power- Assisted 

Setting 

1  Grade:  A-1  (1-3)  The  last 

number  can  be  adjusted 

from  1-3.  The  larger  the 

value, the faster the speed.   

8.  P6:  2  Grade  Power-  assisted 

Setting 

2  Grade:  A-2  4-6)  The  last 

number can be adjusted from 4-

6. The larger the value the faster 

the speed.   

9. P7: 3 Grade Power- Assisted 

Setting 3 Grade: A-3 (7-9). The 

last  number  can  be  adjusted 

from 7-9. The larger the value, 

the faster the speed. 

Summary of Contents for TH-0119M

Page 1: ...1 THUNDER E BIKE USER S MANUAL MODEL TH 0119M...

Page 2: ...ONTENTS Safety Instruction Page 3 Bike Display Page 3 LCD Display Operation Page 4 5 Battery Further Information Maintenance Page 6 Charging Page 6 Installation Instruction Page 7 9 Packing List Page...

Page 3: ...part of this e bike 4 Do not at any time dismantle or disassemble any of the e bike components 5 Please check all parts are tight and locked before riding 6 Please make sure that the battery charger...

Page 4: ...Setting Enter into the Main Menu Press P1 Press Left or Right Key choose 0 or 1 0 is Kilometers Miles is 1 Press left or Right Combination key to exit 1 LongPress Left Right Combination key enter int...

Page 5: ...into set P2 change the numerical value in the display 7 P5 Grade Power Assisted Setting 1 Grade A 1 1 3 The last number can be adjusted from 1 3 The larger the value the faster the speed 8 P6 2 Grade...

Page 6: ...ed battery on a flat surface in a dry place 3 Attention The battery should be re charged once every 2 3 month when it is not used 4 1 Keep the battery out of reach of children 4 2 Never try to open th...

Page 7: ...Take out the battery 6 Installation Instructions 1 When opening the bikes box remove the E bike and use tools to cut off the package strings 2 Install front wheel 2 1 Take out the protection axle the...

Page 8: ...3 3 Install the lamp and use the tool to tighten it 3 1 3 2 3 3 4 Install the handle bar 4 1 Use inner hexagon tool to loosen the stem cover and don t tighten all bolts immediately before adjusting t...

Page 9: ...e rear light 6 3 Put the seat post into the frame 6 4 Adjust seat post to the height that suits your riding position best and tighten quick release Please make sure that the quick release is tightened...

Page 10: ...10 Any question about the item please contact us at Sales thundere bikes com Packing List...

Page 11: ...ntity Checked TH 0119M Electric Bike 1 Tool kit open end spanner 10 open end spanner 13 15 open end spanner 14 17 screwdriver inner hexagon spanner M6 M5 M4 M3 1 Manual 1 Specification Sheet 1 Keys 2...

Reviews: