Page 2
For technical questions, please call 1-800-444-3353.
SKU 68698
IMPORTANT SAFETY
INFORMATION
This is the safety alert symbol. It is
used to alert you to potential personal
injury hazards. Obey all safety
messages that follow this symbol
to avoid possible injury or death.
Safety Precautions
1. Wear ANSI-approved safety goggles and heavy-
duty work gloves during installation. Do not
wear jewelry or metal watches when working
near solar panels, wiring or batteries.
2. Keep installation area clean and well lit.
3. Install out of reach of children.
4. Keep bystanders out of the area during installation.
5. Do not install when tired or when under
the influence of drugs or medication.
6.
Use only to install 96418 plastic Solar Panel
or the individual plastic solar panels in the
68751 Solar Panel Kit.
Do not use to mount
or install any other kind of solar panel or other
piece of equipment.
Use as intended only.
7. Inspect before use; do not use if parts
loose are loose or damaged.
SAVE THESE
INSTRUCTIONS.
Installation Instructions and Maintenance
1. Select a mounting location for the Solar Panel.
Do not mount on outside of vehicle. The solar
panel should face the sun, and not be blocked
by shadows. The location should allow the panel
to be protected from accidental damage.
2. The mounting location should be sturdy enough
to support the weight of the Solar Panel, and
any additional accessories. Before drilling, be
sure there are no hidden wires or utility lines
that may be damaged during installation.
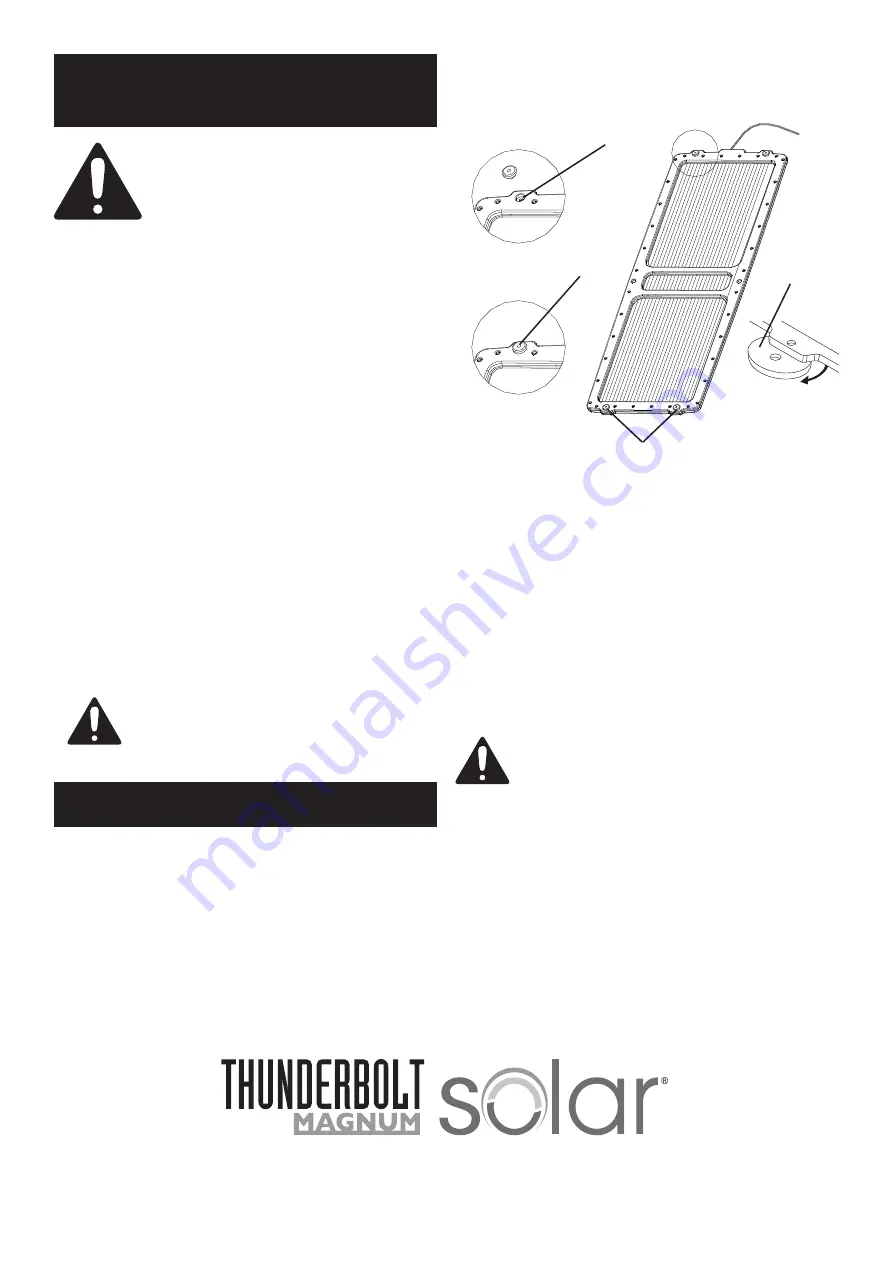
3. To mount Solar Panel’s frame, insert the Mounting
Brackets into the mounting holes along the Panel’s
frame. See Figure 1, below.
4. Make sure to rotate the Mounting Units
outward so that the units’ surface mounting
holes are visible. See Figure 1 above.
5.
WARNING!
Do NOT drill through the Solar Panel’s
frame. You may damage the frame or break the glass.
6. Once all four Mounting Units are securely in place,
mount the Solar Panel to an appropriate mounting
area using screws and nuts (not included) through
the Mounting Units.
WARNING!
Verify mounting area is free of
hidden wires or utility lines before installing.
Procedures not specifically explained in
this manual must be performed by a
qualified technician.
Clean and inspect Solar Panel
MONTHLY
, or
more frequently to maintain peak efficiency.
7. Inspect general condition of Mounting Frame. Check
for loose hardware, damage or weathering, cracked
or broken parts, loose or corroded contacts, and any
other condition that may affect its safe operation.
8. If you notice any damage, remove Solar Panel from
Mounting Frame and replace Frame immediately.
Do not mount Solar Panel until Frame is replaced.
3491 Mission Oaks Blvd. • PO Box 6009 • Camarillo, CA 93011 • (800) 444-3353
Mounting Holes
Mounting Holes
Mounting Unit
Figure 1
Facing
Outward


