5. USE
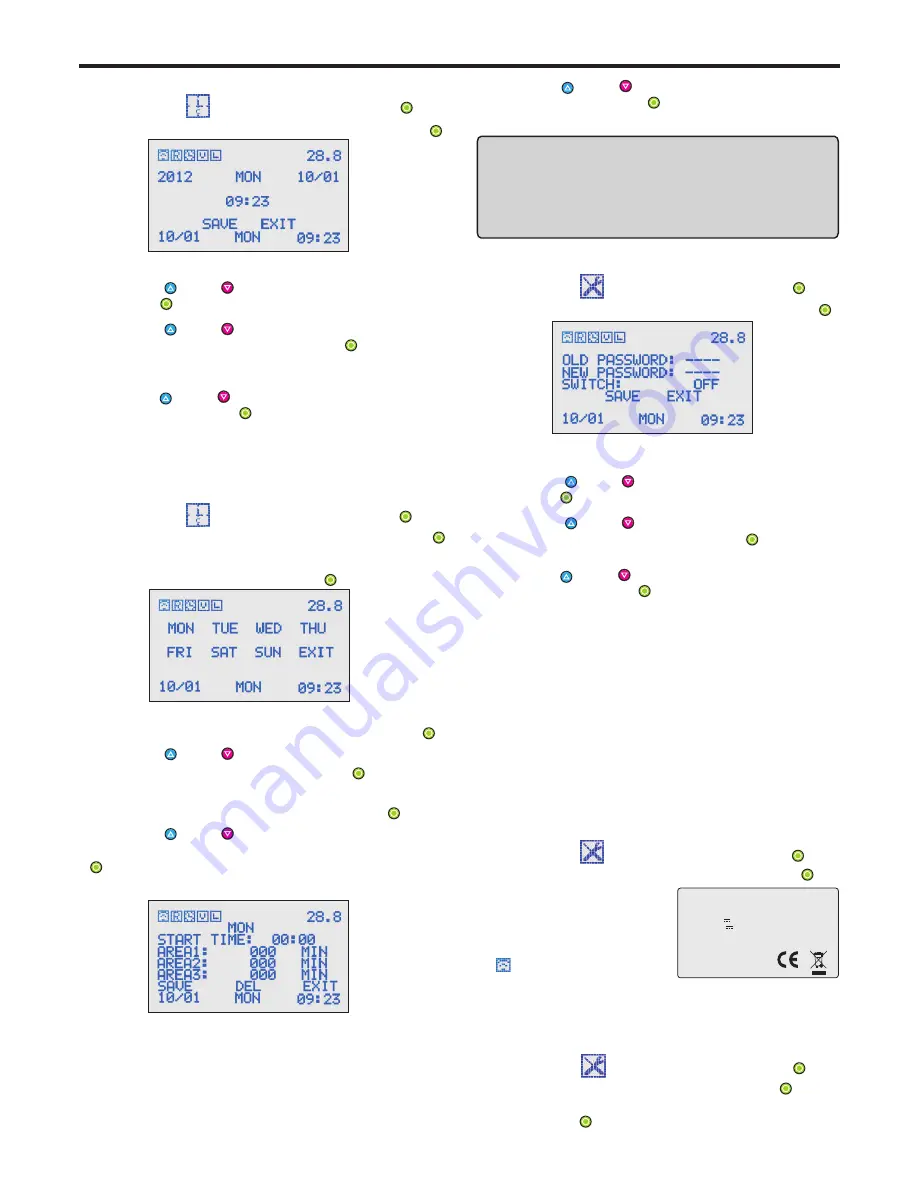
5.5 System time setting
1. Select
TIME
and enter it by pressing key .
- Press key or key to scroll to Year setting.
press key to enter Year setting.
2. Select
SYSTEM TIME
and enter it by pressing key .
3. To set Year.
4. Set Week, Month/Date, Hour/Minute as Step 3.
- Press key or key to scroll to the correct Year.
and confirm the setting by pressing key .
5. Press key or key to scroll to SAVE and save the
setting by pressing key .
5.6 Schedule time setting
1. Select
TIME
and enter it by pressing key .
- Press key or key to set Hour/ Minute.
2. Select
SCHEDULE TIME
and enter it by pressing key .
4. To set START TIME.
and confirm the settings by pressing key .
Explanation:
- If Set AREA 1 with 000 minute, it means Non-cutting in
3. Select
WEEK (
MON,TUE,WED,THU,FRI,SAT,
SUN)
and enter it by pressing key .
- Select
START TIME
and enter it by pressing key .
- Press key or key to set how long should the robot
5. To set working time in each area.
and confirm the settings by pressing key
- Select
AREA 1
and enter it by pressing key .
The schedule time setting should be used together
with AREA function.
P14-5.11 AREA setting.
works in AREA 1,
.10minutes for each scrolling.(From 000 to 250minutes).
6. Set
AREA 2
and
AREA 3
as Step5.
7. Press key or key to scroll to SAVE and save the .
settings by pressing key .
AREA 1.
- If user doesn’t select working in AREA 2. (See
P14-
). Even user has set a working
5.11AREA SETTING
time in AREA 3, robot will not work in AREA 3.
8. Select
DEL
to delete the settings.
IMPORTANT INFORMATION
By using
SCHEDULE
function, the
LINE
must be turn
on or the robot must be put onto virtual wire. Otherwise,
the robot don’t works under schedule time setting.
5.7 Password setting
1. Select
SET
and enter it by pressing key .
- Press key or key to scroll to OLD PASSWORD
press key to enter it.
2. Select
PASSWORD
and enter it by pressing key .
4. To input OLD PASSWORD.
- Press key or key to scroll to the correct password.
and confirm the setting by pressing key .
6. Press key or key to scroll to SAVE and save the
setting by pressing key .
3. Initial password: 0000
5. To set NEW PASSWORD as Step 4.
Password function is optional.
SWITCH ON: every time the robot starts,
user has to input correct password.
SWITCH OFF: user does not need to enter password
when starts the mower.
5.8 Address setting
2. Select
SET
and enter it by pressing key .
3. Select
ADDRESS
and enter it by pressing key .
The robot communicates with charging station.
There is an
ADDRESS
between robot and charging
station. User has to set the address before using it.
Otherwise the robot can not start working.
A label
with
Address Code pasted on charging station.
To set the address:
4. Input the Address Code
Address:XX
Product name: Robot lawn mower
Model: S510 IP55
Input: 29.4 V 2A
Ouput 29.4
2A
:
V
Made in China
R
O
HS
Zhejiang Tianchen Intelligence & Technology Co., Ltd
as the label pasted at the
back of charging station.
- 13 -
5.9 Initial setting
Restore to factory settings.
1. Select
SET
and enter it by pressing key .
2. Select
INITIAL
and enter it by pressing key .
3. Select
YES / NO
and confirm the selection by
key .
pressing
1. Put the mower near the charging station.
5. Re-start the mower to find
from display, then the
address setting is finished.


