background image

Note: The Ethernet port of the DS100/EM100SK is of 10BaseT type, not 100BaseT. You can use the 

DS100/EM100SK on “10” or “Auto 10/100” LANs, but not on “100” LANs. 

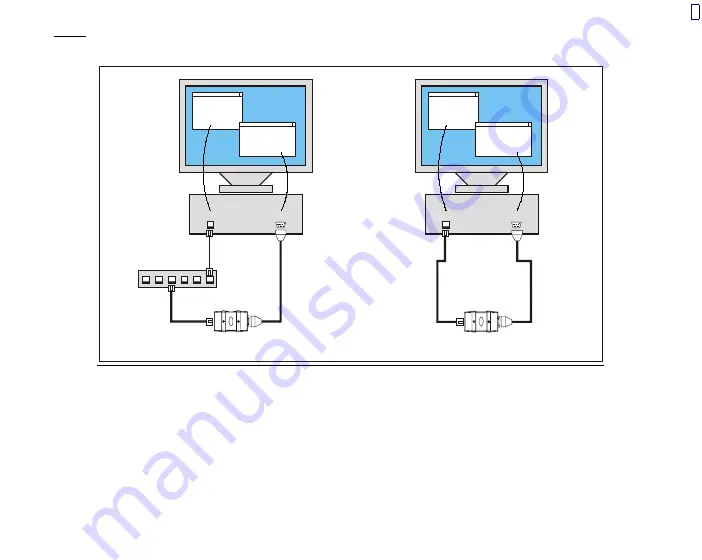
WinSock

Demo

Hyper

Terminal

COM

LAN

WinSock

Demo

Hyper

Terminal

COM

LAN

Test PC

Connecting via Hub

Connecting directly

Test PC

Hub

WAS-1455

WAS-1455

WAS-1499

WAS-1498

DS100

DS100


Fig. 1. Test arrangement 

2.2. Choosing 

an 

IP-address 

Each DS100/EM100 you use must be assigned a network-unique IP-address. Most LANs have 

restrictions on the range of permitted IP-addresses, so you cannot just use any random address. One 
reliable way to obtain a “good” IP-address is to ask your IT guy 

. If there is no such person in your building 

then you can follow this (many times proven) method: 

Summary of Contents for DS100

Page 1: ...VB Tutorial Tibbo TECHNOLOGY Using Visual Basic VB to communicate with the DS100 and EM100 Please register at www tibbo com to receive update notifications Version 2 0a Tibbo Technology Inc 2001 2002 ...

Page 2: ... address 5 2 3 Installing the HyperTerminal 7 2 4 Setting up the HyperTerminal 8 2 5 Setting up the DS100 EM100SK 9 2 6 Testing the LAN link 10 3 Creating the WinSock Demo 12 3 1 WinSock Demo action plan 12 3 2 Step 1 creating a simple UDP IP Demo 12 3 3 Step 2 learning to control the DS100 EM100 over the network 15 3 4 Step 3 TCP IP communications 18 ...

Page 3: ...lete fully functional programs but rather a templates that show you the basic steps of building your own applications with the WinSock Complete VB projects for each WinSock Demo packed into a ZIP archives and named WinSock Demo Step1 WinSock Demo Step2 and WinSock Demo Step3 can be downloaded from www tibbo com downloads htm 1 2 Required tools DS100 Serial Device Server or EM100SK Starter Kit WAS ...

Page 4: ... LAN or directly to your PC using the WAS 1499 or WAS 1498 cable see below for more information Power the DS100 EM100SK up using the power adaptor There are two ways to connect the Ethernet side of the DS100 EM100SK to the PC Via LAN If you have a LAN installed in your office and your PC is already connected to this LAN then you will need a spare cable coming out of the network hub to connect the ...

Page 5: ...ing directly Test PC Hub WAS 1455 WAS 1455 WAS 1499 WAS 1498 DS100 DS100 Fig 1 Test arrangement 2 2 Choosing an IP address Each DS100 EM100 you use must be assigned a network unique IP address Most LANs have restrictions on the range of permitted IP addresses so you cannot just use any random address One reliable way to obtain a good IP address is to ask your IT guy If there is no such person in y...

Page 6: ...ing the address for the DS100 EM100SK that differs slightly from your PC s IP address in the last digit produces a workable result That is if your PC s address is 192 168 100 39 then choosing 192 168 100 40 for your DS100 EM100 will most probably work fine Using WINIPCFG to find out the IP address of your PC Fig 2 WINIPCFG window Choose Run from the Start menu of Windows the Run dialog will open T...

Page 7: ...serial communications software called HyperTerminal This program is also used here to setup the DS100 EM100SK Actually there is a setup software called DS Manager part of Tibbo Device Server Toolkit available for download from www tibbo com downloads htm that can be used to setup the DS100 EM100SK However we are deliberately choosing to make you type all the setup commands manually This way you wi...

Page 8: ...ect to dialog opens select an appropriate COM port from the Connect Using drop down box for example Direct to COM1 When the COM Properties dialog appears set communications parameters as follows Bits per second 38400 Data bits 8 Parity None Stop bits 1 Flow control None Click OK when done the HyperTerminal s main window will appear Choose File Properties from the Main menu the Properties dialog wi...

Page 9: ...re version string V A V2 20 Input all other commands is a similar way start every command with a Ctrl B and finish it off by pressing Enter Note that you cannot correct input errors by pressing Backspace etc If you ve made a mistake you have to start the whole command over again press Ctrl B etc 2 5 Setting up the DS100 EM100SK To make sure that all the Settings of the DS100 EM100SK are correct yo...

Page 10: ...k Use PING program to check this Choose Run from the Start menu of Windows the Run dialog will open Type ping 192 168 100 40 into the Open textbox and press OK The ping program will send four messages to the DS100 EM100SK If there is no reply from the DS100 EM100SK then the program output will look like this Pinging 192 168 100 40 with 32 bytes of data Request timed out Request timed out Request t...

Page 11: ...e not important The only important point is that the DS100 EM100SK does indeed reply to your PC s pinging Obtaining a good ping from the DS100 EM100SK is a required step in setting up your test network Nothing will work as expected unless your PC can find the DS100 EM100SK by pinging it ...

Page 12: ... the end of the Tutorial You can follow our instructions step by step or you can download a completed project for each of the steps from www tibbo com downloads htm The projects are archived zip and named WinSock Demo Step1 WinSock Demo Step2 and WinSock Demo Step3 Important you may need to change the RemoteHost property of the WinSock control in each project to the actual IP address you ve set fo...

Page 13: ...r the Demo step 1 o CmdSend CommandButton change its Caption property to Send o TxtSend TextBox change its Text property to i e empty string o LblRcv Label change its Caption property to Receive o TxtRcv TextBox change its Text property to i e empty string and set its MultiLine property to True Make this TextBox span several lines as shown on Fig 3 o CmdClear CommandButton change its Caption prope...

Page 14: ...SendData TxtSend Text End Sub o For the DataArrival event of the WinSock control Private Sub WinSock_DataArrival ByVal bytesTotal As Long WinSock GetData s TxtRcv Text TxtRcv Text s End Sub o For the Click event of the CmdClear button Private Sub CmdClear_Click TxtRcv Text End Sub That s it The Project is done Save it and proceed to testing Run the Demo you have created run the HyperTerminal and c...

Page 15: ...box of your Demo Congratulations Step 1 successfully completed 3 3 Step 2 learning to control the DS100 EM100 over the network The DS100 EM100 can be programmed setup over the network see Section 4 3 of the DS100 Tech Manual Programming commands are sent as UDP datagrams one datagram per command to the DS100 EM100 s Command Port whose number is fixed at 65535 Most of the commands are the same as t...

Page 16: ... the TCP IP transport protocol send this command STP1 Again the DS100 EM100 will respond with A End the Network Setup Session by sending E The DS100 EM100SK will not respond to this command but simply reboot The DS100 EM100SK is now using TCP IP One last thing that remains to be demonstrated is the use of broadcast commands Broadcast commands are sent using Ethernet broadcast packets These packets...

Page 17: ... will get a reply from each device For example A0 2 3 4 12 250 1001 A 0 2 3 4 23 126 1000 A 1 2 3 4 23 127 1001 Each reply contains the Ethernet MAC address of the DS100 EM100 and its current Data Port number The Ethernet address is important because it is unique for every DS100 EM100 and in fact for every other Ethernet device connected to your network You can use the Ethernet address to referenc...

Page 18: ...dvantages over the UDP IP Naturally this also implies a somewhat more complicated programming Fig 4 Controls for the Demo step 3 Stop the Demo If you have assigned a new IP address to the DS100 EM100 in the previous section then change the RemoteHost property of the WinSock control accordingly Change the RemotePort property of the WinSock back to 1001 ...

Page 19: ...0 times second Add the code below to the Timer event of Timer1 This code does three things 1 It periodically updates the status of the TCP IP connection 2 Dynamically changes the Caption of the CmdConnect button when the connection is closed WinSock State 0 the Caption reads Connect when the connection is not closed the Caption reads Disconnect This way the button can be used as a toggle switch 3 ...

Page 20: ...nect End If enable or disable the Send button If WinSock State 7 Then CmdSend Enabled True Else CmdSend Enabled False End If End Sub Add the code below to the Click event of the CmdConnect button This code selects open the connection when it is closed and to close the connection when it is not closed Private Sub CmdConnect_Click If WinSock State 0 Then WinSock Connect Else WinSock Close End If End...

Page 21: ...al data exchange Private Sub WinSock_DataArrival ByVal bytesTotal As Long WinSock GetData s TxtRcv Text TxtRcv Text s Chr 13 Chr 10 Comment out End Sub Now you can test your TCP IP Demo Run the Demo The Status of the TCP IP connection will be Closed The Send button will not be active Click Connect button The Status will change to Connecting then to Connected If the program cannot connect to the DS...

Reviews: