Installing the TE3000
11
Clock Interface Configuration 3
If the DTE cannot turn around the ST, and
does not have an internal clock source that can be provided as TT to the TE3000,
configure the TE3000 to use the ST to latch the data. However, this scenario is not
recommended and should be considered only if neither of the other two clock
source configurations can be used.
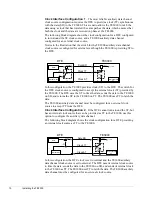
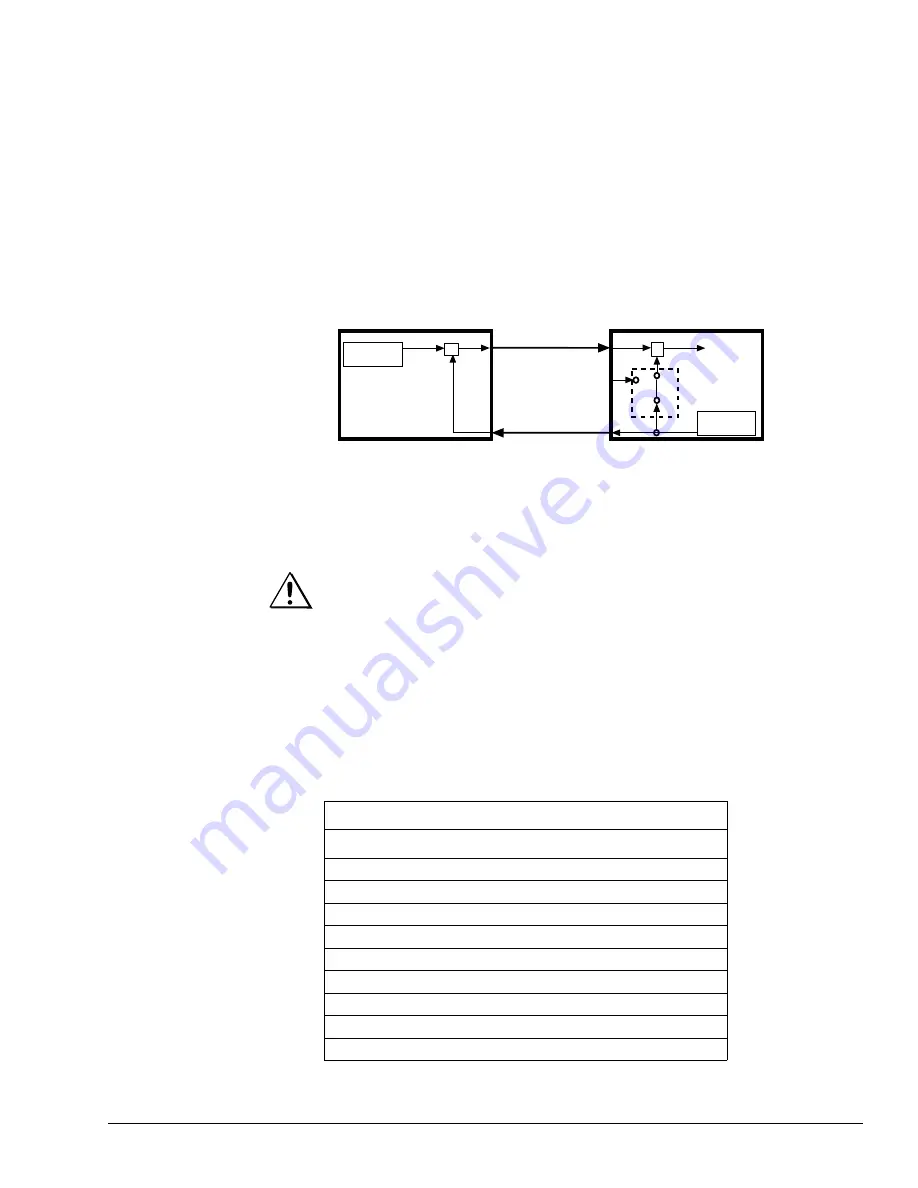
The following block diagram shows the clock configuration for a DTE configured
for an external clock and a TE3000 auxiliary data channel configured for an
internal clock.
In this scenario, both the DTE and the TE3000 use ST, but the ST is provided to
the DTE on one path and to the TE3000 on a different path. Depending upon the
length of cable between the DTE and the TE3000, the clock may be received out
of phase at the TE3000. The longer the cable, the further out of phase the clock
will be.
If the internal clock is used to latch the data, the length of cable between the DTE
and the TE3000 must be limited to one meter (3 feet). Additionally, the auxiliary
data rate must be limited to not more than 64 kbps. If the cable length exceeds one
meter, or if you attempt to process data at rates above 64 kbps, the auxiliary data
may be corrupted.
Asynchronous Configuration
In asynchronous configurations, ports can be configured to accept RS-232 or
RS-422 input at rates of 1200 bps to 38400 bps.
RS-232
The DB-9 connector allows a standard RS-232 DCE connection. The
auxiliary Data A and Data B asynchronous port pin assignments for RS-232 are
listed in the following table.
Aux Data Port Pin Assignments: Asynchronous – RS-232
Pins
Signal
Direction
Definition
1
Unused
—
—
2
Unused
—
—
3
TD
In
Transmit Data
4
Unused
—
—
5
GND
—
Ground
6
Unused
—
—
7
RTS
In
Ready to Send
8
CTS
Out
Clear to Send
9
Unused
—
—
DTE
Data SD
Clock ST
ST
Data
Timing Data
TE3000
Internal Clock
ST
TT
ST
SD
Latching Data
To TTM
Ext
Source
Int
Source
Switch
CAUTION!
Please Read
Carefully
Summary of Contents for TE3000
Page 10: ...viii Preface ...
Page 14: ...4 TE3000 Overview ...
Page 52: ...42 Using the Front Panel ...
Page 94: ...84 Maintenance and Software Upgrades ...
Page 96: ...86 Technical Specifications ...
Page 102: ...92 TE3000 PID Assignments ...
Page 112: ...102 Glossary ...

