background image

23

22

23

22

English

Reheating Cooked Rice

For piping hot rice, reheat the rice that is being kept 

warm before serving it.

Note


Rice will not be fully heated if more than half of 

the inner pot is full.


The rice will end up being dry if reheated under 

any of the following conditions.

•  The rice is still hot, such as immediately after 

cooking.

•  There is less than the minimum required 

amount of rice (1 cup with the 1.0 L type, 2 

cups with the 1.8 L type).

•  The rice is reheated 3 times or more.

Stir and loosen the rice that was 

being kept warm.

Add 1 to 2 tablespoons of water 

evenly over the rice.


Adding water will prevent the rice from drying out 

and result in plumper rice.

Make sure that the Keep Warm 

lamp is on.

On

• Reheating is not available if the Keep Warm 

lamp is not on. If the lamp is not on, press 

the [Keep Warm] key. (See p.21.)
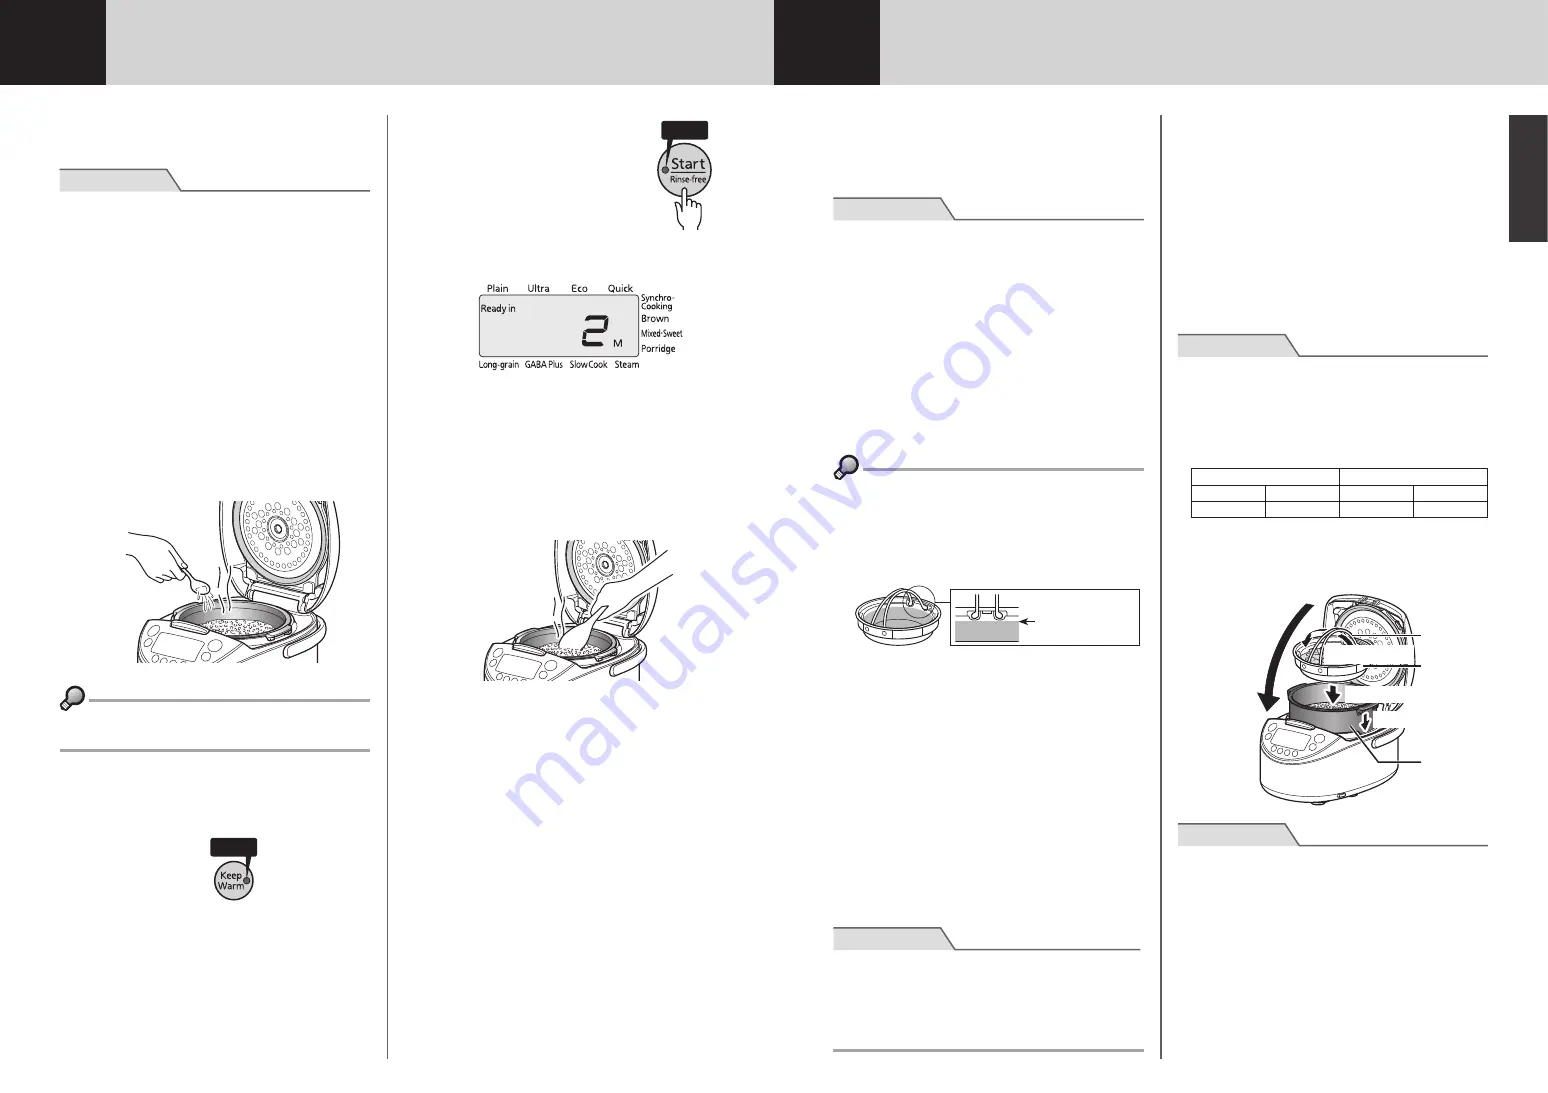
Press the [Start/Rinse-

free] key.

The Start lamp will blink and 

reheating will start.

The remaining time will be 

displayed and an alarm (3 long 

beeps) will sound when the 

operation is completed.

• To stop reheating, press the [Cancel] key.

• Reheating is not available if the rice is too 

cold (55˚C or lower as a guideline). In this 

case, a repeated beeping alarm will sound.

Stir and loosen the reheated 

rice well, and even it out in the 

inner pot.

Blinks

You can use the cooking plate to cook side dishes 

described in the supplied “COOKBOOK” at the same 

time as you cook rice. You can also add water to the 

inner pot and cook side dishes without making rice.

Refer to the supplied “COOKBOOK” for directions.

Note


Do not cook with a greater volume of ingredients 

than that indicated in the supplied “COOKBOOK”.

Doing so may cause the contents to boil over or 

result in improperly cooked food.


Be careful of the following points when using the 

cooking plate.

•  When cooking dishes with a strong odor, the 

odor may adhere to the cooking plate.

•  When cooking ingredients with a strong color, 

that color may be transferred to the cooking 

plate through the broth, etc.

•  Do not use sharp instruments like kitchen knives, 

table knives, or forks inside the cooking plate.

Precautions for ingredients to be placed in the 

cooking plate


● Do not fill up the cooking plate with ingredients.


Spread or make spaces between ingredients so 

that steam is applied evenly (fill up to the position 

shown below).

Fill ingredients up 

to under the base of 

the carrying handle.


Do not allow the center hole of the inner lid to be 

blocked with ingredients.


Only use a small amount of liquid such as water or 

sauce (it takes time to heat a large amount of liquid).


If milk or fresh cream is separated during use, stir it well.


Only use a small amount of leavening ingredients 

such as pancake mix (about 1/3 of the cooking 

plate). Be careful about the number of eggs 

because they increase in volume (2-3 eggs 

(medium size) for 1.0L(5.5 cup) type, 3-4 eggs 

(medium size) for 1.8L(10 cup) type can be 

added. Adjustment may be necessary when you 

add other ingredients.).


Cut the root vegetables in thin slices as it takes a 

long time to cook them.


Using the cooking plate, only steaming is possible.

Note


● If heating is not sufficient while cooking by 

following the above suggestions, transfer the 

ingredients to another container, and reheat them 

using a device such as a microwave (do not put 

the inner pot and cooking plate in the microwave).

Prepare the ingredients and 

place them in the cooking plate.

Stacking ingredients on top of each other 

may result in the contents boiling over or in 

improperly cooked food. Spread ingredients 

over the whole of the cooking plate.

Make the necessary 

preparations for cooking rice. 

(See p.14.)

Note


Refer to the following table for the acceptable 

amounts of rice that can be cooked concurrently 

with food. Do not cook more than the acceptable 

maximum or less than the minimum required 

amounts. Doing so may cause the contents to boil 

over or result in improperly cooked food.

1.0 L type

1.8 L type

Maximum

Minimum

Maximum

Minimum

2 cups

1 cup

4 cups

2 cups

Place the cooking plate inside 

the inner pot and close the lid.

Inner pot

Cooking 

plate

Carrying 

handle

(1) Set properly

(2) Set the cooking plate

(3) Tilt outward

(4) Close 

the lid

Note


Always place the cooking plate inside the inner 

pot.


Make sure that the cooking plate is level (not set 

at an angle).


Tilt the carrying handle of the cooking plate 

outward before closing the lid.

Cooking Rice and Side Dishes Together 

(“Synchro-Cooking” Menu)

Summary of Contents for JKT-S10A

Page 1: ...S10A JKT S18A IH IH Rice Cooker OPERATING INSTRUCTIONS Thank you for purchasing this TIGER rice cooker warmer Please read these instructions carefully before use and observe them during use For house...

Page 2: ...ly in removable container SAVE THESE INSTRUCTIONS Servicing should be performed by an authorized service representative This appliance is intended for household use 1 A short power cord or detachable...

Page 3: ...m 21 8 Reheating Cooked Rice 22 9 Cooking Rice and Side Dishes Together Synchro Cooking Menu 23 10 Slow Cooking Slow Cook Menu 26 11 Steaming Food Steam Menu 28 12 Cleaning and Maintenance 31 13 If Ri...

Page 4: ...e unit with wet hands Do not plug in or unplug with wet hands This is to avoid electric shock or injury Warning General safety precautions Disassembly is prohibited Do not attempt to disassemble repai...

Page 5: ...a small space where the operation panel is exposed to steam Steam and heat may result in deformation of the operation panel and or damage discoloration deformation and or malfunction of the rice cook...

Page 6: ...s to keep the fluorocarbon resin coating from scratching or peeling Do not place the inner pot directly over gas electric or IH stove top Do not place in the microwave or oven Use the Keep Warm functi...

Page 7: ...thium battery yourself To replace the battery contact the place of purchase Menu options and features Menu Rinse free rice function availability Timer function availability Keep Warm function availabi...

Page 8: ...ss water than the recommended amount do not deviate from that amount by any more than 1 3 of one line Amount of water to add Type of rice Corresponding scale Use the corresponding scale on the inner p...

Page 9: ...he guidelines on p 12 When cooking 3 cups of white rice adjust the water level to line 3 on the Plain scale 4 Wipe off any water and rice etc Outer surface and brim of the inner pot Inside the rice co...

Page 10: ...r menus only a one beep alarm will sound On When cooking rinse free rice Rinse free appears on the display When you selected the Plain menu a one short one long another one short beep alarm will sound...

Page 11: ...31 to 36 6 Setting the Timer When cooking rinse free rice press the key twice 1 2 3 5 6 4 Using the Timer function Timer 1 Timer 2 You can preset the time that you want cooking to be actually complete...

Page 12: ...ou make a mistake or otherwise want to reset the timer press the Cancel key and repeat the procedure from step 2 on p 19 7 Keeping the Rice Warm The Keep Warm function will especially maintain the shi...

Page 13: ...ents to be placed in the cooking plate Do not fill up the cooking plate with ingredients Spread or make spaces between ingredients so that steam is applied evenly fill up to the position shown below F...

Page 14: ...tilt the cooking plate while removing it The broth etc may spill out and result in burns Do not return the cooking plate to the inner pot after removing it Doing so may result in the rice spoiling or...

Page 15: ...e set time will increase by 5 minutes Each time the Min key is pressed that time will decrease by 5 minutes The cooking time can be set to any 5 minute increment between 5 and 180 minutes Blinks 6 Pre...

Page 16: ...ng is completed an alarm 8 beeps will sound the Start lamp will turn off The Keep Warm lamp will turn on and 0h will be displayed On To steam the food further use the Hour and Min keys to set the addi...

Page 17: ...on top of dishes etc to dry Doing so may damage the fluorocarbon resin coating or cause it to peel Guidelines for steaming times Ingredients Amount Approx time Hints for steaming Chicken 1 fillet 200...

Page 18: ...grains of rice etc Note Do not allow water to get inside the rice cooker unit Do not immerse the power cord in or splash it with water Doing so may result in short circuiting or electric shock Power c...

Page 19: ...ching the steam cap Removing the steam cap 1 Insert your finger into the hole in the lid and lift the steam cap upward Steam cap Note Be careful of the hot steam contained in the steam cap immediately...

Page 20: ...oked rice or with the operation of the rice cooker etc Check point Problem Was the amount of rice ingredients and water or the ratio of multi grain rice correct Was more than the maximum acceptable am...

Page 21: ...correct Are there any grains of burned rice on the outside bottom of the inner pot or the center sensor Was the rice stirred and loosened well Are there any grains of rice adhering to gaskets the brim...

Page 22: ...press the Start Rinse free key The rice is cold Rice of below approximately 55 C cannot be reheated 22 Is the Keep Warm lamp off Press the Keep Warm key and check that the Keep Warm lamp lights up Th...

Page 23: ...ay Action Reference page Err appears on the display and a long lasting or continuous beeping alarm sounds If the rice cooker is placed on the carpet or where the room temperature is high the air inlet...

Page 24: ...cm Width 26 0 28 8 Depth 35 4 38 6 Height 21 3 25 0 Weight kg 4 5 5 7 Note One cup of white rice is about 150 g In case of a power outage If a power outage does occur the rice cooker will resume its n...

Page 25: ...45 1 46 2 50 52 53 3 55 4 57 58 5 59 6 60 7 62 8 63 9 Synchro Cooking 64 10 Slow Cook 66 11 Steam 68 12 71 13 76 14 Synchro Cooking 78 15 Slow Cook 79 16 80 81 82 83 83 83...

Page 26: ...47 46 30cm 30cm COOKBOOK 7A 1 2 3 1 2 3 1...

Page 27: ...49 48 IH IH...

Page 28: ...51 50 Hour Min Menu Cancel Keep Warm Timer Start Rinse free Start Rinse free Cancel COOKBOOK 0 18L 150g IH 24 P 82 4 5 0 00 Note P 73 2 P 74 75...

Page 29: ...a Eco Eco Sweet Sweet Sweet Plain Sweet Brown GABA Plus Brown Porridge Porridge hard Porridge soft Long grain Long grain Plain Ultra COOKBOOK Plain Brown Plain 1 2 Mixed Sweet Plain Ultra Plain 2 Eco...

Page 30: ...55 55 54 1 0 18L Note P 83 P 53 2 P 53 Note 35 3 P 53 3 Plain 3 4 P 72 3 Plain Ultra 2 1 0L 5 5 1 8L 10 Brown 1 0L 3 5 1 8L 6 Long grain Mixed Sweet...

Page 31: ...a 2 Porridge Hour Min Hour 5 Min 5 40 90 5 5 5 60 3 Start Rinse free 1 2 Plain Ultra Eco Quick Synchro Cooking Mixed Sweet Porridge 20 Start Rinse free Plain Plain Rinse free Plain Plain 5 1 2 1 2 6 N...

Page 32: ...el 2 3 P 71 75 P 53 54 Plain Ultra Eco Quick Synchro Cooking 1 0L 5 5 43 53 65 75 41 51 17 34 41 51 1 8L 10 46 56 65 75 41 52 21 38 46 56 Brown Mixed Sweet Long grain GABA Plus 1 0L 5 5 64 75 35 60 19...

Page 33: ...1 2 Timer 30 Timer Start Rinse free 5 Hour Min Hour 1 Min 10 Note 12 6 Start Rinse free 1 2 Plain Ultra Eco Porridge Plain Plain Rinse free Plain Plain Cancel P 60 2 6 2 1 2 3 5 6 4 1 2 Timer1 Timer2...

Page 34: ...63 62 63 62 8 Note 1 0L 1 1 8L 2 3 1 2 1 2 3 Keep Warm P 62 4 Start Rinse free 3 Cancel 55 5 7 Cancel Keep Warm Hour 24 24h 1 24 24 h Note 24 1 0L 5 5 1 1 8L 10 2 Porridge...

Page 35: ...g 6 Start Rinse free 2 7 8 8 Note Steam P 68 70 Note Plain 1 0L 5 5 2 1 8L 10 1 20 30 1 Cancel 2 3 P 71 75 COOKBOOK COOKBOOK Note COOKBOOK 1 3 1 0L 5 5 2 3 1 8L 10 3 4 Note 1 2 P 55 Note 1 0L 1 8L 2 1...

Page 36: ...rt Rinse free 30 3 Note Cancel 1 2 10 3 4 P 66 4 Start Rinse free 3 1 Cancel 2 P 75 Note Cancel 1 1 1h 6 6h 6 6 6 10 Slow Cook COOKBOOK 93 88 COOKBOOK Note COOKBOOK 1 2 Note Plain Plain 1 0L 1 8L 5 5...

Page 37: ...Min Start Rinse free 15 3 Note Cancel 1 2 10 3 4 P 68 4 8 1 Cancel 2 3 P 71 75 11 Steam 1 1 0L 5 5 3 1 2 630mL 1 8L 10 4 1 2 810mL Note 2 3 Note Cancel 4 Steam 5 Hour Min Hour 5 Min 5 5 60 5 6 Start R...

Page 38: ...0 70 12 P 71 75 P 75 Note 1 2 Note 2 P 74 75 1 2 Note 1 200 300g 20 30 2 3 150 200g 20 25 2cm 6 10 100 200g 15 20 1 2 200 300g 30 40 2 3 250 300g 30 40 1 200 300g 30 40 8 15 20 25 1 0L 5 5 3cm 1 8L 10...

Page 39: ...73 72 1 2 Note 1 2 Note 320 Note Note...

Page 40: ...75 74 75 74 Note Note 1 7 8 Plain Start Rinse free Cancel Note 20g 2 3 1 1 Note 2 2 1 3 1 2 3...

Page 41: ...77 76 12 24 53 55 83 55 71 75 59 55 71 75 53 55 63 61 62 83 62 62 63 62 62 71 75 63 67 75 13 Start Rinse free 53 55 83 53 83 57 61 59 55 71 75 59 83 35 55 71 75 53 55 55 56 71 75 53 71 75...

Page 42: ...79 78 14 Synchro Cooking COOKBOOK Synchro Cooking COOKBOOK 64 64 64 65 64 83 15 Slow Cook 66 66 55 71 75 55 71 75 83...

Page 43: ...2 76 82 0 00 Quick Synchro Cooking Mixed Sweet Steam Slow Cook 61 55 71 75 Start Rinse free 55 63 Keep Warm Start Rinse free 61 51 IH Start Rinse free Keep Warm 56 Timer 30 61 Hour Min 82 Hour 24 24 6...

Page 44: ...ing 0 18 0 36 1 2 0 36 0 72 2 4 Brown 0 18 0 63 1 3 5 0 36 1 08 2 6 Mixed 0 18 0 72 1 4 0 36 1 08 2 6 Sweet 0 18 0 54 1 3 0 36 0 9 2 5 Porridge hard 0 09 0 18 0 5 1 0 09 0 36 0 5 2 soft 0 09 0 5 0 09...

Page 45: ...TIGER CORPORATION Head Office 3 1 Hayamicho Kadoma City Osaka 571 8571 Japan...

Reviews: