background image

33

32

English

Steam cap 

(Can be disassembled 

into two parts. See 

p.35 to 36.)

Lid

These parts can be washed under running water.

Clean with a sponge using tap or lukewarm water.

Wipe off water with a dry cloth and completely dry 

all parts.

Note


Do not wash parts in the following manners as they can 

cause those parts to become deformed.

•  Washing with hot water

•  Soaking

•  Washing the hot inner pot with running water immediately 

after cooking rice


Always wash the steam cap after cooking with grains 

(amaranths, etc.). The steam cap may clog and cause 

problems, like preventing the lid from opening, resulting in 

improperly cooked food.


„

Parts to wash when dirty

Hook 

button

Upper 

casing

Heating 

plate

Power cord

Power plug

Center 

sensor

Inside and outside the rice cooker

Wet a towel or cloth, wring out excess water, and wipe.

Center sensor

Remove burned rice and any other adhering grains of rice.

If adhering objects are hard to remove, use commercially 

available sandpaper (around #320), then wet a towel or cloth, 

wring out excess water, and wipe.

Around the upper casing and hook button

Remove any adhering grains of rice, etc.

Note


Do not allow water to get inside the rice cooker unit.


Do not immerse the power cord in or splash it with water. 

Doing so may result in short-circuiting or electric shock.

Power cord and plug

Wipe with a dry cloth.

Note


Always keep the inner pot and lid clean to prevent corrosion and odors.


Do not clean the rice cooker or its parts with thinner, cleanser, bleach, disposable cloth, metal spatulas, 

nylon scouring sponges or the like.


Always clean each part separately.


Do not immerse the steam cap, measuring cup, spatula or ladle in hot water. Doing so may cause them to 

become deformed.


Do not use a dishwasher/dryer to clean the rice cooker or its parts. Doing so may cause them to become 

deformed.


When cleaning the rice cooker with a detergent, do not use alkaline kitchen detergent.

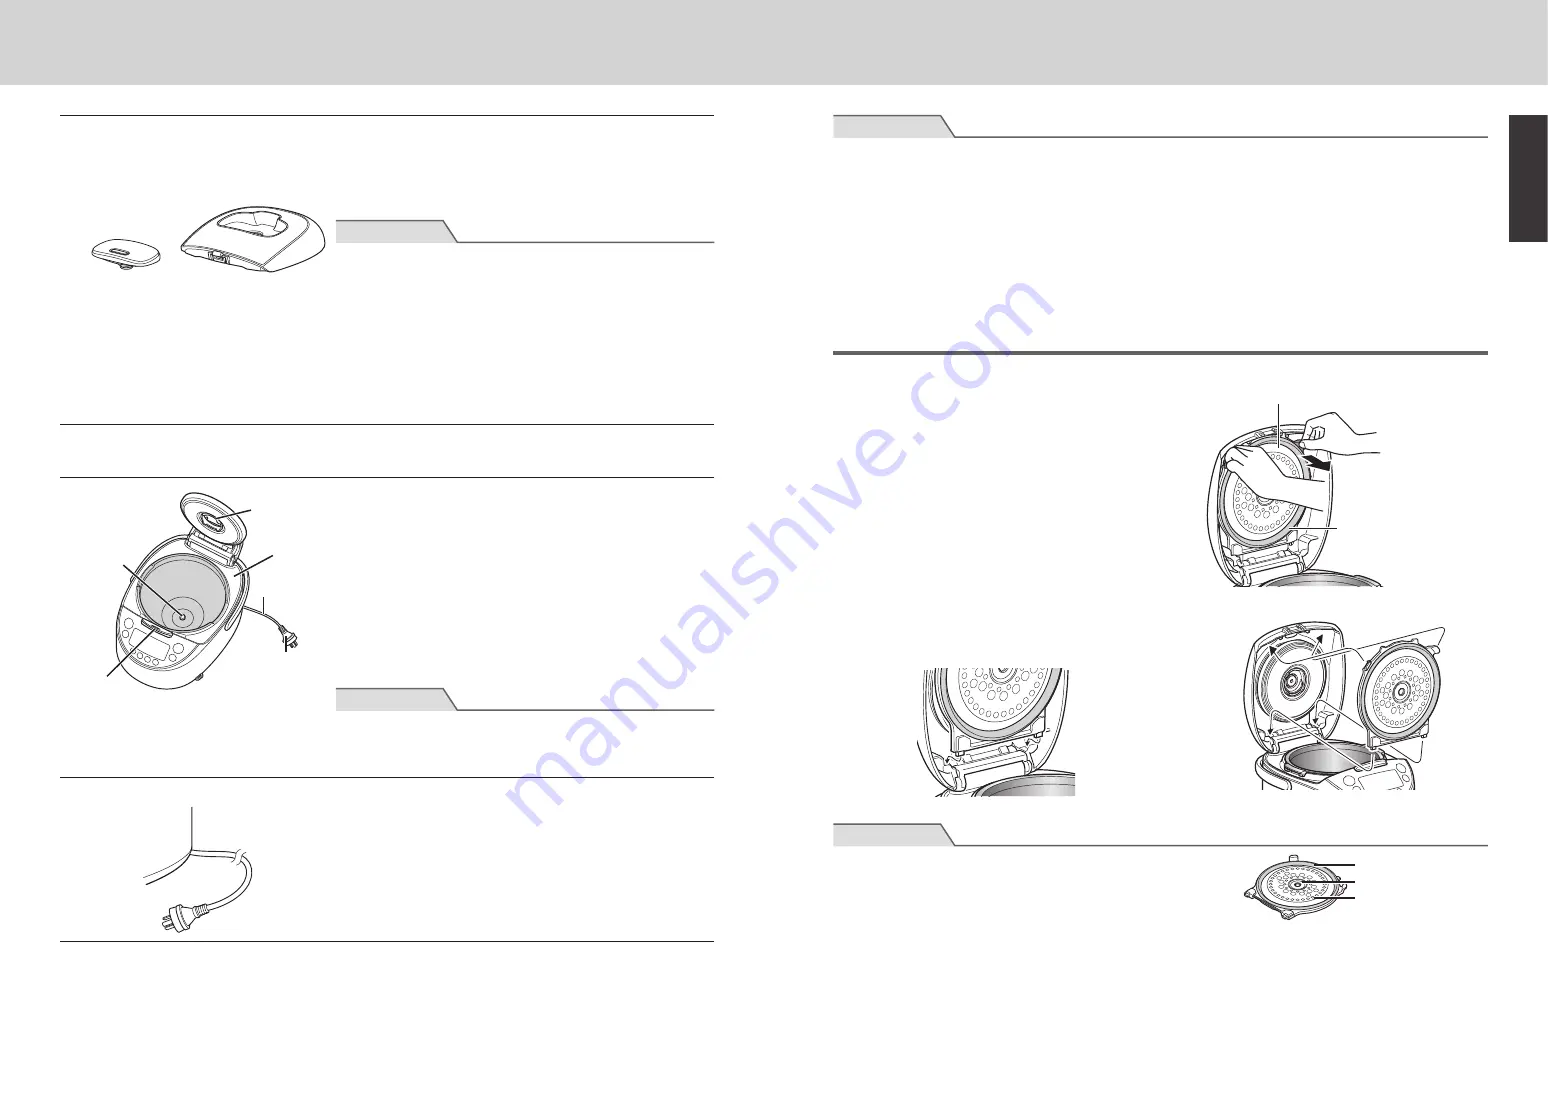
Removing and attaching the inner lid


„

Removing the inner lid

Push down and pull the inner lid levers to the front to 

detach.

Inner lid

Do not pull the 

inner lid gasket.


„

Attaching the inner lid

Set the inner lid securely in the lid as shown in the 

figure below.

(1) Set in place

(2) Set in place

Note


Do not pull the inner lid gasket and steam gasket.

Once there are detached, those cannot be reattached. If the 

gaskets are detached, contact the place of purchase.

Inner lid gasket

Inner lid

Steam gasket

Summary of Contents for JKT-S10A

Page 1: ...S10A JKT S18A IH IH Rice Cooker OPERATING INSTRUCTIONS Thank you for purchasing this TIGER rice cooker warmer Please read these instructions carefully before use and observe them during use For house...

Page 2: ...ly in removable container SAVE THESE INSTRUCTIONS Servicing should be performed by an authorized service representative This appliance is intended for household use 1 A short power cord or detachable...

Page 3: ...m 21 8 Reheating Cooked Rice 22 9 Cooking Rice and Side Dishes Together Synchro Cooking Menu 23 10 Slow Cooking Slow Cook Menu 26 11 Steaming Food Steam Menu 28 12 Cleaning and Maintenance 31 13 If Ri...

Page 4: ...e unit with wet hands Do not plug in or unplug with wet hands This is to avoid electric shock or injury Warning General safety precautions Disassembly is prohibited Do not attempt to disassemble repai...

Page 5: ...a small space where the operation panel is exposed to steam Steam and heat may result in deformation of the operation panel and or damage discoloration deformation and or malfunction of the rice cook...

Page 6: ...s to keep the fluorocarbon resin coating from scratching or peeling Do not place the inner pot directly over gas electric or IH stove top Do not place in the microwave or oven Use the Keep Warm functi...

Page 7: ...thium battery yourself To replace the battery contact the place of purchase Menu options and features Menu Rinse free rice function availability Timer function availability Keep Warm function availabi...

Page 8: ...ss water than the recommended amount do not deviate from that amount by any more than 1 3 of one line Amount of water to add Type of rice Corresponding scale Use the corresponding scale on the inner p...

Page 9: ...he guidelines on p 12 When cooking 3 cups of white rice adjust the water level to line 3 on the Plain scale 4 Wipe off any water and rice etc Outer surface and brim of the inner pot Inside the rice co...

Page 10: ...r menus only a one beep alarm will sound On When cooking rinse free rice Rinse free appears on the display When you selected the Plain menu a one short one long another one short beep alarm will sound...

Page 11: ...31 to 36 6 Setting the Timer When cooking rinse free rice press the key twice 1 2 3 5 6 4 Using the Timer function Timer 1 Timer 2 You can preset the time that you want cooking to be actually complete...

Page 12: ...ou make a mistake or otherwise want to reset the timer press the Cancel key and repeat the procedure from step 2 on p 19 7 Keeping the Rice Warm The Keep Warm function will especially maintain the shi...

Page 13: ...ents to be placed in the cooking plate Do not fill up the cooking plate with ingredients Spread or make spaces between ingredients so that steam is applied evenly fill up to the position shown below F...

Page 14: ...tilt the cooking plate while removing it The broth etc may spill out and result in burns Do not return the cooking plate to the inner pot after removing it Doing so may result in the rice spoiling or...

Page 15: ...e set time will increase by 5 minutes Each time the Min key is pressed that time will decrease by 5 minutes The cooking time can be set to any 5 minute increment between 5 and 180 minutes Blinks 6 Pre...

Page 16: ...ng is completed an alarm 8 beeps will sound the Start lamp will turn off The Keep Warm lamp will turn on and 0h will be displayed On To steam the food further use the Hour and Min keys to set the addi...

Page 17: ...on top of dishes etc to dry Doing so may damage the fluorocarbon resin coating or cause it to peel Guidelines for steaming times Ingredients Amount Approx time Hints for steaming Chicken 1 fillet 200...

Page 18: ...grains of rice etc Note Do not allow water to get inside the rice cooker unit Do not immerse the power cord in or splash it with water Doing so may result in short circuiting or electric shock Power c...

Page 19: ...ching the steam cap Removing the steam cap 1 Insert your finger into the hole in the lid and lift the steam cap upward Steam cap Note Be careful of the hot steam contained in the steam cap immediately...

Page 20: ...oked rice or with the operation of the rice cooker etc Check point Problem Was the amount of rice ingredients and water or the ratio of multi grain rice correct Was more than the maximum acceptable am...

Page 21: ...correct Are there any grains of burned rice on the outside bottom of the inner pot or the center sensor Was the rice stirred and loosened well Are there any grains of rice adhering to gaskets the brim...

Page 22: ...press the Start Rinse free key The rice is cold Rice of below approximately 55 C cannot be reheated 22 Is the Keep Warm lamp off Press the Keep Warm key and check that the Keep Warm lamp lights up Th...

Page 23: ...ay Action Reference page Err appears on the display and a long lasting or continuous beeping alarm sounds If the rice cooker is placed on the carpet or where the room temperature is high the air inlet...

Page 24: ...cm Width 26 0 28 8 Depth 35 4 38 6 Height 21 3 25 0 Weight kg 4 5 5 7 Note One cup of white rice is about 150 g In case of a power outage If a power outage does occur the rice cooker will resume its n...

Page 25: ...45 1 46 2 50 52 53 3 55 4 57 58 5 59 6 60 7 62 8 63 9 Synchro Cooking 64 10 Slow Cook 66 11 Steam 68 12 71 13 76 14 Synchro Cooking 78 15 Slow Cook 79 16 80 81 82 83 83 83...

Page 26: ...47 46 30cm 30cm COOKBOOK 7A 1 2 3 1 2 3 1...

Page 27: ...49 48 IH IH...

Page 28: ...51 50 Hour Min Menu Cancel Keep Warm Timer Start Rinse free Start Rinse free Cancel COOKBOOK 0 18L 150g IH 24 P 82 4 5 0 00 Note P 73 2 P 74 75...

Page 29: ...a Eco Eco Sweet Sweet Sweet Plain Sweet Brown GABA Plus Brown Porridge Porridge hard Porridge soft Long grain Long grain Plain Ultra COOKBOOK Plain Brown Plain 1 2 Mixed Sweet Plain Ultra Plain 2 Eco...

Page 30: ...55 55 54 1 0 18L Note P 83 P 53 2 P 53 Note 35 3 P 53 3 Plain 3 4 P 72 3 Plain Ultra 2 1 0L 5 5 1 8L 10 Brown 1 0L 3 5 1 8L 6 Long grain Mixed Sweet...

Page 31: ...a 2 Porridge Hour Min Hour 5 Min 5 40 90 5 5 5 60 3 Start Rinse free 1 2 Plain Ultra Eco Quick Synchro Cooking Mixed Sweet Porridge 20 Start Rinse free Plain Plain Rinse free Plain Plain 5 1 2 1 2 6 N...

Page 32: ...el 2 3 P 71 75 P 53 54 Plain Ultra Eco Quick Synchro Cooking 1 0L 5 5 43 53 65 75 41 51 17 34 41 51 1 8L 10 46 56 65 75 41 52 21 38 46 56 Brown Mixed Sweet Long grain GABA Plus 1 0L 5 5 64 75 35 60 19...

Page 33: ...1 2 Timer 30 Timer Start Rinse free 5 Hour Min Hour 1 Min 10 Note 12 6 Start Rinse free 1 2 Plain Ultra Eco Porridge Plain Plain Rinse free Plain Plain Cancel P 60 2 6 2 1 2 3 5 6 4 1 2 Timer1 Timer2...

Page 34: ...63 62 63 62 8 Note 1 0L 1 1 8L 2 3 1 2 1 2 3 Keep Warm P 62 4 Start Rinse free 3 Cancel 55 5 7 Cancel Keep Warm Hour 24 24h 1 24 24 h Note 24 1 0L 5 5 1 1 8L 10 2 Porridge...

Page 35: ...g 6 Start Rinse free 2 7 8 8 Note Steam P 68 70 Note Plain 1 0L 5 5 2 1 8L 10 1 20 30 1 Cancel 2 3 P 71 75 COOKBOOK COOKBOOK Note COOKBOOK 1 3 1 0L 5 5 2 3 1 8L 10 3 4 Note 1 2 P 55 Note 1 0L 1 8L 2 1...

Page 36: ...rt Rinse free 30 3 Note Cancel 1 2 10 3 4 P 66 4 Start Rinse free 3 1 Cancel 2 P 75 Note Cancel 1 1 1h 6 6h 6 6 6 10 Slow Cook COOKBOOK 93 88 COOKBOOK Note COOKBOOK 1 2 Note Plain Plain 1 0L 1 8L 5 5...

Page 37: ...Min Start Rinse free 15 3 Note Cancel 1 2 10 3 4 P 68 4 8 1 Cancel 2 3 P 71 75 11 Steam 1 1 0L 5 5 3 1 2 630mL 1 8L 10 4 1 2 810mL Note 2 3 Note Cancel 4 Steam 5 Hour Min Hour 5 Min 5 5 60 5 6 Start R...

Page 38: ...0 70 12 P 71 75 P 75 Note 1 2 Note 2 P 74 75 1 2 Note 1 200 300g 20 30 2 3 150 200g 20 25 2cm 6 10 100 200g 15 20 1 2 200 300g 30 40 2 3 250 300g 30 40 1 200 300g 30 40 8 15 20 25 1 0L 5 5 3cm 1 8L 10...

Page 39: ...73 72 1 2 Note 1 2 Note 320 Note Note...

Page 40: ...75 74 75 74 Note Note 1 7 8 Plain Start Rinse free Cancel Note 20g 2 3 1 1 Note 2 2 1 3 1 2 3...

Page 41: ...77 76 12 24 53 55 83 55 71 75 59 55 71 75 53 55 63 61 62 83 62 62 63 62 62 71 75 63 67 75 13 Start Rinse free 53 55 83 53 83 57 61 59 55 71 75 59 83 35 55 71 75 53 55 55 56 71 75 53 71 75...

Page 42: ...79 78 14 Synchro Cooking COOKBOOK Synchro Cooking COOKBOOK 64 64 64 65 64 83 15 Slow Cook 66 66 55 71 75 55 71 75 83...

Page 43: ...2 76 82 0 00 Quick Synchro Cooking Mixed Sweet Steam Slow Cook 61 55 71 75 Start Rinse free 55 63 Keep Warm Start Rinse free 61 51 IH Start Rinse free Keep Warm 56 Timer 30 61 Hour Min 82 Hour 24 24 6...

Page 44: ...ing 0 18 0 36 1 2 0 36 0 72 2 4 Brown 0 18 0 63 1 3 5 0 36 1 08 2 6 Mixed 0 18 0 72 1 4 0 36 1 08 2 6 Sweet 0 18 0 54 1 3 0 36 0 9 2 5 Porridge hard 0 09 0 18 0 5 1 0 09 0 36 0 5 2 soft 0 09 0 5 0 09...

Page 45: ...TIGER CORPORATION Head Office 3 1 Hayamicho Kadoma City Osaka 571 8571 Japan...

Reviews: