background image

13

12

English

Tips on making delicious rice

Read p.14 to 15 for preparations 

before cooking rice, and p.16 to 

20 for how to cook rice.

Select high quality rice and store it in a 

cool location. 

Choose freshly polished, glossy rice with a 

uniform grain size. Store in a cool, dark, well-

ventilated place.

Carefully measure the rice with the 

supplied measuring cup.

One cup equals about 0.18 L. 

Use the supplied measuring 

cup for rinse-free rice as well.

This product contrives the 

cooking method. It is not 

necessary to use the 

measuring cup for rinse-free 

rice.

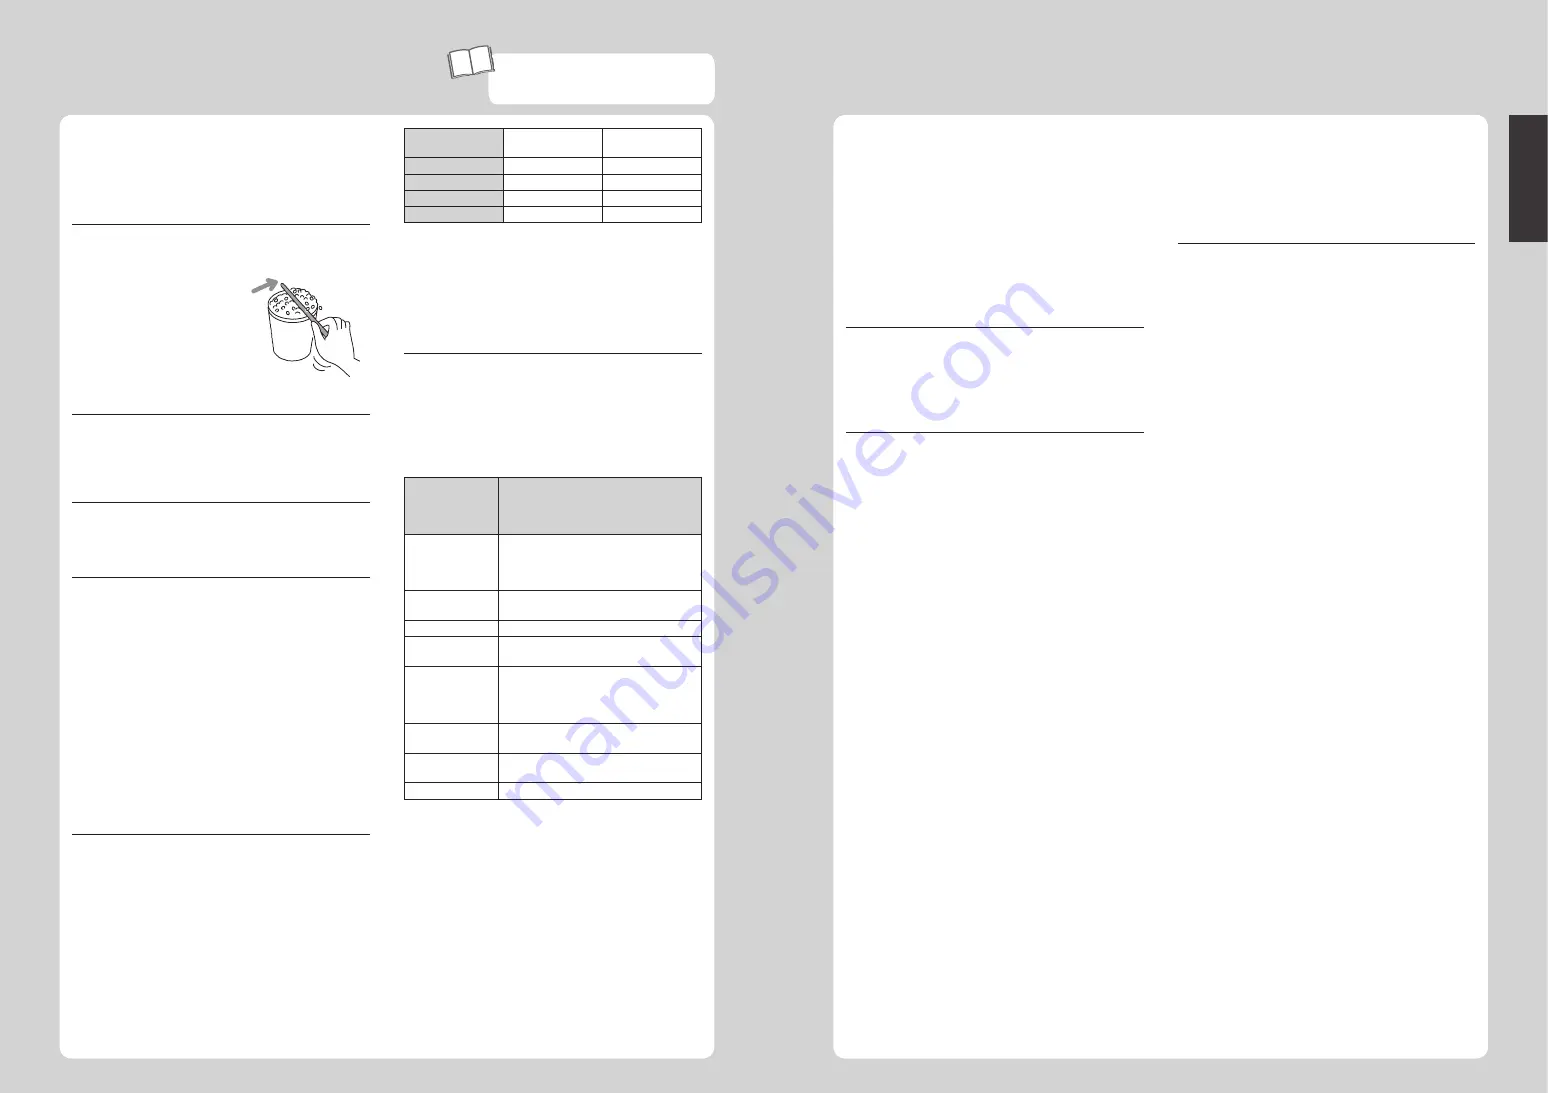
Wash the rice quickly.

Stir the rice around with your hand in a generous 

amount of water, pour out the water, and repeat 

until the water remains clear.

When cooking germinated brown rice, 

whole rice or semi-polished rice, select 

the “Plain” or “Ultra” menu.

Cooking rinse-free rice

•  Add the rinse-free rice and water, and then stir 

well from the bottom so that every individual 

grain of rice becomes immersed in the water. 

(Merely adding water to the rice will prevent 

it from soaking in the water and may result in 

improperly cooked rice.)

•  If the added water turns white, we recommend 

you wash the rice thoroughly by replacing the 

water once or twice. (The water turning white 

is due to the starch in the rice and not its bran; 

however, cooking it with the starch left in the 

water may result in burned rice, the contents 

boiling over, or improperly cooked rice.)

Adding other ingredients to the rice

The total amount of ingredients should be no more 

than 70 g per cup of rice. Stir in any seasoning 

well and then add the extra ingredients on top of 

the rice. If other ingredients are to be added to the 

rice, be sure to use no more than the acceptable 

maximum amount (refer to the table below).

Type of rice

1.0 L (5.5-cup) 

type

1.8 L (10-cup) 

type

Brown

3 cups or less

5 cups or less

Mixed

4 cups or less

6 cups or less

Sweet

3 cups or less

5 cups or less

Porridge • hard

0.5 cups or less 1.5 cups or less

•  Add water prior to adding the ingredients. 

Adding water after the ingredients will result in 

the cooked rice being too firm.

•  Cooking it with the seasoning left in the bottom 

of the rice cooker or with using ketchup or 

tomato sauce may result in improperly cooked 

rice.

Add water according to the type of rice 

and your personal preference.

If you choose to use more or less water than the 

recommended amount, do not deviate from that 

amount by any more than 1/3 of one line.

 Amount of water to add

Type of rice

Corresponding scale (Use the 

corresponding scale on the inner pot 

as a guide and add water according 

to your personal preference.)

Plain 

Quick 

Synchro-

Cooking

“Plain” scale

Ultra

Mixed

“Ultra” scale

Eco

“Eco”scale

Sweet  

(glutinous rice)  “Sweet” scale
Sweet (a mixture 

of glutinous and 

non-glutinous 

rice)

Between the “Plain” and “Sweet” 

scales

Brown

GABA Plus

“Brown” scale

Porridge

Hard porridge: “Porridge • hard” scale

Soft porridge: “Porridge • soft” scale

Long-grain

“Long-grain” scale

•  Water levels in the above table also apply to 

rinse-free rice.

•  When cooking germinated brown rice, whole 

rice or semi-polished rice, use the “Plain” or 

“Ultra” scale as a reference.

• 

If the amount of water to add is specified on 

a package of germinated brown rice or multi-

grain rice, follow those directions and add water 

according to your personal preference.

•  When cooking paella described in the supplied 

“COOKBOOK”, use the “Plain” scale as a 

reference.

Cooking brown rice and/or multi-grain 

rice mixed in with white rice

•  If the rice to be cooked includes more brown 

rice and/or multi-grain rice than white rice, use 

the “Brown” menu.

•  If there is an equal amount of white rice and 

brown rice and/or multi-grain rice, or there is 

more white rice than brown rice and/or multi-

grain rice, use the “Plain” menu. (The brown 

rice and/or multi-grain rice should be soaked 

separately for 1 to 2 hours before cooking.)

Cooking sweet rice

When cooking sweet rice, select the “Mixed•Sweet” 

menu.

Wash the rice, and then level it out so that all of 

the rice is under water.

Cooking grains together with white rice

•  Use the “Plain” or “Ultra” menu.
•  The amount of multi-grain rice should equal 

less than 20% of the volume of the white rice. 

The maximum acceptable amount for the 

combination of white rice and grains is 5.5 cups 

with the 1.0 L type and 10 cups with the 1.8 L 

type.

•  The grains should be placed on top of the 

white rice. Mixing them together may result in 

improperly cooked food.

Cooking grains together with brown rice

•  Always use the “Brown” menu.
•  The maximum acceptable amount for the 

combination of brown rice and grains is 3.5 

cups with the 1.0 L type and 6 cups with the 1.8 

L type.

Cooking long-grain rice

•  When cooking long-grain rice, select the “Long-

grain” menu. When cooking seasoned rice with 

various ingredients using long-grain rice, select 

the “Mixed•Sweet” menu. Selecting any other 

menu may result in the contents boiling over.

Summary of Contents for JKT-S10A

Page 1: ...S10A JKT S18A IH IH Rice Cooker OPERATING INSTRUCTIONS Thank you for purchasing this TIGER rice cooker warmer Please read these instructions carefully before use and observe them during use For house...

Page 2: ...ly in removable container SAVE THESE INSTRUCTIONS Servicing should be performed by an authorized service representative This appliance is intended for household use 1 A short power cord or detachable...

Page 3: ...m 21 8 Reheating Cooked Rice 22 9 Cooking Rice and Side Dishes Together Synchro Cooking Menu 23 10 Slow Cooking Slow Cook Menu 26 11 Steaming Food Steam Menu 28 12 Cleaning and Maintenance 31 13 If Ri...

Page 4: ...e unit with wet hands Do not plug in or unplug with wet hands This is to avoid electric shock or injury Warning General safety precautions Disassembly is prohibited Do not attempt to disassemble repai...

Page 5: ...a small space where the operation panel is exposed to steam Steam and heat may result in deformation of the operation panel and or damage discoloration deformation and or malfunction of the rice cook...

Page 6: ...s to keep the fluorocarbon resin coating from scratching or peeling Do not place the inner pot directly over gas electric or IH stove top Do not place in the microwave or oven Use the Keep Warm functi...

Page 7: ...thium battery yourself To replace the battery contact the place of purchase Menu options and features Menu Rinse free rice function availability Timer function availability Keep Warm function availabi...

Page 8: ...ss water than the recommended amount do not deviate from that amount by any more than 1 3 of one line Amount of water to add Type of rice Corresponding scale Use the corresponding scale on the inner p...

Page 9: ...he guidelines on p 12 When cooking 3 cups of white rice adjust the water level to line 3 on the Plain scale 4 Wipe off any water and rice etc Outer surface and brim of the inner pot Inside the rice co...

Page 10: ...r menus only a one beep alarm will sound On When cooking rinse free rice Rinse free appears on the display When you selected the Plain menu a one short one long another one short beep alarm will sound...

Page 11: ...31 to 36 6 Setting the Timer When cooking rinse free rice press the key twice 1 2 3 5 6 4 Using the Timer function Timer 1 Timer 2 You can preset the time that you want cooking to be actually complete...

Page 12: ...ou make a mistake or otherwise want to reset the timer press the Cancel key and repeat the procedure from step 2 on p 19 7 Keeping the Rice Warm The Keep Warm function will especially maintain the shi...

Page 13: ...ents to be placed in the cooking plate Do not fill up the cooking plate with ingredients Spread or make spaces between ingredients so that steam is applied evenly fill up to the position shown below F...

Page 14: ...tilt the cooking plate while removing it The broth etc may spill out and result in burns Do not return the cooking plate to the inner pot after removing it Doing so may result in the rice spoiling or...

Page 15: ...e set time will increase by 5 minutes Each time the Min key is pressed that time will decrease by 5 minutes The cooking time can be set to any 5 minute increment between 5 and 180 minutes Blinks 6 Pre...

Page 16: ...ng is completed an alarm 8 beeps will sound the Start lamp will turn off The Keep Warm lamp will turn on and 0h will be displayed On To steam the food further use the Hour and Min keys to set the addi...

Page 17: ...on top of dishes etc to dry Doing so may damage the fluorocarbon resin coating or cause it to peel Guidelines for steaming times Ingredients Amount Approx time Hints for steaming Chicken 1 fillet 200...

Page 18: ...grains of rice etc Note Do not allow water to get inside the rice cooker unit Do not immerse the power cord in or splash it with water Doing so may result in short circuiting or electric shock Power c...

Page 19: ...ching the steam cap Removing the steam cap 1 Insert your finger into the hole in the lid and lift the steam cap upward Steam cap Note Be careful of the hot steam contained in the steam cap immediately...

Page 20: ...oked rice or with the operation of the rice cooker etc Check point Problem Was the amount of rice ingredients and water or the ratio of multi grain rice correct Was more than the maximum acceptable am...

Page 21: ...correct Are there any grains of burned rice on the outside bottom of the inner pot or the center sensor Was the rice stirred and loosened well Are there any grains of rice adhering to gaskets the brim...

Page 22: ...press the Start Rinse free key The rice is cold Rice of below approximately 55 C cannot be reheated 22 Is the Keep Warm lamp off Press the Keep Warm key and check that the Keep Warm lamp lights up Th...

Page 23: ...ay Action Reference page Err appears on the display and a long lasting or continuous beeping alarm sounds If the rice cooker is placed on the carpet or where the room temperature is high the air inlet...

Page 24: ...cm Width 26 0 28 8 Depth 35 4 38 6 Height 21 3 25 0 Weight kg 4 5 5 7 Note One cup of white rice is about 150 g In case of a power outage If a power outage does occur the rice cooker will resume its n...

Page 25: ...45 1 46 2 50 52 53 3 55 4 57 58 5 59 6 60 7 62 8 63 9 Synchro Cooking 64 10 Slow Cook 66 11 Steam 68 12 71 13 76 14 Synchro Cooking 78 15 Slow Cook 79 16 80 81 82 83 83 83...

Page 26: ...47 46 30cm 30cm COOKBOOK 7A 1 2 3 1 2 3 1...

Page 27: ...49 48 IH IH...

Page 28: ...51 50 Hour Min Menu Cancel Keep Warm Timer Start Rinse free Start Rinse free Cancel COOKBOOK 0 18L 150g IH 24 P 82 4 5 0 00 Note P 73 2 P 74 75...

Page 29: ...a Eco Eco Sweet Sweet Sweet Plain Sweet Brown GABA Plus Brown Porridge Porridge hard Porridge soft Long grain Long grain Plain Ultra COOKBOOK Plain Brown Plain 1 2 Mixed Sweet Plain Ultra Plain 2 Eco...

Page 30: ...55 55 54 1 0 18L Note P 83 P 53 2 P 53 Note 35 3 P 53 3 Plain 3 4 P 72 3 Plain Ultra 2 1 0L 5 5 1 8L 10 Brown 1 0L 3 5 1 8L 6 Long grain Mixed Sweet...

Page 31: ...a 2 Porridge Hour Min Hour 5 Min 5 40 90 5 5 5 60 3 Start Rinse free 1 2 Plain Ultra Eco Quick Synchro Cooking Mixed Sweet Porridge 20 Start Rinse free Plain Plain Rinse free Plain Plain 5 1 2 1 2 6 N...

Page 32: ...el 2 3 P 71 75 P 53 54 Plain Ultra Eco Quick Synchro Cooking 1 0L 5 5 43 53 65 75 41 51 17 34 41 51 1 8L 10 46 56 65 75 41 52 21 38 46 56 Brown Mixed Sweet Long grain GABA Plus 1 0L 5 5 64 75 35 60 19...

Page 33: ...1 2 Timer 30 Timer Start Rinse free 5 Hour Min Hour 1 Min 10 Note 12 6 Start Rinse free 1 2 Plain Ultra Eco Porridge Plain Plain Rinse free Plain Plain Cancel P 60 2 6 2 1 2 3 5 6 4 1 2 Timer1 Timer2...

Page 34: ...63 62 63 62 8 Note 1 0L 1 1 8L 2 3 1 2 1 2 3 Keep Warm P 62 4 Start Rinse free 3 Cancel 55 5 7 Cancel Keep Warm Hour 24 24h 1 24 24 h Note 24 1 0L 5 5 1 1 8L 10 2 Porridge...

Page 35: ...g 6 Start Rinse free 2 7 8 8 Note Steam P 68 70 Note Plain 1 0L 5 5 2 1 8L 10 1 20 30 1 Cancel 2 3 P 71 75 COOKBOOK COOKBOOK Note COOKBOOK 1 3 1 0L 5 5 2 3 1 8L 10 3 4 Note 1 2 P 55 Note 1 0L 1 8L 2 1...

Page 36: ...rt Rinse free 30 3 Note Cancel 1 2 10 3 4 P 66 4 Start Rinse free 3 1 Cancel 2 P 75 Note Cancel 1 1 1h 6 6h 6 6 6 10 Slow Cook COOKBOOK 93 88 COOKBOOK Note COOKBOOK 1 2 Note Plain Plain 1 0L 1 8L 5 5...

Page 37: ...Min Start Rinse free 15 3 Note Cancel 1 2 10 3 4 P 68 4 8 1 Cancel 2 3 P 71 75 11 Steam 1 1 0L 5 5 3 1 2 630mL 1 8L 10 4 1 2 810mL Note 2 3 Note Cancel 4 Steam 5 Hour Min Hour 5 Min 5 5 60 5 6 Start R...

Page 38: ...0 70 12 P 71 75 P 75 Note 1 2 Note 2 P 74 75 1 2 Note 1 200 300g 20 30 2 3 150 200g 20 25 2cm 6 10 100 200g 15 20 1 2 200 300g 30 40 2 3 250 300g 30 40 1 200 300g 30 40 8 15 20 25 1 0L 5 5 3cm 1 8L 10...

Page 39: ...73 72 1 2 Note 1 2 Note 320 Note Note...

Page 40: ...75 74 75 74 Note Note 1 7 8 Plain Start Rinse free Cancel Note 20g 2 3 1 1 Note 2 2 1 3 1 2 3...

Page 41: ...77 76 12 24 53 55 83 55 71 75 59 55 71 75 53 55 63 61 62 83 62 62 63 62 62 71 75 63 67 75 13 Start Rinse free 53 55 83 53 83 57 61 59 55 71 75 59 83 35 55 71 75 53 55 55 56 71 75 53 71 75...

Page 42: ...79 78 14 Synchro Cooking COOKBOOK Synchro Cooking COOKBOOK 64 64 64 65 64 83 15 Slow Cook 66 66 55 71 75 55 71 75 83...

Page 43: ...2 76 82 0 00 Quick Synchro Cooking Mixed Sweet Steam Slow Cook 61 55 71 75 Start Rinse free 55 63 Keep Warm Start Rinse free 61 51 IH Start Rinse free Keep Warm 56 Timer 30 61 Hour Min 82 Hour 24 24 6...

Page 44: ...ing 0 18 0 36 1 2 0 36 0 72 2 4 Brown 0 18 0 63 1 3 5 0 36 1 08 2 6 Mixed 0 18 0 72 1 4 0 36 1 08 2 6 Sweet 0 18 0 54 1 3 0 36 0 9 2 5 Porridge hard 0 09 0 18 0 5 1 0 09 0 36 0 5 2 soft 0 09 0 5 0 09...

Page 45: ...TIGER CORPORATION Head Office 3 1 Hayamicho Kadoma City Osaka 571 8571 Japan...

Reviews: