background image

27

26

27

26

English

10 

Slow Cooking 

(“Slow Cook” Menu)

Refer to the supplied “COOKBOOK” for directions.

With this menu, food is first brought to near boiling, 

the heat is then lowered to about 93˚C and the 

food left to simmer. The temperature is then 

lowered even further to about 88˚C and simmering 

is continued. By gradually lowering the heating 

temperature in this way, flavors are enhanced and 

the liquids do not boil down even when heated for a 

long period of time.

Menu examples

Braised pork, gobo and yamaimo soup


For how to cook “braised pork” and “gobo and 

yamaimo soup”, see the supplied “COOKBOOK”.

Note


Caution should be exercised when making 

dishes other than those described in the supplied 

“COOKBOOK”, as they may boil over.


Stir well before cooking to prevent seasonings 

from settling at the bottom of the inner pot.


When simmering foods in broth, cool the broth 

before cooking.


When thickening with starch, add the starch at the 

end of cooking.


● Since fish-paste products like “chikuwa” tube-

shaped fish paste and “kamaboko” fish paste 

cake will swell when heated, the amount being 

used should be adjusted with that in mind.

Prepare the ingredients.

Add ingredients to the inner pot 

and close the lid.

Note


Use the “Plain” scale on the inside of the inner pot 

as a reference. Using more than the maximum 

acceptable amount (see the table below) can 

prevent proper boiling or cause the contents to 

boil over. Be careful also not to use less than the 

minimum required amount either, as that can also 

cause the contents to boil over.

“Plain” scale

1.0 L type

1.8 L type

Maximum

Minimum

Maximum

Minimum

5.5 or below 2 or above

8 or below

3 or above

Connect the power plug to an 

outlet.

Note


If the Keep Warm lamp is on, press the [Cancel] 

key to turn off the lamp.
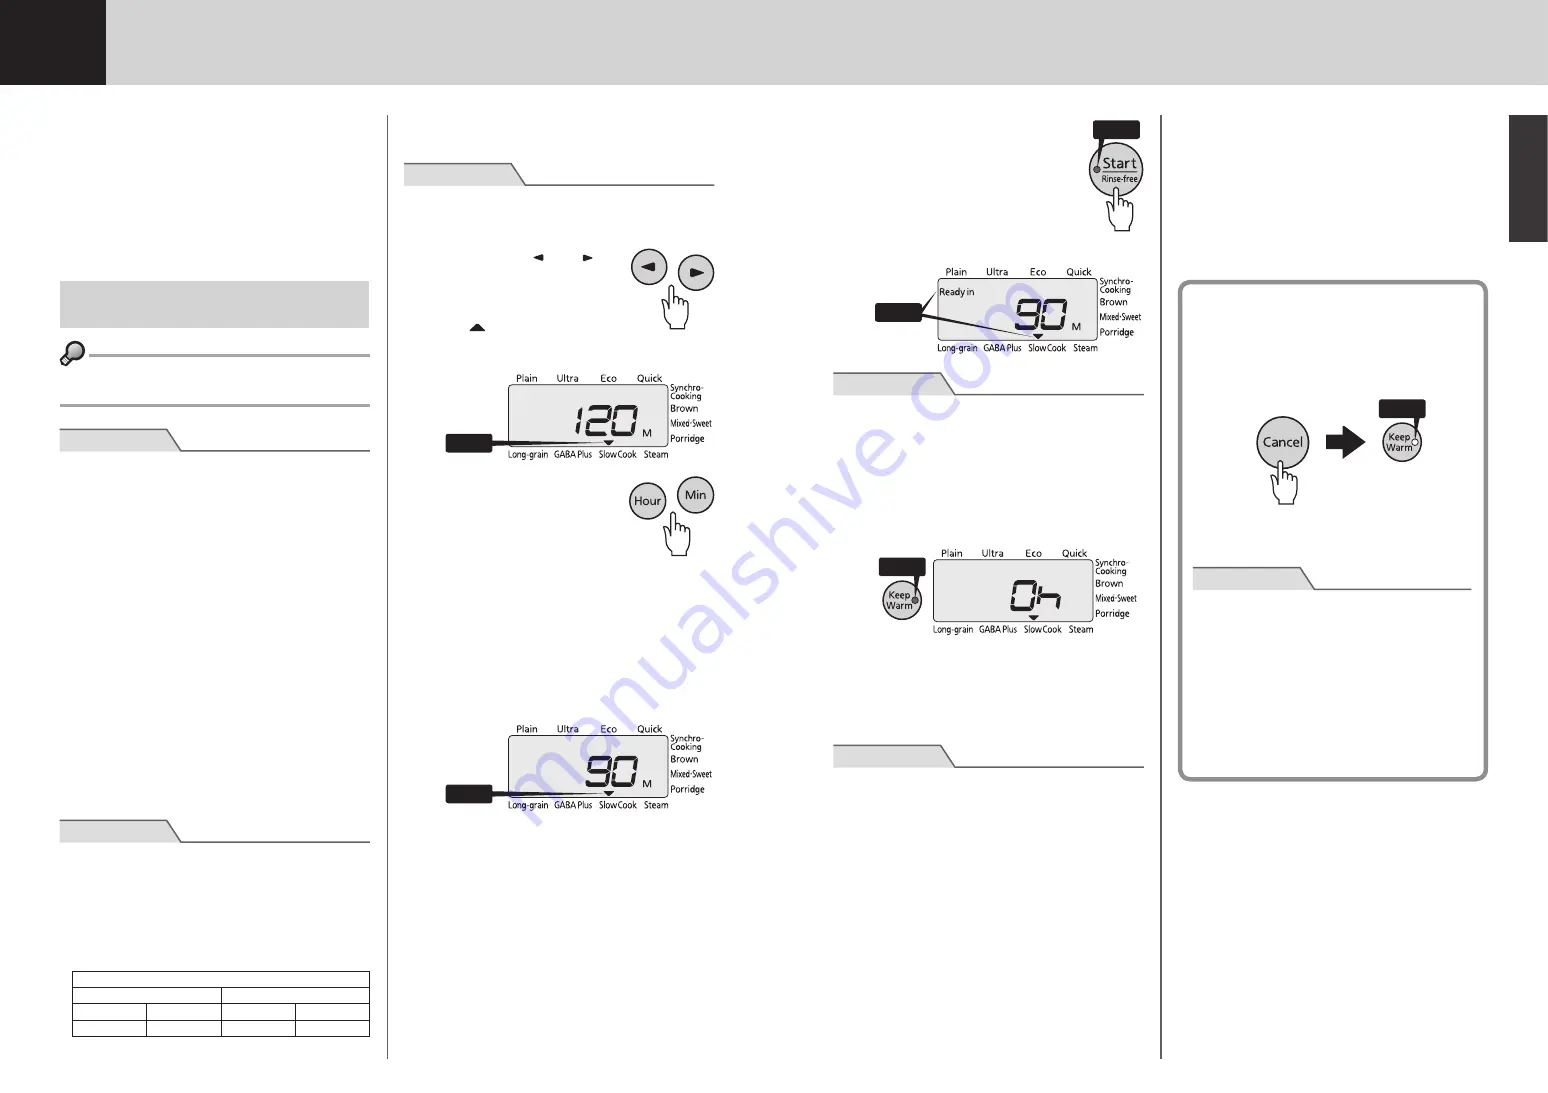
Press the [ ] or [ ]  

key to select the 

“Slow Cook” menu.

The   symbol will blink while 

the menu is being selected.

Blinks

Use the [Hour] and 

[Min] keys to set 

the desired cooking 

time.

Each time the [Hour] key is pressed, the set 

time will increase by 5 minutes. Each time the 

[Min] key is pressed, that time will decrease 

by 5 minutes.

The cooking time can be set to any 5-minute 

increment between 5 and 180 minutes.

Blinks

Press the [Start/Rinse-

free] key.

The Start lamp will turn on and 

cooking will start.

“Ready in” will appear on the 

display.

On

Note


Do not open the lid during cooking.

Once cooking is completed, an 

alarm (8 beeps) will sound (the 

Start lamp will turn off).

The Keep Warm lamp will turn on and “0h” 

will be displayed.

On


• To simmer the food further, use the [Hour] 

and [Min] keys to set the additional cooking 

time and then press the [Start/Rinse-free] 

key. The cooking time can be extended up to 

30 minutes, a maximum of 3 times.

Note


● When food is not sufficiently cooked, do not press 

the [Cancel] key before additional cooking. Doing 

so will cause the Keep Warm lamp to go out and 

additional cooking will not be possible. If you 

mistakenly pressed the [Cancel] key, perform the 

following procedure.

1.  Remove the inner pot and set it on a wet towel 

or cloth.

2.  Leave the rice cooker lid open and cool 

down the unit and the inner pot for about 10 

minutes.

3.  Place the inner pot back inside the rice 

cooker.

4. Repeat the procedure from step 

on p.26.


If you want food that is being kept warm to be 

piping hot before serving it, press the [Start/

Rinse-free] key when the Keep Warm lamp is 

on in order to reheat that food. The remaining 

reheating time will be displayed and an alarm 

(3 long beeps) will sound when the operation is 

completed. After reheating, the Keep Warm lamp 

will turn on and the elapsed Keep Warm time will 

be displayed.

Once cooking is completed...

Press the [Cancel] key to turn off the 

Keep Warm function.

The Keep Warm lamp will turn off.

Off

Remove any odors. (See p.36.)

Note


If the [Cancel] key is not pressed when 

cooking is completed, the Keep Warm 

function will automatically engage and the 

elapsed Keep Warm time will be displayed in 

hourly increments from the first hour (“1h”) up 

to 6 hours (“6h”) after that. After 6 hours has 

elapsed, “6h” will blink on the display.


Do not use the Keep Warm function 

continuously for more than 6 hours as some 

foods will lose their taste.

On

Summary of Contents for JKT-S10A

Page 1: ...S10A JKT S18A IH IH Rice Cooker OPERATING INSTRUCTIONS Thank you for purchasing this TIGER rice cooker warmer Please read these instructions carefully before use and observe them during use For house...

Page 2: ...ly in removable container SAVE THESE INSTRUCTIONS Servicing should be performed by an authorized service representative This appliance is intended for household use 1 A short power cord or detachable...

Page 3: ...m 21 8 Reheating Cooked Rice 22 9 Cooking Rice and Side Dishes Together Synchro Cooking Menu 23 10 Slow Cooking Slow Cook Menu 26 11 Steaming Food Steam Menu 28 12 Cleaning and Maintenance 31 13 If Ri...

Page 4: ...e unit with wet hands Do not plug in or unplug with wet hands This is to avoid electric shock or injury Warning General safety precautions Disassembly is prohibited Do not attempt to disassemble repai...

Page 5: ...a small space where the operation panel is exposed to steam Steam and heat may result in deformation of the operation panel and or damage discoloration deformation and or malfunction of the rice cook...

Page 6: ...s to keep the fluorocarbon resin coating from scratching or peeling Do not place the inner pot directly over gas electric or IH stove top Do not place in the microwave or oven Use the Keep Warm functi...

Page 7: ...thium battery yourself To replace the battery contact the place of purchase Menu options and features Menu Rinse free rice function availability Timer function availability Keep Warm function availabi...

Page 8: ...ss water than the recommended amount do not deviate from that amount by any more than 1 3 of one line Amount of water to add Type of rice Corresponding scale Use the corresponding scale on the inner p...

Page 9: ...he guidelines on p 12 When cooking 3 cups of white rice adjust the water level to line 3 on the Plain scale 4 Wipe off any water and rice etc Outer surface and brim of the inner pot Inside the rice co...

Page 10: ...r menus only a one beep alarm will sound On When cooking rinse free rice Rinse free appears on the display When you selected the Plain menu a one short one long another one short beep alarm will sound...

Page 11: ...31 to 36 6 Setting the Timer When cooking rinse free rice press the key twice 1 2 3 5 6 4 Using the Timer function Timer 1 Timer 2 You can preset the time that you want cooking to be actually complete...

Page 12: ...ou make a mistake or otherwise want to reset the timer press the Cancel key and repeat the procedure from step 2 on p 19 7 Keeping the Rice Warm The Keep Warm function will especially maintain the shi...

Page 13: ...ents to be placed in the cooking plate Do not fill up the cooking plate with ingredients Spread or make spaces between ingredients so that steam is applied evenly fill up to the position shown below F...

Page 14: ...tilt the cooking plate while removing it The broth etc may spill out and result in burns Do not return the cooking plate to the inner pot after removing it Doing so may result in the rice spoiling or...

Page 15: ...e set time will increase by 5 minutes Each time the Min key is pressed that time will decrease by 5 minutes The cooking time can be set to any 5 minute increment between 5 and 180 minutes Blinks 6 Pre...

Page 16: ...ng is completed an alarm 8 beeps will sound the Start lamp will turn off The Keep Warm lamp will turn on and 0h will be displayed On To steam the food further use the Hour and Min keys to set the addi...

Page 17: ...on top of dishes etc to dry Doing so may damage the fluorocarbon resin coating or cause it to peel Guidelines for steaming times Ingredients Amount Approx time Hints for steaming Chicken 1 fillet 200...

Page 18: ...grains of rice etc Note Do not allow water to get inside the rice cooker unit Do not immerse the power cord in or splash it with water Doing so may result in short circuiting or electric shock Power c...

Page 19: ...ching the steam cap Removing the steam cap 1 Insert your finger into the hole in the lid and lift the steam cap upward Steam cap Note Be careful of the hot steam contained in the steam cap immediately...

Page 20: ...oked rice or with the operation of the rice cooker etc Check point Problem Was the amount of rice ingredients and water or the ratio of multi grain rice correct Was more than the maximum acceptable am...

Page 21: ...correct Are there any grains of burned rice on the outside bottom of the inner pot or the center sensor Was the rice stirred and loosened well Are there any grains of rice adhering to gaskets the brim...

Page 22: ...press the Start Rinse free key The rice is cold Rice of below approximately 55 C cannot be reheated 22 Is the Keep Warm lamp off Press the Keep Warm key and check that the Keep Warm lamp lights up Th...

Page 23: ...ay Action Reference page Err appears on the display and a long lasting or continuous beeping alarm sounds If the rice cooker is placed on the carpet or where the room temperature is high the air inlet...

Page 24: ...cm Width 26 0 28 8 Depth 35 4 38 6 Height 21 3 25 0 Weight kg 4 5 5 7 Note One cup of white rice is about 150 g In case of a power outage If a power outage does occur the rice cooker will resume its n...

Page 25: ...45 1 46 2 50 52 53 3 55 4 57 58 5 59 6 60 7 62 8 63 9 Synchro Cooking 64 10 Slow Cook 66 11 Steam 68 12 71 13 76 14 Synchro Cooking 78 15 Slow Cook 79 16 80 81 82 83 83 83...

Page 26: ...47 46 30cm 30cm COOKBOOK 7A 1 2 3 1 2 3 1...

Page 27: ...49 48 IH IH...

Page 28: ...51 50 Hour Min Menu Cancel Keep Warm Timer Start Rinse free Start Rinse free Cancel COOKBOOK 0 18L 150g IH 24 P 82 4 5 0 00 Note P 73 2 P 74 75...

Page 29: ...a Eco Eco Sweet Sweet Sweet Plain Sweet Brown GABA Plus Brown Porridge Porridge hard Porridge soft Long grain Long grain Plain Ultra COOKBOOK Plain Brown Plain 1 2 Mixed Sweet Plain Ultra Plain 2 Eco...

Page 30: ...55 55 54 1 0 18L Note P 83 P 53 2 P 53 Note 35 3 P 53 3 Plain 3 4 P 72 3 Plain Ultra 2 1 0L 5 5 1 8L 10 Brown 1 0L 3 5 1 8L 6 Long grain Mixed Sweet...

Page 31: ...a 2 Porridge Hour Min Hour 5 Min 5 40 90 5 5 5 60 3 Start Rinse free 1 2 Plain Ultra Eco Quick Synchro Cooking Mixed Sweet Porridge 20 Start Rinse free Plain Plain Rinse free Plain Plain 5 1 2 1 2 6 N...

Page 32: ...el 2 3 P 71 75 P 53 54 Plain Ultra Eco Quick Synchro Cooking 1 0L 5 5 43 53 65 75 41 51 17 34 41 51 1 8L 10 46 56 65 75 41 52 21 38 46 56 Brown Mixed Sweet Long grain GABA Plus 1 0L 5 5 64 75 35 60 19...

Page 33: ...1 2 Timer 30 Timer Start Rinse free 5 Hour Min Hour 1 Min 10 Note 12 6 Start Rinse free 1 2 Plain Ultra Eco Porridge Plain Plain Rinse free Plain Plain Cancel P 60 2 6 2 1 2 3 5 6 4 1 2 Timer1 Timer2...

Page 34: ...63 62 63 62 8 Note 1 0L 1 1 8L 2 3 1 2 1 2 3 Keep Warm P 62 4 Start Rinse free 3 Cancel 55 5 7 Cancel Keep Warm Hour 24 24h 1 24 24 h Note 24 1 0L 5 5 1 1 8L 10 2 Porridge...

Page 35: ...g 6 Start Rinse free 2 7 8 8 Note Steam P 68 70 Note Plain 1 0L 5 5 2 1 8L 10 1 20 30 1 Cancel 2 3 P 71 75 COOKBOOK COOKBOOK Note COOKBOOK 1 3 1 0L 5 5 2 3 1 8L 10 3 4 Note 1 2 P 55 Note 1 0L 1 8L 2 1...

Page 36: ...rt Rinse free 30 3 Note Cancel 1 2 10 3 4 P 66 4 Start Rinse free 3 1 Cancel 2 P 75 Note Cancel 1 1 1h 6 6h 6 6 6 10 Slow Cook COOKBOOK 93 88 COOKBOOK Note COOKBOOK 1 2 Note Plain Plain 1 0L 1 8L 5 5...

Page 37: ...Min Start Rinse free 15 3 Note Cancel 1 2 10 3 4 P 68 4 8 1 Cancel 2 3 P 71 75 11 Steam 1 1 0L 5 5 3 1 2 630mL 1 8L 10 4 1 2 810mL Note 2 3 Note Cancel 4 Steam 5 Hour Min Hour 5 Min 5 5 60 5 6 Start R...

Page 38: ...0 70 12 P 71 75 P 75 Note 1 2 Note 2 P 74 75 1 2 Note 1 200 300g 20 30 2 3 150 200g 20 25 2cm 6 10 100 200g 15 20 1 2 200 300g 30 40 2 3 250 300g 30 40 1 200 300g 30 40 8 15 20 25 1 0L 5 5 3cm 1 8L 10...

Page 39: ...73 72 1 2 Note 1 2 Note 320 Note Note...

Page 40: ...75 74 75 74 Note Note 1 7 8 Plain Start Rinse free Cancel Note 20g 2 3 1 1 Note 2 2 1 3 1 2 3...

Page 41: ...77 76 12 24 53 55 83 55 71 75 59 55 71 75 53 55 63 61 62 83 62 62 63 62 62 71 75 63 67 75 13 Start Rinse free 53 55 83 53 83 57 61 59 55 71 75 59 83 35 55 71 75 53 55 55 56 71 75 53 71 75...

Page 42: ...79 78 14 Synchro Cooking COOKBOOK Synchro Cooking COOKBOOK 64 64 64 65 64 83 15 Slow Cook 66 66 55 71 75 55 71 75 83...

Page 43: ...2 76 82 0 00 Quick Synchro Cooking Mixed Sweet Steam Slow Cook 61 55 71 75 Start Rinse free 55 63 Keep Warm Start Rinse free 61 51 IH Start Rinse free Keep Warm 56 Timer 30 61 Hour Min 82 Hour 24 24 6...

Page 44: ...ing 0 18 0 36 1 2 0 36 0 72 2 4 Brown 0 18 0 63 1 3 5 0 36 1 08 2 6 Mixed 0 18 0 72 1 4 0 36 1 08 2 6 Sweet 0 18 0 54 1 3 0 36 0 9 2 5 Porridge hard 0 09 0 18 0 5 1 0 09 0 36 0 5 2 soft 0 09 0 5 0 09...

Page 45: ...TIGER CORPORATION Head Office 3 1 Hayamicho Kadoma City Osaka 571 8571 Japan...

Reviews: