3
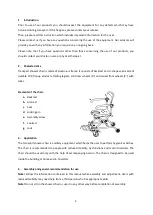
ASSEMBLY
Step 1.
Unfold the legrest.
Step 2
. Lift the seat and lock it on the rear part of frame by tightening the assembly screw.
Step 3.
Insert the tubes of the backrest into the rear part of the frame and lock the backrest with
locking pins.
Step 4.
Lower the armrests.
The chair is ready to use.
SHOWER CHAIR HANDLING
•
Check the condition of the locks, construction and wheels.
•
The chair is not width adjustable. Before use, ensure the width of the chair matches to the
user.
•
The chair helps the user to perform hygienic activities and is designed to be used only on
short distances inside the rooms. The chair is not equipped with shock absorbers so that long
usage is not recommended.
Note! Do not
use the chair if any defects or deficiencies are noticed.
LOCKS
•
To lock the wheels, press the lever of the right and left lock with foot. To release the wheel,
pull the lever upwards with foot.
FOOTREST
•
The footrest should be folded when getting on or out the chair.
Do not use the footrest as a
support while getting on or out the chair due to the risk of chair tipping over and falling.
Note!
Do not stand on the footrest due to the risk of damage.
•
When the user sits on the chair, unfold the footrest parallel to the ground so that his/her
feet are on the footrest while using the chair.
GETTING ON THE CHAIR
•
While getting on or out the chair, changing the user’s position or stop, the wheels must be
absolutely locked.
•
The chair should be located at the place of changing the seat as close as possible. The chair
should touch the bed or other seat being used, rear wheel and front element of the frame. If
the user cannot change his/her seat independently, transfer the user to the chair.
•
The user should sit as deep as possible in the middle of the seat in order to avoid chair
instability.


