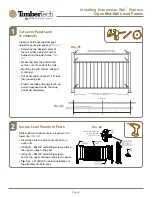
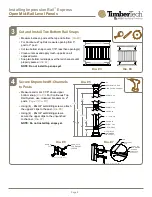
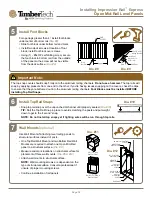
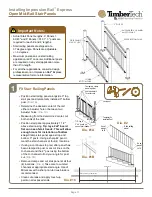
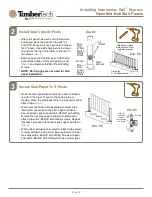
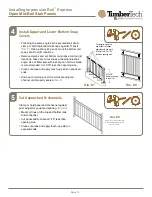
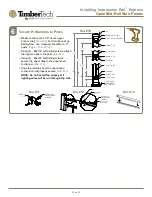
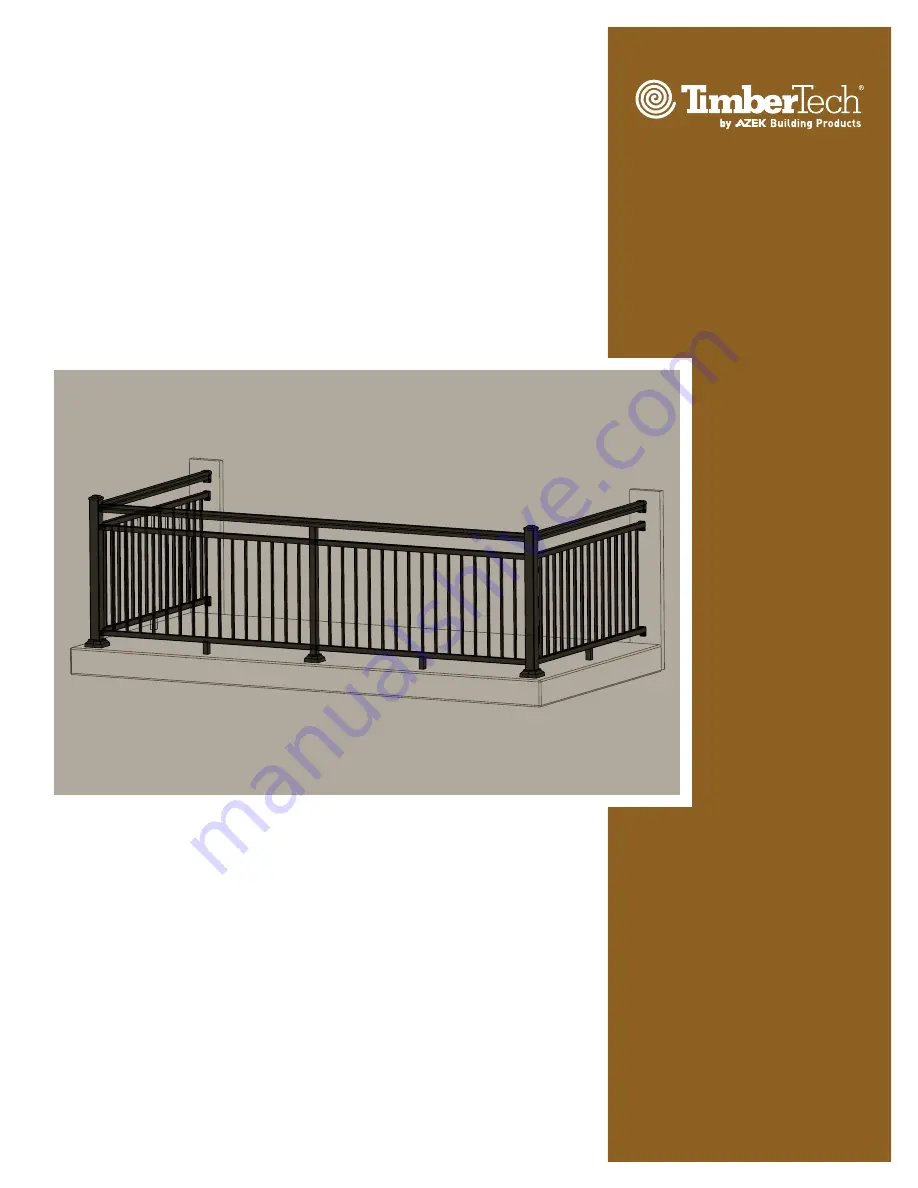
background image

Impression Rail


Express

Installation Guide

Aluminum Posts ............................4
Level Panels ...................................8
Stair Panels .................................. 11

TimberTech.com

Open Mid-Rail

Summary of Contents for Impression Rail Express

Page 1: ...Impression Rail Express Installation Guide Aluminum Posts 4 Level Panels 8 Stair Panels 11 TimberTech com Open Mid Rail...

Page 2: ...ded below The AZEK Co LLC accepts no liability or responsibility for the improper installation of this product Impression Rail Express may not be suitable for every application and it is the sole resp...

Page 3: ...IRING MUST BE INSTALLED PRIOR TO SECURING POSTS TO DECK STAIR SURFACE AND INSTALLING TOP RAIL SNAPS It is the responsibility of the installer to meet all local code requirements and obtain all require...

Page 4: ...led Dia 4 Pre drill 3 16 holes for post attachment fasteners sold separately 5 8 hole for lighting wires optional Dia 3C TOP VIEW Determine All Posts Needed and Prepare end center or corner Important...

Page 5: ...gap between post and wall to be less than a 4 opening Dia 6 Install 90 degree Corner Posts Position post on same 3 centerline typical and temporarily fasten using a single fastener through base plate...

Page 6: ...Dia 10 PLAN VIEW CLOSE UP VIEW CENTER LINE Install 45 Corner Posts Post to be installed at 22 5 to accommodate a 45 angle Position post on same 3 centerline typical and temporarily fasten to deck surf...

Page 7: ...Screws Dia 12C 12D Repeat for lower clips Install base plate vinyl cover only after railing assembly is completed Dia 4 8 9 Dia 11 3 CENTERLINE TYPICAL DECK EDGE Secure 2 Posts to Deck center only For...

Page 8: ...nels Clamp or hold panel against post adjust for equal end spacing Dia 1 Determine the desired center of the rail either a baluster hole or between two baluster holes Dia 2 Measuring from the determin...

Page 9: ...IL 4X 8 X 3 4 TEK SCREW STRAIGHT CLIP EMBLED AND FASTENED IN ACCORDANCE WITH ULTRALOX S INSTALLATION INSTRUCTIONS ARE BLACK WHITE BRONZE REVISIONS BALLOONS DENOTE CHANGES REV DESCRIPTION DATE APPROVED...

Page 10: ...G SCREWS POST RAIL PANEL CLIP 2 POST DETAIL CROSSOVER BRACKET 4X BASE MOUNTING SCREWS MOUNTING STRUCTURE 2 POST 2 POST BASE 2 BASE SKIRT Wall Mounts optional Use Wall Mounts if attaching level railing...

Page 11: ...etween two baluster holes Dia 1C Measuring from the determined center cut both ends of the rails Position stair panel approximately 1 1 2 above stair nosing Tip lay a 2x4 board flat on nose of stair t...

Page 12: ...SELF DRILLING SCREWS OUTSIDE INSTALL 2X 8 X 3 4 SELF DRILLING SCREWS Dia 5 Dia 6 3 Secure Stair Panel To 3 Posts Once the stair panel attach clips have been installed re attach the lower 3 post to th...

Page 13: ...1 16 less than opening size Clean cut areas and apply touch up paint on exposed ends Snap each rail snap over the corresponding rail channel until properly seated Dia 8 34 to 38 from stair nosing to...

Page 14: ...ia 11 4X 8 X 3 4 SELF DRILLING SCREWS 3 POST DETAIL 3 X 3 POST CAP MOUNTING STRUCTURE 4X BASE MOUNTING SCREWS 3 POST BASE RAIL PANEL CLIP DETAIL RAIL PANEL BOTTOM RAIL WALL MOUNT 2X WALL MOUNTING SCRE...

Page 15: ...or building codes The consumer assumes all risks and liability associated with the construction or use of this product The consumer or contractor should take all necessary steps to ensure the safety...

Page 16: ...TimberTech com AZEK Building Products 1330 W Fulton Market Suite 350 Chicago IL 60607 2019 AZEK Building Products All Rights Reserved...

Reviews: