background image

SAFE WORKING

5

BASIC WOODCHIPPING SAFETY

The operator should be aware of the following points:

MAINTAIN A SAFETY EXCLUSION ZONE

around the chipper of at least 10 metres for the

general public or employees without adequate protection.  Use hazard tape to identify this
working area and keep it clear from debris build up.  Chips should be ejected away from any
area the general public have access to.  

HAZARDOUS MATERIAL

- Some species of trees and bushes are poisonous.  The chipping

action can produce vapour, spray and dust that can irritate the skin.  This may lead to
respiratory problems or even cause serious poisoning.  Check the material to be chipped before
you start.  Avoid confined spaces and use a facemask if necessary.

BE AWARE

when the chipper is processing material that is an awkward shape.  The material

can move from side to side in the funnel with great force.  If the material extends beyond the
funnel, the brash may push you to one side causing danger.  Badly twisted brash should be
trimmed before being chipped to avoid thrashing in the feed funnel.

BE AWARE

that the chipper can eject chips out of the feed funnel with considerable force.

Always wear full head and face protection.   

ALWAYS

work on the side of the machine furthest from any local danger, e.g. not road side.

WARNING

The chipper will feed material through on its own.  To do this, it relies on
sharp blades on the chipper rotor.  To keep the blades sharp, only feed the
machine with clean brushwood.  DO NOT put muddy/dirty wood, roots,
potted plants, bricks, stones or metal into the chipper.

!

!

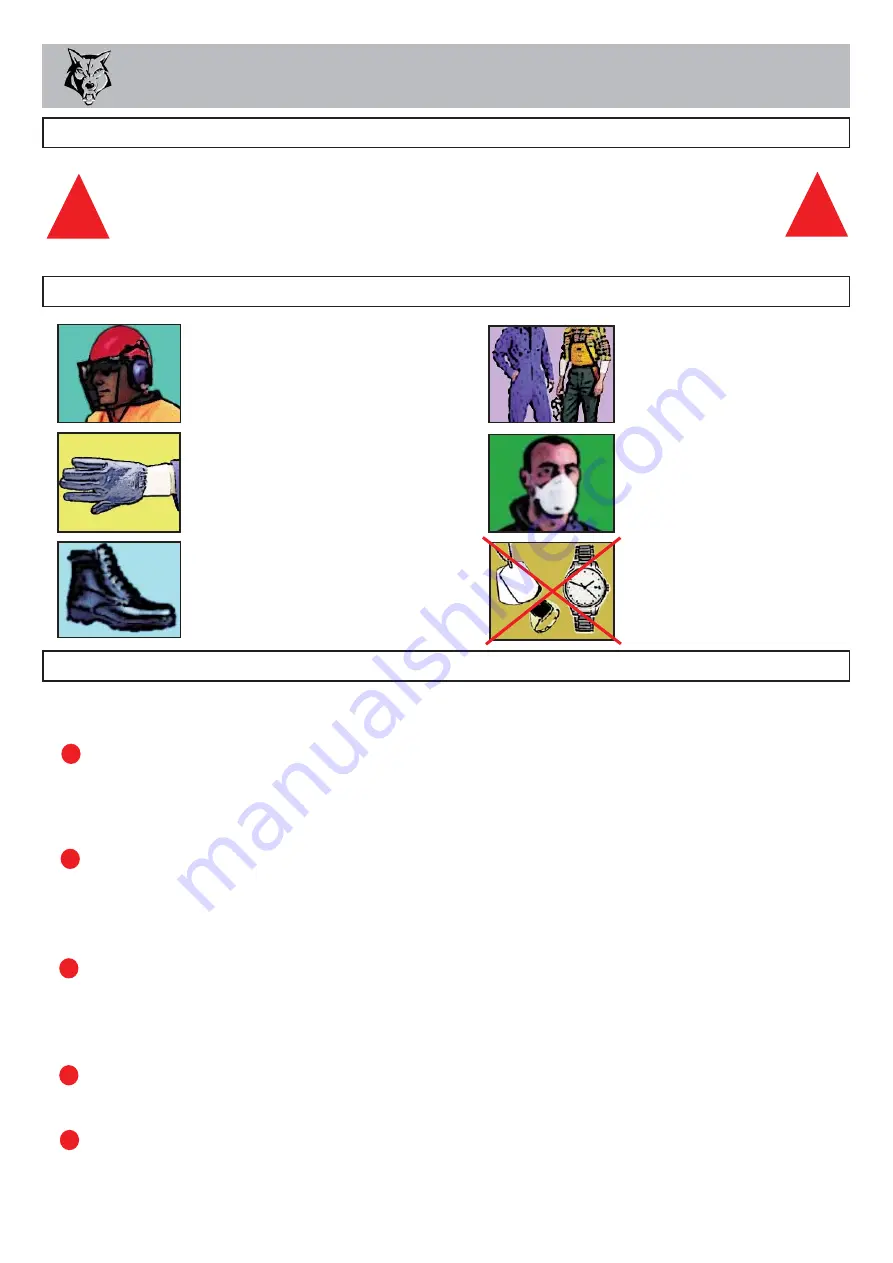
OPERATOR'S PERSONAL PROTECTIVE EQUIPMENT REQUIRED 

Chainsaw safety helmet
fitted with mesh visor and
recommended ear defenders
to the appropriate
specifications. 

Work gloves with
elasticated wrist.

Close fitting heavy-duty
non-snag clothing.

Face mask if
appropriate.

DO NOT

wear rings, bracelets,
watches, jewellery or any
other items that could be
caught in the material and
draw you into the chipper.

Steel toe cap safety boots.

Summary of Contents for TW PTO/100G

Page 1: ...ent Required 8 Hitching Up 8 Connecting PTO Shaft 9 Daily Checks Before Starting 9 Starting to Chip 9 Chipping 9 Blade Wear 10 Blockages 10 SERVICE INSTRUCTIONS 11 Service Schedule 12 Spares 12 Copper...

Page 2: ...are adequately trained for operating this machine especially with regard to safe working practices Timberwolf s policy of constantly improving their products may involve major or minor changes to the...

Page 3: ...e pin hitch of an 18 40hp compact tractor unit with 540rpm PTO when in use Power from the attached compact tractor unit is to be supplied to the chipper via PTO drive shaft 1570 mm DIMENSIONS 2180 mm...

Page 4: ...PARTS LOCATOR 3 FEED FUNNEL DISCHARGE BUCKET ROTOR HOUSING BELT GUARD TOW HEAD PTO SHAFT GUARD PTO SHAFT STAND DISCHARGE HANDLE DISCHARGE TUBE DISCHARGE CLAMPS FRONT SUPPPORT...

Page 5: ...PARTS LOCATOR 4 ROTOR FAN SECTION X2 CUTTER BLADE x2 ROTOR DRIVE PULLEY REAR BEARING FRONT BEARING GEARBOX BELTS BREATHER PIPE...

Page 6: ...ds beyond the funnel the brash may push you to one side causing danger Badly twisted brash should be trimmed before being chipped to avoid thrashing in the feed funnel BE AWARE that the chipper can ej...

Page 7: ...tenance of any kind or whenever the machine is to be left unattended ALWAYS check machine is securely coupled to tractor pin hitch and on firm level ground ALWAYS run tractor engine at required speed...

Page 8: ...0 dB 1 METRE 90 5 dB 95 1 dB 99 0 dB R 4 metres Noise levels between 80 and 103dBA will be experienced at the working position Wear ear defenders at all times to prevent possible damage to hearing Al...

Page 9: ...is 1 and slide the bar until the desired length is reached Replace the bolt and tighten The PTO 100G is fitted with a pin type hitch It is suitable for use with a range of compact tractor with a 540rp...

Page 10: ...gages the rotor Some pieces of wood may move around significantly while being chipped The wood will be drawn into the cutting blade quite quickly be ready for this to happen Stand well clear A piece o...

Page 11: ...ed as follows STOP the tractor engine and remove the ignition keys ENSURE tractor engine has come to a complete stop REMOVE the discharge tube Check that it is clear WEARING gloves reach into the roto...

Page 12: ...TS OF TOTAL SERVICE AND MAINTENANCE OF TIMBERWOLF WOODCHIPPERS YOU ARE STRONGLY ADVISED TO TAKE YOUR CHIPPER TO AN AUTHORISED AGENT FOR ALL BUT THE MOST ROUTINE MAINTENANCE AND CHECKS TIMBERWOLF ACCEP...

Page 13: ...result in damage to the chipper personal injury or even loss of life SPARES Product name Copper Ease Copper Ease contains no hazardous ingredients at or above regulatory disclosure limits however saf...

Page 14: ...for disassembly CLEAN machines are safer and easier to service SAFE MAINTENANCE TENSION DRIVE BELTS 1 Remove the belt guard 2 Check the belt tension For instructions on checking belt tension correct...

Page 15: ...gloves for the blade changing operation CHANGE BLADES 2 8 CHECK WHEEL GREASE POINTS 1 Remove the belt guard 2 Locate the drain plug underneath the gear box 3 Drain out oil and replace plug 4 Add 560ml...

Page 16: ...nce of the required maintenance listed in your Environmental Manufacturing LLP instruction manual In the event of a failure the Environmental Manufacturing LLP authorised Timberwolf dealer is to be no...

Page 17: ...CERTIFICATE OF CONFORMITY 16...

Page 18: ...IDENTIFICATION PLATE 17 EXAMPLE...

Page 19: ...ITH THIS MACHINE CONTAINS IMPORTANT OPERATING MAINTENANCE AND HEALTH AND SAFETY INFORMATION FAILURE TO FOLLOW THE INFORMATION CONTAINED IN THE INSTRUCTION MANUAL MAY LEAD TO DEATH OR SERIOUS INJURY AT...

Page 20: ...TO REDUCE EXPOSURE TO NOISE DUST AND RISK FROM EJECTED PARTICLES DO NOT USE THIS MACHINE WITHOUT THE DISCHARGE UNIT FITTED FAILURE TO COMPLY MAY RESULT IN SERIOUS INJURY OR DAMAGE STOP ENGINE AND REMO...

Page 21: ...VE TRAIN 23 FUNNEL BELT GUARD 24 ROTOR 25 V BELT TENSIONING TABLE 26 The following illustrations are for parts identification only The removal or fitting of these parts may cause a hazard and should o...

Page 22: ...M12 A Washers 4 10 0334 M12 70 Bolt 3 11 1022FB Tow Hitch 1 12 made in production Prop Leg Pin 1 Item Part No Part Name Q ty 13 0524P Access Cover 1 14 0371 M10 70 Bolt 2 15 0701 M10 A Washer 4 16 07...

Page 23: ...uare 1 6 0430 M12 35 Cup Square 1 7 0134 Black Handle Grip 1 8 1649MS Discharge Clamp Handle 1 9 4109M M16 Clamp Nut 1 10 4131 Roll Pin 1 11 0434 M16 70 Hex Bolt 1 12 1354 M16 C Washer 1 13 2837MS Cla...

Page 24: ...10 0316 M12 150 Bolt 1 11 0704 M12 C Washer 3 Item Part No Part Name Q ty 12 0644 M12 P Nyloc Nut 2 13 1531FS Gear Box Bracket 1 14 0701 M10 A Washer 6 15 0360 M10 25 Bolt 6 16 0318 M12 30 Bolt 1 17...

Page 25: ...nsion 1 5 0361 Knob 1 6 0704 M12 C Washer 4 7 0318 M12 20 Bolt 1 Item Part No Part Name Q ty 8 1415 M6 16 Pan Posi 6 9 0709 M6 A Washer 6 10 0391 M6 T Nyloc Nut 6 11 0712 M8 C Washer 8 12 0346 M8 20 B...

Page 26: ...ring 6205 2 6 0796 20 Thou Shim As Req d 7 0883MCB Bearing Cup 1 8 1611M Nose Shaft 1 9 1083M Rotor 1 Item Part No Part Name Q ty 10 1571 Fan Section 2 11 0386 M10 30 Caphead 6 12 0071H Blade 2 13 006...

Page 27: ...EXTENDED BELT SPAN LENGTHS ON THE 250DH S425 S426 SHREDDER THE FORCE READINGS ARE INCREASED BY 0 5Kgf OVER THE DESIGN IQ OUTPUTS Force reading Kgf New belt Used belt TW MODEL No PUMP BELT Used belt Fo...

Reviews: