Repeat this process to set additional network parameters, such as your Subnet Mask,
Gateway, Primary DNS server and Secondary DNS server. You may also specify
your NTP server if you know its IP address. If you know your NTP server by its
name (such as ntp.yourcompany.com) you will need to use a USB keyboard or enter
this information through the web interface. Be sure to select “Apply Settings” to
save your changes.
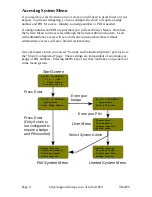
If you have set your clock to a static IP address you can easily change it back to
DHCP. You will need to be an administrative user. Access the menu and navigate
to “Configure Network.” Scroll down to “Revert to DHCP” and press Enter.
You will need to select “Apply Settings.” In some cases, you may need to perform a
full restart or power cycle for the change to take effect.
IPS120T-B Biometrics Mounting
The IPS120T-B unit should be mounted at approximately eye-level for employees to
use the biometric option most successfully.
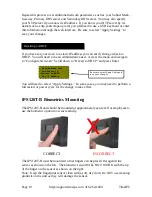
The IPS120T-B must be mounted so that fingers can be placed flat against the
sensor as shown on the left. The biometric sensor WILL NOT WORK with the tip
of the finger on the sensor as shown on the right.
Note: Keep the fingerprint sensor clean with a soft, dry cloth. Do NOT use cleaning
products on the unit as they will damage the sensor.
Page 10
http://support.timeips.com 316.264.1600
TimeIPS
Reverting to DHCP
Show Network Info
Set Master IP
>Revert to DHCP
Set IP Address
Be sure to select Apply Settings to
save your changes.
X
CORRECT
INCORRECT


