Additional Network Settings
If needed, the TimeIPS IPS120T can be assigned a static IP address on your
network. You may set a static IP address using the menus, or, if it has a DHCP
address and you want to change to static, you can use the web interface provided by
the IPS120T.
(A)
If your clock has a DHCP address, but you want to change it to a static address,
the first option is to use the web interface of the clock. To do this, enter the address
of the clock into a web browser of any computer on your network:
http://192.168.1.106/
Your web browser will take you to a page where you can set the IP address, Subnet
Mask, Default Gateway, Primary and Secondary DNS servers and the NTP server
for this clock. Be sure to click on “Apply Changes” to store your settings.
(B)
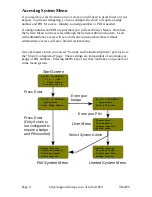
To set a static IP address through the clock menu you must be an administrative
user. Access the menu and navigate to the Full System Menu. Scroll down to
“Configure Network” and press Enter. Then scroll to “Set IP Address” and press
Enter. You should then see a screen similar to the following:
Specify the IP address you want this clock to have and press Enter. You will see a
screen similar to this:
In a few seconds you will return to the “Configure Network” screen. You do not
need to actually select “Apply Settings” until you have changed all of the network
settings. This usually includes the IP address, Subnet Mask, Gateway and Primary
DNS server.
TimeIPS
http://support.timeips.com 316.264.1600
Page 9
Oct 03, 12:00:00PM
NETWORK SETUP
Enter IP Address
Be sure to use the current IP
address of your TimeIPS IPS120T.
Setting a Static IP Address
Select
“Apply Settings”
to apply network
changes.


