
THANK YOU FOR PURCHASING YOUR TIMEX® WATCH.
Register your product at
www.timex.com
W-163
120-095007
NA
Enregistrez votre produit à
www.timex.com
W-163
120-095007
NA
Registre su producto en
www.timex.com
W-163
120-095007
NA
EXTENDED WARRANTY
Available in U.S. only.
Extend your warranty for an additional 4 years from date of purchase
for $5. You can pay with AMEX, Discover, Visa or MasterCard by calling 1 800-448-4639 during
normal business hours. Payment must be made within 30 days of purchase. Name, address,
telephone number, purchase date, and 5-digit model number required. You can also mail a
check for $5 to: Timex Extended Warranty, P.O. Box 1676, Dept. EF, Little Rock, AR 72203.
Please read instructions carefully to understand how to operate your Timex® watch.
Your model may not have all of the features described in this booklet.
FEATURES
• Time and date display • Daily alarm • Chronograph • Hourly chime
BASIC OPERATIONS
Press
MODE
to set time, date and alarm or enter Chrono Mode. Press
INDIGLO®
button to
illuminate watch face. In any mode, press
MODE
to view time display. Press any button to stop
alarm beeps.
MERCI D’AVOIR ACHETÉ CETTE MONTRE TIMEX®
GARANTIE ÉTENDUE
Proposée aux États-Unis seulement.
La garantie peut être prolongée pour une période
additionnelle de 4 ans à compter de la date d’achat pour la somme de 5 $. Vous pouvez effectuer ce
paiement avec AMEX, Discover, Visa ou MasterCard en composant le 1-800-448-4639 durant les
heures normales d’ouverture. Le paiement doit être effectué dans les 30 jours qui suivent l’achat.
Indiquer les nom, adresse, numéro de téléphone, date d’achat et numéro de modèle à 5 chiffres. Il est
également possible d’envoyer un chèque de 5 $ US par courrier à : Timex Extended Warranty, P.O. Box
1676, Dept. EF, Little Rock, AR 72203.
Lire les instructions avec attention pour bien comprendre le fonctionnement de cette montre
Timex®.
Il est possible que ce modèle ne présente pas toutes les fonctions décrites
dans le dépliant.
LE AGRADECEMOS LA COMPRA DE SU RELOJ TIMEX®.
GARANTÍA EXTENDIDA
Disponible solamente en EUA.
Extienda su garantía por 4 años más a partir de la fecha de compra
por $5. Puede pagar con AMEX, Discover, Visa o MasterCard llamando al 1 800-448-4639 en horas
normales de oficina. El pago deberá efectuarse dentro de los 30 días siguientes a la fecha de compra.
Indique el nombre, dirección, número de teléfono, fecha de compra y número de modelo (5 dígitos).
También puede enviar un cheque de $5 por correo a: Timex Extended Warranty, P.O. Box 1676, Dept.
EF, Little Rock, AR 72203.
Le rogamos lea atentamente las instrucciones para poner en funcionamiento su reloj Timex®.
Es posible que su modelo no tenga todas las características descritas en este folleto.
TIME AND DATE
A. Press and hold
MODE
until HOURS digits flash (you’ll be in Alarm Mode). Press
MODE
again
to enter TIME mode. SECONDS digits will flash.
B. Press
ADJUST
to set SECONDS to zero.
C. Press
START/STOP
to select MINUTES.
D. Press
ADJUST
to change.
E. Repeat to set HOURS, MONTH, DATE, and DAY of WEEK. Go through 12 hours to set AM
or PM.
F. Press
MODE
when done.
G. To display DATE from TIME display, press
START/STOP
.
H. With DATE displayed, press and hold
START/STOP
, then press
ADJUST
to change display
between DATE-MONTH and MONTH-DATE.
I. With TIME displayed, press and hold
ADJUST
, then press
MODE
to switch between 12- and
24-hour format.
ALARM AND HOURLY CHIME
A. Press and hold
MODE
until HOURS digits, DAY, and A or P (for AM or PM) flash.
B. Press
ADJUST
to change HOURS digits. Go through 12 hours for AM or PM.
C. Press
START/STOP
to select MINUTES.
D. Press
ADJUST
to change. Press
MODE
when done.
E. Press and hold
ADJUST
, then press
START/STOP
to turn chime on/off. Press
START/STOP
again to turn alarm on/off. Release
START/STOP
when done.
When alarm time is reached, watch will beep until a button on the watch is pushed. Alarm will
repeat every 24 hours until deactivated.
or
will appear in display when alarm is on.
or
will appear in display when
hourly chime is on.
CHRONOGRAPH
Chronograph will count up to 24 hours. Lap times are not stored. After 40 minutes chrono
display changes from seconds to minutes.
A. With time displayed, press
MODE
to select Chrono Mode.
B. Press
START/STOP
to start.
C. Press
ADJUST
to view lap time. Press again to resume lap timing.
D. Press
START/STOP
to stop timing. Press
ADJUST
to reset chrono to zero.
E. Repeat for successive laps.
INDIGLO® NIGHT-LIGHT
Press
INDIGLO®
button to activate light. Patented (U.S. Patent Numbers 4,527,096 and
4,775,964) electroluminescent technology used in the INDIGLO® night-light illuminates watch
face at night and in low light conditions.
If your watch is water-resistant, meter marking or (
) is indicated.
Water-Resistance Depth
p.s.i.a.* Water Pressure Below Surface
30m/98ft
60
50m/164ft
86
*pounds per square inch absolute
WATER RESISTANCE
WARNING: TO MAINTAIN WATER-RESISTANCE, DO NOT PRESS ANY BUTTONS UNDER
WATER.
1.
Watch is water-resistant only as long as lens, push buttons and case remain intact.
2.
Watch is not a diver watch and should not be used for diving.
3.
Rinse watch with fresh water after exposure to salt water.
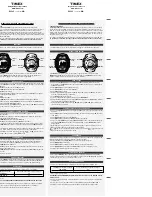
START/
STOP
INDIGLO®
BUTTON
ADJUST
MODE
W R 5 0 M
PM
START/
STOP
INDIGLO®
BUTTON
ADJUST
MODE
FUNCIONES
• Visualización de hora y fecha • Alarma diaria • Cronógrafo • Señal acústica cada hora
OPERACIONES BÁSICAS
Pulse
MODE
para ajustar la hora, fecha y alarma o ingresar al modo cronógrafo. Pulse
lNDIGLO®
para iluminar la esfera del reloj. En cualquier modo pulse
MODE
para ver la hora.
Oprima cualquier botón para silenciar las señales de la alarma.
HORA Y FECHA
A. Pulse y sostenga
MODE
hasta que los dígitos de HORAS destellen (usted estará en el
modo Alarma). Pulse
MODE
de nuevo para ingresar TIME (modo horario). Los dígitos de los
SEGUNDOS destellarán.
B. Pulse
ADJUST
para poner los SEGUNDOS a cero.
C. Pulse
START/STOP
para seleccionar MINUTOS.
D. Pulse
ADJUST
para cambiar.
E. Repita el procedimiento para ajustar HORAS, MES, FECHA y DÍA de la SEMANA. Recorra 12
horas para fijar AM (mañana) o PM (tarde).
F. Pulse
MODE
cuando haya acabado.
G. Para ver la FECHA desde la pantalla de HORA, pulse
START/STOP
.
H. En la pantalla de FECHA, pulse y sostenga
START/STOP
, luego pulse
ADJUST
para cambiar
entre las pantallas de DÍA-MES y MES-DÍA.
I. En la pantalla de HORA, pulse y sostenga
ADJUST
, luego pulse
MODE
para cambiar entre
los formatos de 12 y 24 horas.
ALARMA Y SEÑAL ACÚSTICA CADA HORA
A. Pulse y sostenga
MODE
hasta que los dígitos de HORAS, Día, y A o P (para mañana o tarde)
destellen.
B. Pulse
ADJUST
para cambiar los dígitos de HORAS. Recorra 12 horas para fijar AM (mañana)
o PM (tarde).
C. Pulse
START/STOP
para seleccionar MINUTOS.
D. Pulse
ADJUST
para cambiar. Pulse
MODE
cuando haya acabado.
E. Pulse y sostenga
ADJUST
, pulse luego
START/STOP
para activar o desactivar la señal acús-
tica. Pulse
START/STOP
para activar o desactivar la alarma. Suelte
START/STOP
cuando
haya acabado.
Cuando llegue la hora de la alarma, el reloj sonará hasta que se pulse un botón del reloj. La
alarma se repetirá cada 24 horas hasta que sea desactivada.
o
aparecerá en la pantalla cuando la alarma está activada.
o
aparecerá en la
pantalla cuando la señal acústica está activada.
CRONÓGRAFO
El cronógrafo contará hasta 24 horas. Los tiempos de vuelta no se almacenan. Después de 40
minutos la pantalla del cronógrafo cambia de segundos a minutos.
A. En la pantalla de hora, pulse
MODE
para selecionar el modo cronógrafo.
B. Pulse
START/STOP
para iniciarlo.
C. Pulse
ADJUST
para ver tiempo de vuelta. Púlselo otra vez para reanudarlo.
D. Pulse
START/STOP
para detenerlo. Pulse
ADJUST
para poner el cronógrafo a cero.
E. Repita el procedimiento para vueltas sucesivas.
LUZ NOCTURNA INDIGLO®
Pulse el botón
INDIGLO®
para activar la luz. La tecnología electroluminiscente patentada
(patentes de EUA 4.527.096 y 4.775.964) utilizada en la luz nocturna INDIGLO® ilumina toda la
cara del reloj por la noche y en condiciones de poca luz.
Si su reloj es resistente al agua, se indicarán los metros o aparecerá el símbolo (
).
Profundidad de Resistencia al Agua
p.s.i.a.* Presión bajo la superficie del agua
30m/98pies
60
50m/164pies
86
*libras por pulgada cuadrada absoluta
RESISTENCIA AL AGUA
ADVERTENCIA: PARA MANTENER LA RESISTENCIA AL AGUA, NO PULSE NINGÚN BOTÓN
BAJO EL AGUA.
1.
El reloj es resistente al agua solamente mientras el cristal, los botones y la caja permanez-
can intactos.
2.
El reloj no es un reloj de submarinista y no debe utilizarse para realizar submarinismo.
3.
Enjuague el reloj con agua dulce después de haber estado expuesto al agua salada.
FONCTIONS
• Affichage de l’heure et de la date • Alarme quotidienne • Chronographe • Carillon horaire
OPÉRATIONS DE BASE
Appuyer sur
MODE
pour ajuster l'heure, la date et l'alarme ou entrer dans le mode Chrono.
Appuyer sur le bouton
INDIGLO®
pour illuminer la montre. Dans tout mode, appuyer sur
MODE pour afficher l'heure. Appuyer sur tout bouton pour couper l'alarme.
HEURE ET DATE
A. Tenir
MODE
enfoncé jusqu’à ce que les chiffres des HEURES clignotent (vous serez en mode
Alarme). Appuyer sur
MODE
une deuxième fois pour entrer en mode Heure. Les chiffres des
SECONDES clignotent.
B. Appuyer sur
ADJUST
pour remettre les SECONDES à zéro.
C. Appuyer sur
START/STOP
pour sélectionner les MINUTES.
D. Appuyer sur
ADJUST
pour changer.
E. Répéter pour régler les HEURES, le MOIS, la DATE et LE JOUR DE LA SEMAINE. Faire défiler
12 heures pour alterner entre AM (matin)
et PM (après-midi).
F. Appuyer sur
MODE
pour valider.
G. Appuyer sur
START/STOP
pour afficher la DATE à partir de l’affichage de l’HEURE.
H. Alors que la DATE est affichée, tenir
START/STOP
enfoncé, puis appuyer sur
ADJUST
pour
alterner l’affichage entre DATE-MOIS et MOIS-DATE.
I. Alors que l’HEURE est affichée, tenir
ADJUST
enfoncé, puis appuyer sur
MODE
pour alterner
entre l’affichage de 12 heures et celui de 24 heures.
ALARME ET CARILLON HORAIRE
A. Tenir
MODE
enfoncé jusqu’à ce que les chiffres des HEURES, le JOUR et A ou P
(pour AM ou PM) clignotent.
B. Appuyer sur
ADJUST
pour changer les chiffres des HEURES. Faire défiler 12 heures pour
alterner entre AM (matin) et PM (après-midi).
C. Appuyer sur
START/STOP
pour sélectionner les MINUTES.
D. Appuyer sur
ADJUST
pour changer. Appuyer sur
MODE
pour valider.
E. Tenir
ADJUST
enfoncé, puis appuyer sur START/STOP pour activer ou désactiver le carillon.
Appuyer sur
START/STOP
pour activer ou désactiver l’alarme. Relâcher
START/STOP
pour
valider.
À l'heure fixée pour l'alarme, la montre sonne jusqu'à ce qu'un des boutons de la montre soit
enfoncé. L’alarme se répète toutes les 24 heures jusqu’à ce qu’elle soit désactivée.
Lorsque la fonction Alarme est activée (ON), son icone s’affiche
ou
. Lorsque la fonc-
tion Carillon est activée (ON), son icone s’affiche
ou
.
CHRONOMÈTRE
Le chronomètre peut compter jusqu’à 24 heures. Les temps au tour ne sont pas stockés en
mémoire. Après 40 minutes, l’affichage du chronomètre passe des secondes aux minutes.
A. Alors que l’heure est affichée, appuyer sur
MODE
pour sélectionner le mode Chrono.
B. Appuyer sur
START/STOP
pour démarrer.
C. Appuyer sur
ADJUST
pour afficher le temps au tour. Appuyer une nouvelle fois pour repren-
dre le chronométrage du temps au tour.
D. Appuyer sur
START/STOP
pour arrêter le chronomètre. Appuyer sur
ADJUST
pour remettre
le chronomètre à zéro.
E. Répéter pour les tours successifs.
VEILLEUSE INDIGLO®
Appuyer sur le bouton
INDIGLO®
pour activer l'éclairage. La technologie électroluminescente
brevetée (brevets américains n° 4,527,096 et 4,775,964) utilisée dans la veilleuse INDIGLO®
permet d’illuminer la face de la montre la nuit et dans des conditions de faible éclairage.
Si la montre est étanche, la profondeur maximale ou le symbole (
) est indiqué.
Profondeur d’étanchéité
Pression de l’eau sous la surface en p.s.i.a.*
30m/98 pi
60
50m/164 pi
86
*livres par pouce carré (abs.)
ÉTANCHÉITÉ
MISE EN GARDE : POUR PRÉSERVER L’ÉTANCHÉITÉ, NE PAS ENFONCER LES BOUTONS
SOUS L’EAU.
1.
La montre est étanche aussi longtemps que le verre, les boutons et le boîtier sont intacts.
2.
La montre n’est pas conçue pour la plongée. Ne pas l’utiliser dans ces conditions.
3.
Rincer la montre à l’eau douce après tout contact avec l’eau de mer.
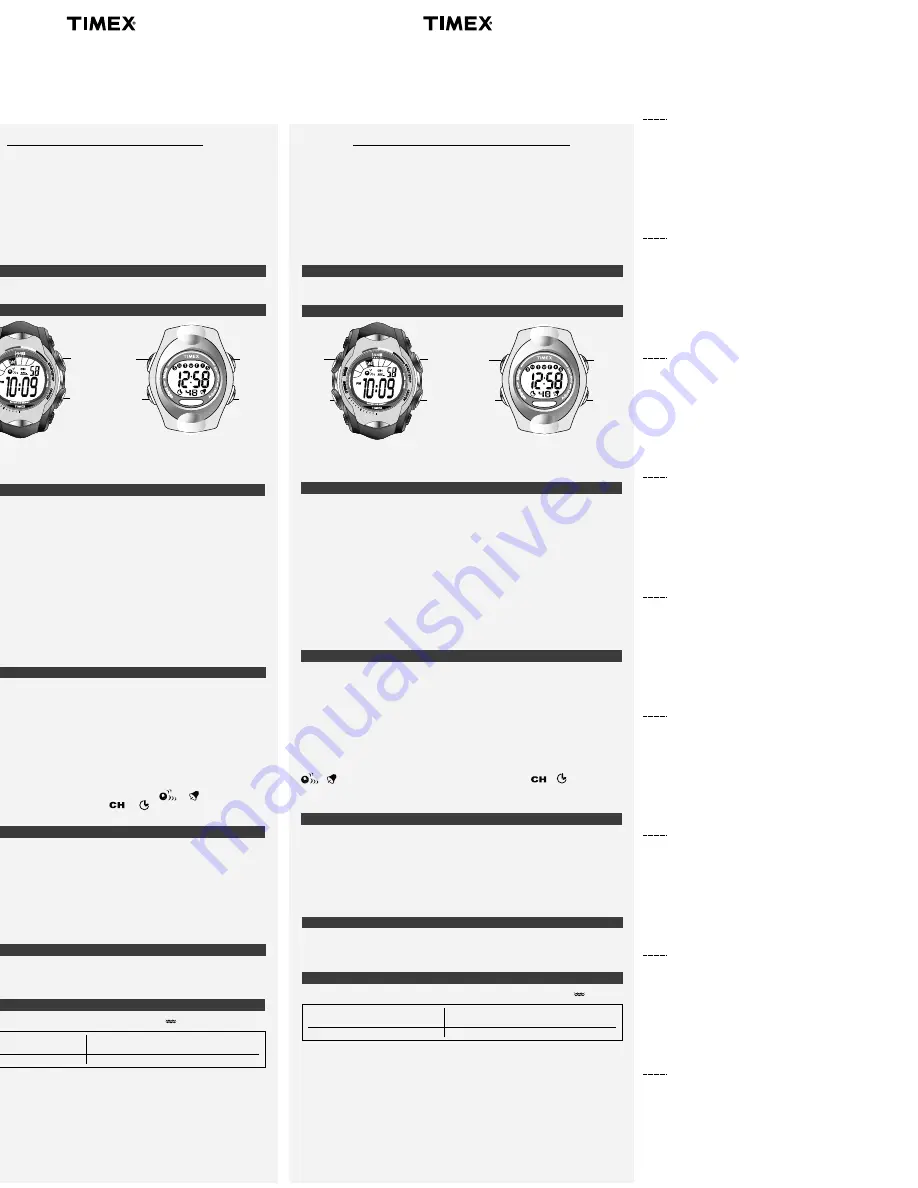
START/
STOP
INDIGLO®
BOUTON
ADJUST
MODE
W R 5 0 M
PM
START/
STOP
INDIGLO®
BOUTON
ADJUST
MODE
START/
STOP
BOTÓN
INDIGLO®
ADJUST
MODE
W R 5 0 M
PM
START/
STOP
BOTÓN
INDIGLO®
ADJUST
MODE


