background image

2

1. 

Do not

 operate the hard floor washer too close to heaters, 

radiators or other hot surfaces.

2. 

Before inserting the charger into the wall, make sure your 
hands are dry.

3. 

Before turning on the hard floor washer, safely remove any 
large objects from the floor or cleaning surface in order to 
prevent damage to the filter.

4. 

When you want to remove the charger from the power 
socket, do not use the power cable, gently pull the plug 
from the power socket.

Do not use this hard floor washer if the housing and/or the charger 
housing is damaged.

Precautionary measures:

Summary of Contents for FLOOR ONE S3 Series

Page 1: ...SERIES Smart Cordless Vacuum Washer Instruction Manual Actual product may differ from illustration ...

Page 2: ......

Page 3: ...1 CONTENTS Important Safety Instructions 3 Overview 6 Accessories 8 Assembly 9 Operation 10 Maintenance 16 Specifications 20 Troubleshooting 21 Warranty 22 ...

Page 4: ...urning on the hard floor washer safely remove any large objects from the floor or cleaning surface in order to prevent damage to the filter 4 When you want to remove the charger from the power socket do not use the power cable gently pull the plug from the power socket Do not use this hard floor washer if the housing and or the charger housing is damaged Precautionary measures ...

Page 5: ...outdoors or on wet surfaces 5 Always check the power cord before use the power cord and the power adapter should be in a good condition and must not be damaged If the power cord or the charger adaptor is damaged or defective it must be replaced 6 The appliance and charger are intended for domestic indoors use only 7 Do not unplug the charger by pulling on the power cord To unplug grasp the power a...

Page 6: ...maged have them replaced immediately 19 Never clean the hard floor washer or any of the electrical parts especially the electrical connections with water or liquid cleaners 20 Never attempt to make any modifications to the hard floor washer and charger 21 Always store the appliance and charger indoors in a cool and dry place 22 This washer is for dry household use only 23 Never run over the power ...

Page 7: ... liquid comes into contact with your eyes seek medical help immediately 5 Do not charge or store the appliance outdoors or inside the car Only charge or store the battery in a dry indoor area where the temperature is more than 4 deg C but less than 40 deg C The charger is for indoor use only 6 Never attempt to open the battery for any reason If the plastic housing of the battery casing breaks or c...

Page 8: ...ter Tank Release H Dirty Water Tank Handle I Brush Roller Cover Release J Tube K WiFi Mute Button L Clean Water Tank CWT M Dirty Water Tank DWT N Floater O Brush Roller Cover P Brush Roller Q 3 in 1 Cleaning Tool R HEPA Filter HEPA Holder S Accessory Holder T Adaptor U Charging Base A Q B R J M C S K N D T L O E U F G H I P Overview ...

Page 9: ...n B Brush Roller Tangled Indicator C Dirt Monitoring Loop Blue to red according to the dirt amount D AUTO Mode E DWT Full or Blocked F CWT Empty G Power Indicator H Tineco Logo I WiFi Indicator J Battery Level Indicator A B C D E F G H J I ...

Page 10: ...ime It can be easily cleaned with the self cleaning function HEPA Filter HEPA and filter net can block large particles and debris ensure the appliance s durability Please install the HEAP before use or it may lead to weak suction 3 in 1 Cleaning Tool A full brush to clean the DWT brush chamber and opening The tool also has a bristled end to remove dirt and mud on the roller and DWT The tool has a ...

Page 11: ...ration and Maintenance click To assemble the handle insert it into the appliance until you hear a click In the event that the product must be returned please disassemble the handle Press the spring to release the handle with a tool like a screwdriver and lift the released handle from the appliance ...

Page 12: ...use water only Press the button and the appliance will start in AUTO mode by default Press it again to turn off the appliance Switch between AUTO and MAX mode by pressing the AUTO MAX button 142 The appliance will stop working when put uprightly and start running again when you recline Do not recline more than 142 to protect against water leakage Place the appliance on the charging base vertically...

Page 13: ...tor into a power outlet 1 To charge the appliance connect the external charging cord to the charging base and plug it into the wall outlet 2 To avoid tripping hazards please place the appliance on the charging base near a wall during charging Warning Only charge the appliance with the adaptor supplied by Tineco During long periods of not being used the appliance must be charged once every 3 months...

Page 14: ...dirt is detected This mode automatically provides the best cleaning solution Clean on Min Power Vary depending on dirt amount Heavy dirt on Max Power MAX Mode AUTO MAX In AUTO mode press the AUTO MAX button to enter MAX mode The AUTO indicator on the display will turn off In Max mode the appliance will apply max suction power and will spray water solution for deeper cleaning Note Keep sharp object...

Page 15: ...ratory using ambient temperatures between 39 2 F 4 C to 104 F 40 C Indicator When in Use Battery level 10 battery indicator will be illuminated Battery level 10 battery indicator will be blinking Off no power detected or possible battery malfunction Blinking red dirt sensor malfunction or blocked Indicator blinking CWT is empty Indicator blinking DWT is full or channel has a blockage Indicator bli...

Page 16: ... minutes all indicator lights turn off App All the functions can be performed using the Tineco app Download the Tineco app from the App Store Google Play and Tineco Official Site Tineco Tineco www tineco com Support App Downloads GET IT ON Google Play iOS 9 0 or later Android 5 0 or later Download on the App Store App Downloads Note The default setting for voice prompt is English you can set other...

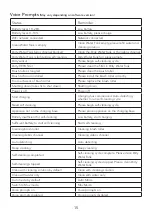
Page 17: ... 3s to shut down Shutting down Power is off Power off Start charging Charging has commenced Auto detecting whether to run self cleaning cycle Need self cleaning Please begin self cleaning cycle Appliance not on the charging base Please place appliance on the charging base Battery insufficient for self cleaning Low battery start charging Sufficient battery to start self cleaning Start self cleaning...

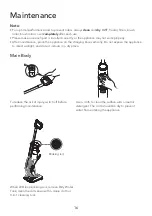
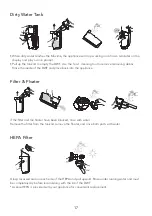
Page 18: ...ce the appliance on the charging base vertically Do not expose the appliance to direct sunlight and store it indoors in a dry place Main Body AUTO MAX To reduce the risk of injury switch off before performing maintenance Use a cloth to clean the surface with a neutral detergent The cloth should be dry to prevent water from entering the appliance Blinking red When LED loop blinking red remove Dirty...

Page 19: ...side of the DWT and place back into the appliance Filter Floater If the filter and the floater have been blocked rinse with water Remove the filter from the tank lid remove the floater and rinse both parts with water HEPA Filter Grasp recessed area on each side of the HEPA and pull upward Rinse under running water and must be completely dry before recombining with the lid of the DWT A spare HEPA i...

Page 20: ...lete you will hear the voice prompt self cleaning completed please clean the Dirty Water Tank At this point the appliance will begin charging Note Ensure the charging base is plugged in Before self cleaning cycle please clean the DWT and ensure the water level in the CWT exceeds 40 Brush Roller Cover Grab the front handle while pressing the button and pull upward to remove Rinse with water When re...

Page 21: ...he brush roller back into the accessory holder and allow it to dry completely before reinstalling Remove hair and debris from the brush roller chamber and the opening with a tissue or a damp cloth Replace the brush roller by inserting the brush roller end into the right side of the holder then lock the pull tab into place by pressing downward Note A spare brush roller is provided with your applian...

Page 22: ...t FLOOR ONE S3 SERIES AC Input 100 240V Voltage 21 6V 4000mAh Lion Rated Power 220W Running Time AUTO 35 mins MAX 25 mins Charging Time 4 0 5 hrs Water Flow Rate 30 100ml min CWT Capacity 0 6L DWT Capacity 0 5L Waterproof IPX4 ...

Page 23: ...ator blinking Voice prompt Please clean Dirty Water Tank The dirty water in DWT has reached the MAX line Empty the dirty water and then reinstall the DWT All lights off in operation Battery overheat or malfunction Cool the appliance down and restart Battery level indicator blinking Voice prompt Low battery please charge Low battery Charge the appliance or restart LED loop blinking red Voice prompt...

Page 24: ...r to prolong the life of accessories and consumables regular care and maintenance is recommended When properly used and cared for your washer will render excellent service refer to the instruction manual for further details as misuse or failure to follow the instructions makes this warranty void In the event of service claim or advice being needed please contact Electrical Home Aids Pty Ltd Buildi...

Page 25: ...nt or refund for a major failure and compensation for any other reasonably foreseeable loss or damage You are also entitled to have the goods repaired or replaced if the goods fail to be of acceptable quality and the failure does not amount to a major failure REGISTRATION We highly recommend that upon purchase you register your appliance on the Tineco official website www tineco com and enjoy excl...

Page 26: ......

Page 27: ......

Page 28: ...ce Hotline AUS 1800 815 270 NZ 0800 282 288 www godfreys com au www godfreys co nz Distributed in Australia New Zealand by Electrical Home Aids Pty Ltd Godfreys Building 3 Brandon Business Park 530 Springvale Road Glen Waverley VIC 3150 Australia tinecoglobal ...

Reviews: