background image

USER GUIDE

PRODUCT INFORMATION

File: TISPLUS 

Cradle 

for 

Zebra T

C5

1/56 

Stand: 

16.01.2018

 5 

© TIS GmbH 2018  – Subject to changes and amendments, errors excepted        Müller-Armack-Str. 8 | 46397 Bocholt | www.tis-gmbh.com | 

contact@tis-gmbh.com

 | +49 2871 2722-0

Using TC51/56 without Rubber Boot

click

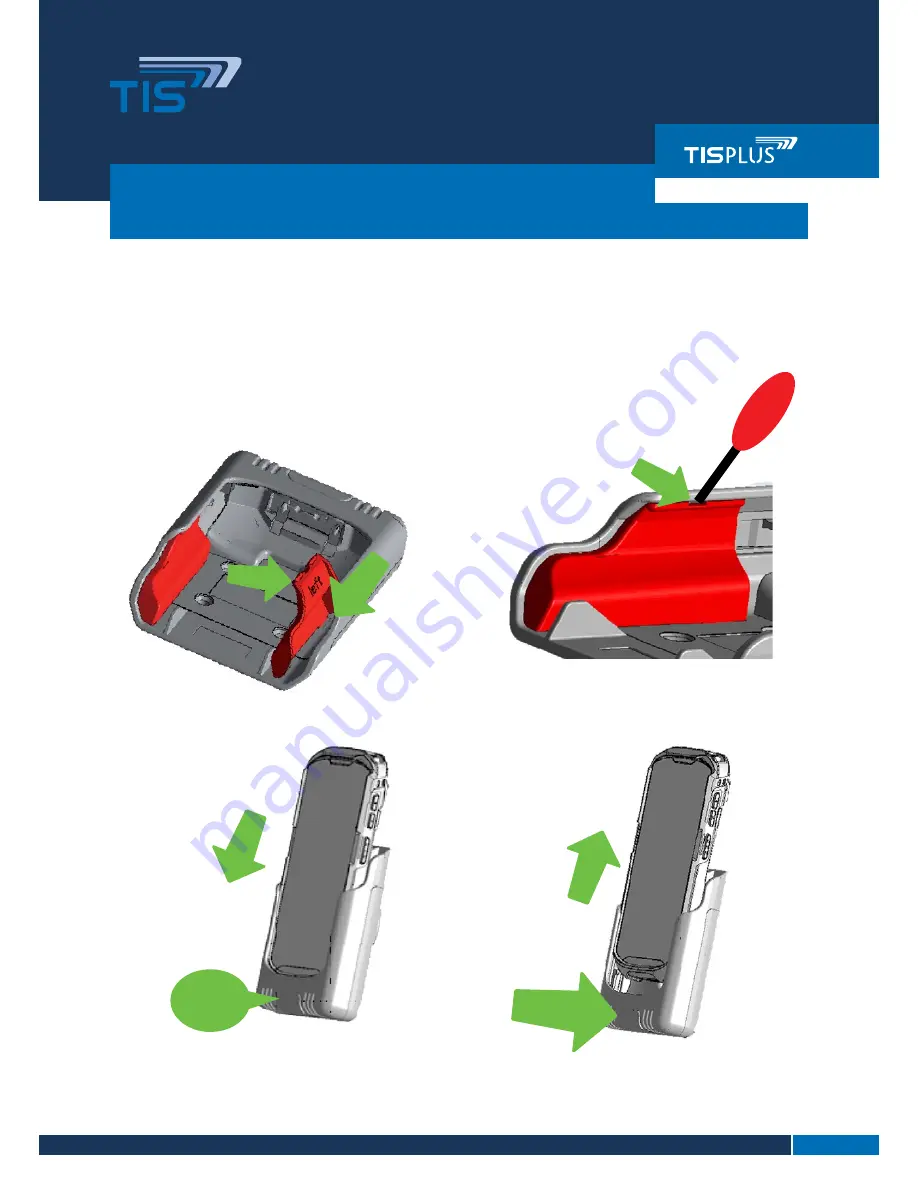
Please insert the spacers according to the inscription “left” and “right” in the upper sides of the 

cradle. First insert the spacer with the locking lugs on the rear panel (1) and press it against 

the side panel (2) until it clicks into place. 

To remove the spacers, insert a screwdriver into the opening (3) on top of the spacer

and pry the spacer out. 

To remove the device first press

the key (1) and than remove it(2)

Insert the device into the cradle

(1) until it snaps into the lock

position.

1

1

2

2

3

push

Insert spacer

Insert

Handling

 Remove spacer

Remove

TISPLUS VEHICLE CRADLE FOR ZEBRA TC51/56

USER GUIDE

PRODUCT INFORMATION

 5 

© TIS GmbH 2018 – Subject to changes and amendments, errors excepted                   Müller-Armack-Str. 8 | 46397 Bocholt | www.tis-gmbh.com | contact@tis-gmbh.com | +49 2871 2722-0

Summary of Contents for TISPLUS

Page 1: ...WELL DOLPHIN CT50 1 Monting Information 2 2 Connection cable 3 3 Mounting the TISPLUS Cradle 3 4 Power LED 4 5 Using TC51 56 without Rubber Boot 5 6 Handling 5 7 Maintenance Care 6 8 Technical Data 6 Content TISPLUSVEHICLE CRADLE FOR ZEBRATC51 56 USERGUIDE PRODUCT INFORMATION 1 TIS GmbH 2018 Subject to changes and amendments errors excepted Müller Armack Str 8 46397 Bocholt www tis gmbh com contac...

Page 2: ...LEDs displays re set button etc remain visible and accessible Do not bend or damage the connection cable avoid reverse polarity The installation of the cables shall not affect the steering and brakes Make sure that the installation will not interfere the function of the airbag Radio antennas shall be mounted in a sufficient distance to persons 0 5 m Cables shall be mounted in the junction box with...

Page 3: ...the installation and remains disconnected during installation Make sure that no electrical cables fuel or brake lines and the safety equipment of the vehicle will be damaged during installation Make sure that the function of the airbag is not interfered by the installation Make sure that the installation will not affect the use of the steering and brakes and any other vehicle operation Make sure t...

Page 4: ...s Mount the cradle only with cheese head screws countersunk head cause damage to the chas sis The mounting holes of the cradle are compatible with the RAM mount system http www rammount de The TISPLUS Cradle has a power LED which is visible on the side of the connector when the device is removed Power LED TISPLUS Cradle with R A M Mount holder ball RAM B 202U TISPLUSVEHICLE CRADLE FOR ZEBRATC51 56...

Page 5: ...g lugs on the rear panel 1 and press it against the side panel 2 until it clicks into place To remove the spacers insert a screwdriver into the opening 3 on top of the spacer and pry the spacer out To remove the device first press the key 1 and than remove it 2 Insert the device into the cradle 1 until it snaps into the lock position 1 1 2 2 3 push Insert spacer Insert Handling Remove spacer Remov...

Page 6: ... USB power adapter Temperature Range Operating Temperatur 20 C to 60 C Storage Temperatur 40 C to 85 C Humidity 5 to 80 no condensation Imprint This specification and all components and programs described here in are copyrighted work of the TIS Technische Informationssysteme GmbH Germany The TIS GmbH does not accept any responsibility for the correctness or completeness of the information containe...

Reviews: