25
4) Make sure that the turnstile installation site is ready as follows:
• The installation site surface to be flat and horizontal;
• Thickness of concrete blinding coat under the site to be at least 150 mm;
WARNING:
The turnstile to be fixed by means of Redibolt (with jacket and screw) included in
the scope of delivery.
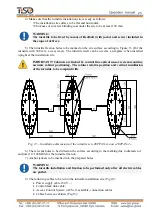
5) The turnstile fixation holes to be marked on the site surface according to Figure 13 (For the
turnstile with 500 mm access ways). The turnstile itself can be used as a template, when installed
upright at the installation site.
IMPORTANT! Cabinets are linked by control line optical sensor system requiring
accurate cabinet positioning. The cabinet relative position and vertical installation
of the turnstile to be complied with.
Fig. 13
–
Installation dimensions of the turnstile set «JETPAN-1» and «JETPAN-2»
6) The relevant holes to be drilled on the surface according to the marking due to diameter of
anchors (12×120М10) for the turnstile fixation.
7) Anchor jackets to be inserted into the prepared holes
WARNING:
The turnstile installation and fixation to be performed only after all electric cables
are pulled.
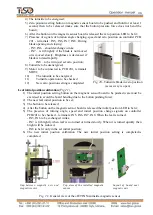
8) The following cables to be run to the turnstile installation site
(Fig.14);
•
Power supply cable 230 V ~;
•
Control desk link cable;
•
Access Control System (ACS), if available, connection cables
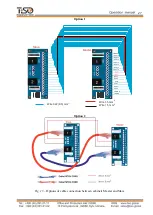
•
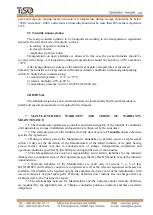
Cables between cabinets (Fig.15);


