Chronograph with alarm
*
www.tissot.ch
124_EN / 08.06
3/4
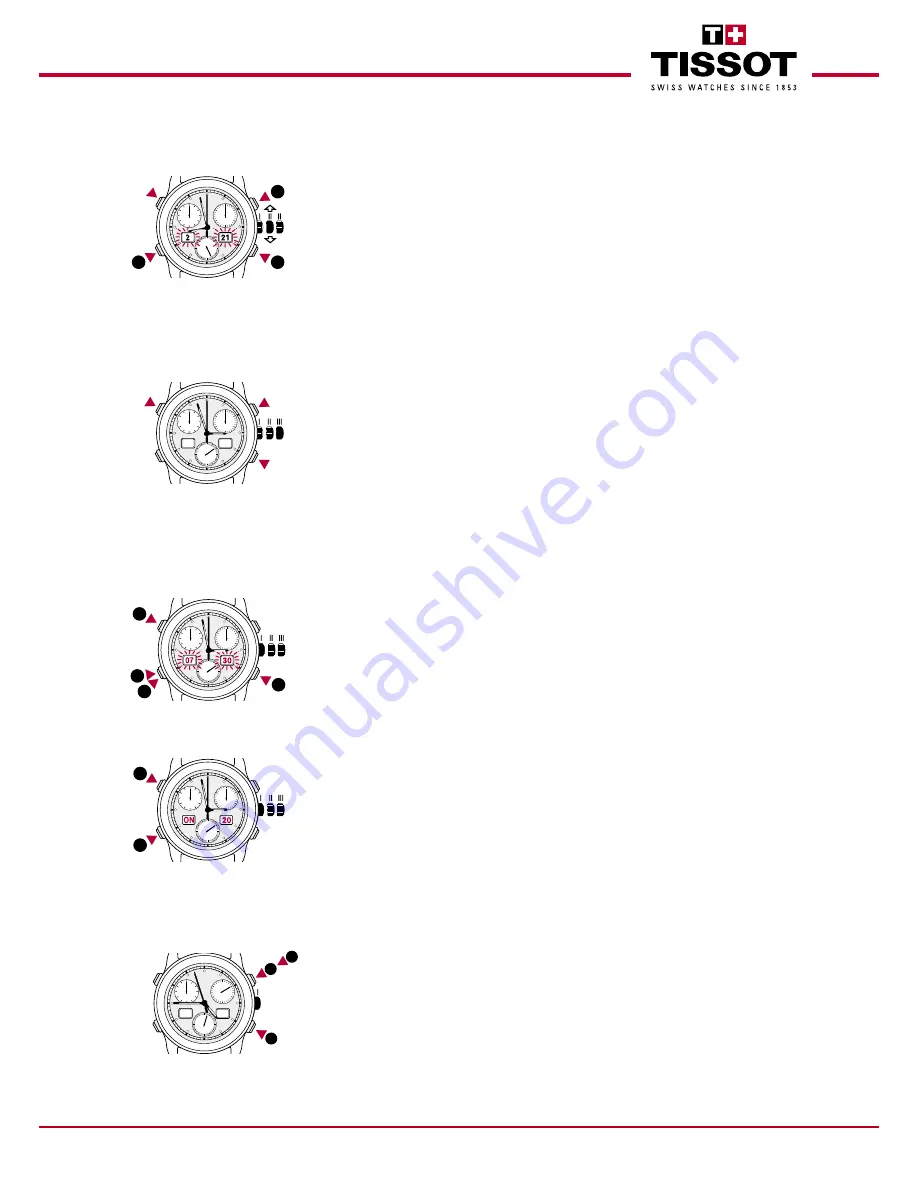
Setting the counters to zero
Crown in position II
In exceptional circumstances, the counter hands may not be set at or return to the
0
position (12 o'clock). In
this case, press each pusher to reset the hands concerned to zero:
A
Sets the 30 minute counter hand to zero
B
Sets the 60 second counter hand to zero
D
Sets the 12 hour counter hand to zero
Note:
Brief pressure on the pusher advances the hand incrementally.
Extended pressure (>1 sec.) on the pushbutton advances the hand rapidly.
Alarm
Crown in position I
Select the «
ALARM
» (e.g. : AL/Am) by pressing pusher
D for < 1 second.
Notes :
The display of the
ALARM
function in the left aperture of the digital display (
AL
) is automatically followed by
the display of the alarm hours (left LCD aperture) and of the alarm minutes (right LCD aperture).
Activate the flashing of hours and minutes of the alarm by pressing pusher
C for < 1 second.
Correct the alarm hours with pusher
C.
Correct the alarm minutes with pusher
B.
Crown in position I
Once the hours and minutes of the alarm are set, activate or deactivate the alarm as follows :
Return to «
ALARM/DATE
» mode by pressing pusher
D for < 1 second.
Select the alarm status «
ON/OFF
» by pressing pusher
C for > 1 second.
Notes :
An audible signal indicates that the alarm is switched on (
ON
). You can also check that the alarm bell is
working properly by pressing pusher
D
(alarm demo mode).
When programming the alarm, ensure that the analog time (hands) matches the digital time
(indicators on left/right sides). If the times indicated are not identical, please refer the paragraph
entitled “Setting the time".
Chronograph (simple function)
The simple « chronograph function » enables you to measure isolated events.
Crown in position I
START/STOP
STOP
Reading the time
Reset counters to zero
Note:
Before each timing operation, the chronograph hands must be reset to zero..
If necessary, refer to the paragraph entitled "Setting the counters to zero".
60
20
40
30
20
10
12
3
6
9
14
57
D
C
A
B
60
20
40
30
20
10
12
3
6
9
3
2
D
C
A
B
4
1
60
20
40
30
20
10
12
3
6
9
D
C
A
B
5
6
60
20
40
30
20
10
3
6
9
Ad
74
1
2
3
D
C
B
A
Correction of month and date
Crown in position III
Select the «
MONTH/DATE
» mode using pusher
A.
Correct the date using pusher
B.
Correct the month using pusher
C.
Note:
Every time a leap year occurs, your watch will change from 28 February to 1 March. You therefore need to set
29 February
by hand, in the following manner :
– Put the setting crown in intermediate position (
II
) (correction of time zones).
– Turn the hour hand twice anti-clockwise (2 full turns).
– Return the setting crown to position
I.
60
20
40
30
20
10
12
3
6
9
D
C
A
1
2
3
B


