8
6-INSTALLATION INSTRUCTIONS
PLEASE READ THIS INSTRUCTION BEFORE STARTING TO OPERATE THE LIFT.
Check for ceiling clearance to confirm the lift can be set up in your bay.
1) After unloading the lift, place it near the intended installation location.
2) Remove the shipping bands and packing materials from the unit.
3) Open the wrapping from the upper column and carefully remove the parts form inside.
Unbolt the column from the shipping brackets. Remove the up-rights (part# 9) from the
packaging and assemble them to the scolumns based on any height restrictions.
4) Once the lift location is decided, chalk the center line in the bay and ensure that the
proper lift placement is observed from walls and obstacles. Also check the ceiling height
for clearance in this location. (See Fig 5A & 5B)
NOTE:
the power unit column can be
located on either side.
5) Assemble the uprights to the columns on model HD2P-15000C. (See Fig. 1, page 21).
6) Position the columns facing each other with 148” between the outside of the base plates.
NOTE:
The power unit column is referred to as the main side column and the non power
unit column is referred to as the offside column.
7) Using a 3/4” concrete drill bit, drill the anchor holes in the main side column, installing
anchors as you go (see Fig. 7, pg. 27). Use a block of wood or rubber mallet to drive
anchor bolts in.
8) Using a level , check column for side-to-side plumb and front-to-back plumb. Use 3/4”
washers or shim stock, placing shims as close as possible to the hole locations. This will
prevent bending the column bottom plates. Tighten 3/4” anchor bolts to 85-lbs.
NOTE:
DO NOT USE IMPACT WRENCH.
9) Using a tape measure, measure from front corner of the base on main side column to the
opposite front corner of the offside column to ensure columns are square. (see Fig. 7,
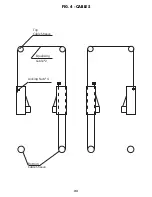
page 27) After confirming the dimensions, install the overhead beam (see Fig 4, page 24)
to the top of the columns BEFORE drilling the anchors for the offside column to ensure
the column is plumb.
10) After overhead beam is assembled, drill and anchor offside column as described in steps
7&8.
Summary of Contents for HD2P-15000C
Page 25: ...21 FIG 2 ARM SWING 148 3 8 Min 5 Max 7 4 3 4 3 34 1 2 R37 1 8 52 1 8 R37 1 8 52 1 8...
Page 26: ...22 FIG 3 COLUMN OVERVIEW...
Page 27: ...23 FIG 4 CABLES Locking Nuts 4 Bottom Cable Sheave Equalizing Cable 2 Top Cable Sheave...
Page 36: ......
Page 37: ...NOTES...
Page 38: ...NOTES...
Page 39: ...NOTES...


