background image

PART LIST  


PART 


DESCRIPTION 


QTY 


PART 


DESCRIPTION 


QTY 


BOLT M12X70 


Ø


12 PIN & CLIP 


Ø


12 WASHER


11 


BASE FRAME 


M12 NUT 


12 


10 


HITCH HINGE 


BOLT M12X120 


11 


SHANK TUBE 


BOLT M12X90 


12 


SUPPORT BAR 


BOLT M12X45 


13 


FAIRING PLATE 


BOLT M12X80 


14 


BOLT M12X20 


Summary of Contents for CC500

Page 1: ...MPN CC500 SKU 332205 UPC 049008261631 Cargo Carrier Owner s Manual ...

Page 2: ...familiar with its contents WARNING Misuse of this equipment may cause serious injury or death Read all safety warnings and instructions Keep this manual for future reference This is not a toy Keep away from children Check local and state laws before attaching or using carrier Maximum weight capacity is 500 lbs Do not stand ride or sit on carrier at any time including loading and unloading Keep bys...

Page 3: ...RIPTION QTY 1 BOLT M12X70 4 8 Ø 12 PIN CLIP 1 2 Ø 12 WASHER 11 9 BASE FRAME 1 3 M12 NUT 12 10 HITCH HINGE 1 4 BOLT M12X120 2 11 SHANK TUBE 1 5 BOLT M12X90 1 12 SUPPORT BAR 2 6 BOLT M12X45 2 13 FAIRING PLATE 1 7 BOLT M12X80 1 14 BOLT M12X20 2 ...

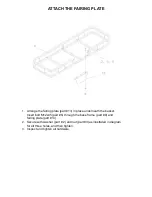
Page 4: ...t 13 in place underneath the basket Insert bolt M12x45 part 6 through the base frame part 9 and fairing plate part 13 2 Secure with washer part 2 and nut part 3 as illustrated in diagram for all three holes and then tighten 3 Inspect and tighten all hardware ...

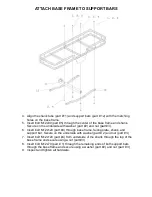
Page 5: ...nut part 3 6 Insert bolt M12x120 part 4 through base frame fairing plate shank and support bar Secure on the underside with washer part 2 and nut part 3 7 Insert bolt M12x120 part 4 from underside of the shank through the top of the base frame and secure using a nut part 3 8 Insert bolt M12x70 part 1 through the remaining ends of both support bars through the base frame and secure using a washer p...

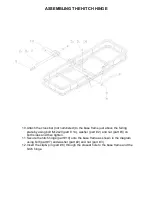
Page 6: ...y using bolt M12x20 part 14 washer part 2 and nut part 3 on both sides and then tighten 11 Secure the hitch hinge part 10 onto the base frame as shown in the diagram using bolt part 7 and washer part 2 and nut part 3 12 Insert the clip pin part 8 through the closest hole to the base frame and the hitch hinge 2 3 ...

Page 7: ...NEED HELP CONTACT US FIRST 1 800 605 8241 team titan fitness www titan fitness Business hours Monday Friday 8am 5pm Central ...

Reviews: