background image

Spraying

POSSIBLE INJECTION HAZARD.  Do not spray
without the tip guard in place.  Never trigger the
gun unless the tip is in either the spray or the
unclog position.  Always engage the gun trigger
lock before removing, replacing, or cleaning tip.

Spraying Technique

The following techniques, if followed, will assure professional
painting results.

Hold the gun perpendicular to the surface and always at equal
distance from the surface.  Depending on the type of material,
surface, or desired spray pattern, the gun should be held at a
distance of 12 to 14 inches (30 to 35 cm).

Move the gun either across or up and down the surface at a
steady rate. Moving the gun at a consistent speed conserves
material and provides even coverage. The correct spraying speed
allows a full, wet coat of paint to be applied without runs or sags.

Holding the gun closer to the surface deposits more paint on
the surface and produces a narrower spray pattern.  Holding
the gun farther from the surface produces a thinner coat and
wider spray pattern.  If runs, sags, or excessive paint occur,
change to a spray tip with a smaller orifice.  If there is an
insufficient amount of paint on the surface or you desire to
spray faster, a larger orifice tip should be selected.

Maintain uniform spray stroke action.  Spray alternately from
left to right and right to left.  Begin movement of the gun before
the trigger is pulled.

Avoid arcing or holding the gun at an angle. This will result in
an uneven finish.

Too Thick

Offspray

Arcing

Gun at angle

start 

stroke

release 

trigger

pull 
trigger

end 
stroke

8

© Titan Tool Inc.  All rights reserved.

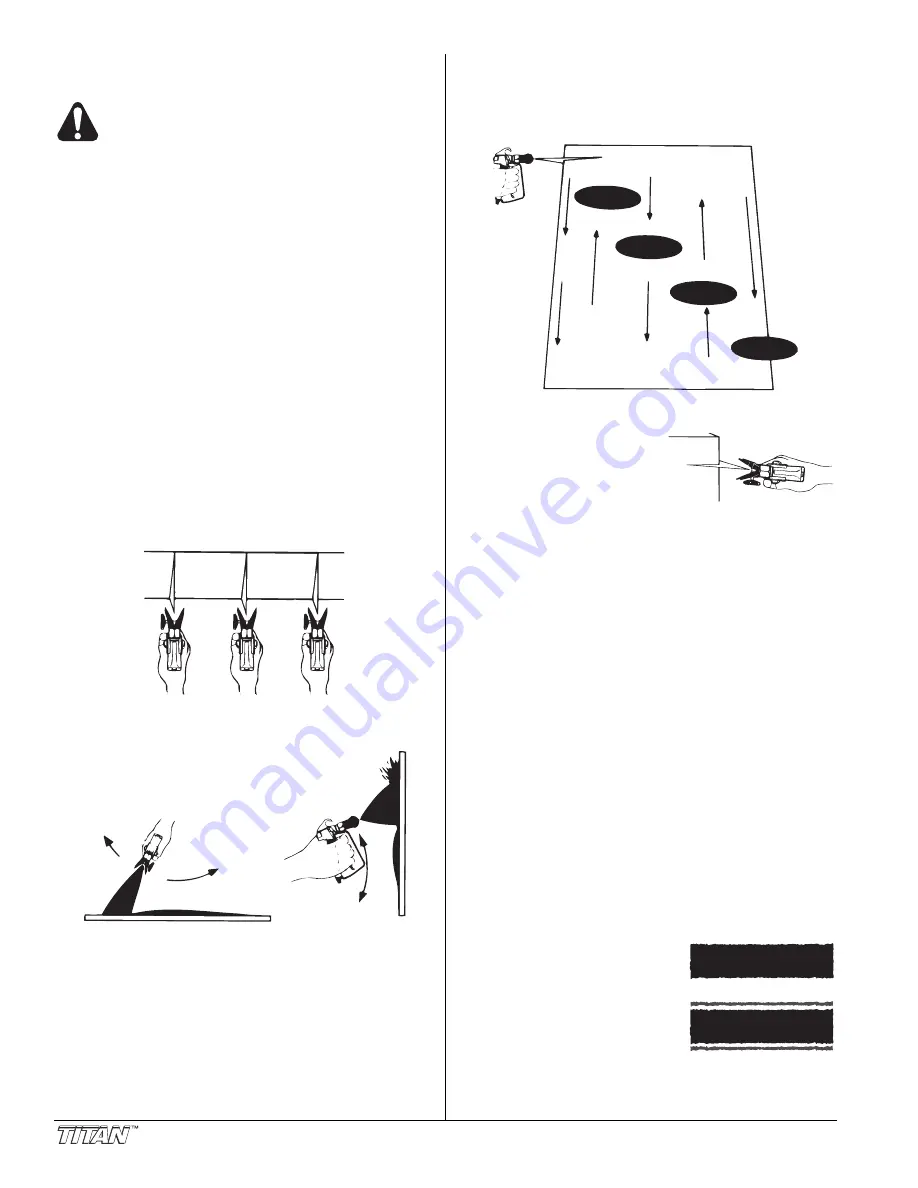
Proper lapping (overlap of spray pattern) is essential to an
even finish.  Lap each stroke.  If you are spraying horizontally,
aim at the bottom edge of the preceding stroke, so as to lap
the previous pattern by 50%.

For corners and edges, split the
center of the spray pattern on the
corner or edge and spray vertically
so that both adjoining sections
receive approximately even
amounts of paint.
When spraying with a shield, hold it firmly against the surface.
Angle the spray gun slightly away from the shield and toward
the surface. This will prevent paint from being forced
underneath.
Shrubs next to houses should be tied back and covered with a
canvas cloth.  The cloth should be removed as soon as possible.
Titan gun extensions are extremely helpful in these situations.
Nearby objects such as automobiles, outdoor furniture, etc.
should be moved or covered whenever in the vicinity of a
spray job.  Be careful of any other surrounding objects that
could be damaged by overspray.

Practice

1. Make sure that the paint hose is free of kinks and clear of

objects with sharp cutting edges.

3. Set the pressure to minimum by turning the pressure

control knob to the “Min” setting in the yellow zone.

3. Move the PRIME/SPRAY valve up to its SPRAY position.
4. Turn the pressure control knob clockwise to its highest

setting in the green zone.  The paint hose should stiffen
as paint begins to flow through it.

5. Unlock the gun trigger lock.
6. Trigger the spray gun to bleed air out of the hose.
7. When paint reaches the spray tip, spray a test area to

check the spray pattern.

8. Use the lowest pressure setting

necessary to get a good spray
pattern.  If the pressure is set too
high, the spray pattern will be too
light.  If the pressure is set too
low, tailing will appear or the paint
will spatter out in gobs rather than
in a fine spray.

Good spray pattern

Paint tailing pattern

Overlap edges

1st 

pass

2nd 

pass

3rd 

pass

4th 

pass

5th 

pass

Summary of Contents for 1140ix Digital 800-3030

Page 1: ...he U S A Do not use this equipment before reading this manual 1140ix Digital Airless Sprayer Owner s Manual For professional use only NOTE This manual contains important warnings and instructions Please read and retain for reference Model Number High Rider Bare 800 3030 High Rider Loaded 800 3035 Low Rider Bare 800 3040 Low Rider Loaded 800 3045 ...

Page 2: ...s injected directly into the blood stream Consultation with a plastic surgeon or reconstructive hand surgeon may be advisable HAZARD HAZARDOUS VAPORS Paints solvents insecticides and other materials can be harmful if inhaled or come in contact with the body Vapors can cause severe nausea fainting or poisoning PREVENTION Use a respirator or mask if vapors can be inhaled Read all instructions suppli...

Page 3: ...uipment Do not use the hose as a strength member to pull or lift the equipment Do not lift by cart handle when loading or unloading Grounding Instructions This product must be grounded In the event of an electrical short circuit grounding reduces the risk of electric shock by providing an escape wire for the electric current This product is equipped with a cord having a grounding wire with an appr...

Page 4: ...the gun and one on the hose tighten securely Make sure all airless hoses and spray guns are electrically grounded and rated at or above the maximum operating pressure range of the airless sprayer 4 Make sure the pressure control knob is in its OFF position in the black zone 5 Fill the oil cup with one tablespoon of piston seal lubricant Piston Lube IMPORTANT Never operate unit for more than ten se...

Page 5: ...uids and paint may cause the valves to become stuck closed which would require disassembly and cleaning of the sprayer s fluid section Painting 1 Place the siphon tube into a container of paint 2 Place the return hose into a metal waste container 3 Set the pressure to minimum by turning the pressure control knob to the Min setting in the yellow zone 4 Move the PRIME SPRAY valve down to the PRIME p...

Page 6: ...essure and the PRIME SPRAY valve is in the SPRAY position either the spray tip is worn or the sprayer is in need of service repair 6 Titan Tool Inc All rights reserved Function Keys The function keys are numbered 1 4 Each key is labeled with an additional function as well 1 Menu Key Pressing the 1 key scrolls through the available menu screens or performs a function described on the active menu sc...

Page 7: ...at startup Also when setting a security code for the first time the Enter Old Code Number screen will not appear SECURITY CODE SELECT 4 MENU 1 SET PSI 3000 ACTUAL PSI 2950 PRESSURE SELECT 4 MENU 1 SERVICE XXXHR RUN HOURS XX SERVICE TIME SELECT 4 MENU 1 ON TIME XXXXX XX RUN TIME XXXX XX JOB TIMERS SELECT 4 MENU 1 ON TIME XXXXX XX RUN TIME XXXX XX TIMERS SELECT 4 MENU 1 SER XXXXXXXXXX PRESS 1 FOR ME...

Page 8: ... even finish Lap each stroke If you are spraying horizontally aim at the bottom edge of the preceding stroke so as to lap the previous pattern by 50 For corners and edges split the center of the spray pattern on the corner or edge and spray vertically so that both adjoining sections receive approximately even amounts of paint When spraying with a shield hold it firmly against the surface Angle the...

Page 9: ...g out of the gun is clean 14 Follow the Pressure Relief Procedure found in the Operation section of this manual 15 Unplug the sprayer and store in a clean dry area IMPORTANT Do not store the unit under pressure NOTE For long term or cold weather storage pump mineral sprits through the entire system For short term storage when using latex paint pump water mixed with Titan Liquid Shield Plus through...

Page 10: ...0 Titan Tool Inc All rights reserved Replacing the Motor Assembly 1 Unplug the unit 2 Loosen and remove the four motor shroud screws Remove the motor shroud 3 Release the tie wrap on the top of the baffle assembly and slip the baffle assembly down off of the motor 4 Loosen and remove the three electronic cover screws Lift the electronic cover off of the electronic control assembly on the motor 5 D...

Page 11: ... motor Make sure the shroud gasket is positioned properly 17 Secure the motor shroud with the four motor shroud screws Front End Bell Assembly Armature Gear 1st Stage Gear 2nd Stage Gear Front Gear Box Assembly Housing Gasket Shroud Gasket NOTE Clean and refill the gear box cavity up to the rear face of each gear with Lubriplate P N 314 171 Replacing the Transducer 1 Unplug the unit 2 Loosen and r...

Page 12: ...he upper housing of the fluid section Gasket Dowel Pin Cam Base Valve Stem Filter Housing Valve Housing Assembly Valve Handle Groove Pin 12 Titan Tool Inc All rights reserved Servicing the Valves The design of the fluid section allows access to the foot valve and seat as well as the outlet valve and seat without completely disassembling the fluid section It is possible that the valves may not seat...

Page 13: ...wer packing through the upper packing and out through the upper seal retainer 21 Remove the piston insertion tool from the top of the piston rod 22 Turn the knock off nut counterclockwise until it is flush against the upper housing 23 Lubricate the threads on the upper housing with anti seize compound Remove the upper housing from the vise 24 Thread the upper housing into the gear box housing turn...

Page 14: ... the Fluid Section procedure in the Maintenance section of this manual 2 Replace the piston rod following the Servicing the Fluid Section procedure in the Maintenance section of this manual 1 Replace hose with a minimum of 50 of 1 4 grounded textile braid airless paint spray hose 2 Replace the spray tip following the instructions that came with the spray gun 3 Rotate the pressure control knob coun...

Page 15: ... screen appears when the transducer has become disconnected or is defective Take the sprayer to a Titan authorized service center for repair Check Motor Screen E3 The Check Motor screen appears when the motor or motor sensor is defective Take the sprayer to a Titan authorized service center for repair Low Voltage Screen E4 The Low Voltage screen appears when the sprayer shuts down because of low i...

Page 16: ...n chirurgie reconstructive de la main DANGER ÉMANATIONS DANGEREUSES Certains produits peintures solvants insecticides ou autres peuvent être nocifs s ils sont inhalés ou entrent en contact avec l organisme Les émanations de ces produits peuvent provoquer de graves nausées évanouissements ou empoisonnements MESURES PRÉVENTIVES Se servir d un masque ou d un respirateur s il y a risque d inhalation l...

Page 17: ...tements aptes à protéger la peau et les cheveux du produit utilisé Ne pas utiliser le pistolet ou ne pas pulvériser de produits en présence d enfants à proximité Éloigner les enfants de l équipement en tout temps Ne pas s étirer ni ne travailler sur un support instable Toujours garder les deux pieds au sol pour rester en équilibre Se servir de la pression la plus basse possible pour vidanger l app...

Page 18: ...os revestimientos inyectados directamente en la corriente sanguínea Puede ser aconsejable consultar con un cirujano plástico o un cirujano especialista en reconstrucción de las manos PELIGRO VAPORES PELIGROSOS Las pinturas solventes insecticidas y demás materiales pueden ser nocivos si se inhalan o toman contacto con el cuerpo Los vapores pueden causar náuseas graves desmayos o envenamiento PREVEN...

Page 19: ...del equipo en todo momento No se asome ni se pare sobre soportes inestables Mantenga siempre la posición firme y el equilibrio efectivos Use la presión más baja posible para enjuagar el equipo Manténgase alerta y mire lo que hace No utilice la unidad cuando se encuentre cansado o bajo la influencia de las drogas o el alcohol Para las aparatos eléctricas Desenchufe siempre el cable antes de trabaja...

Page 20: ...2 8 800 328 Knock off nut 1 9 800 300 Fluid section assembly 1 10 451 241 Siphon tube 1 11 730 334 Hose clamp 1 12 710 046 Inlet screen 1 Item Part Description Quantity 14 800 904 Return hose 1 15 800 900 Filter assembly 1 16 812 003 Outlet fitting 1 17 800 915 PRIME SPRAY valve assembly 1 18 800 269 Fitting 1 19 800 267 Fitting 1 20 860 002 Lock washer 2 21 860 535 Screw 2 22 800 266 Hose not sho...

Page 21: ...rt Description Quantity 25 704 467 Xact Digital Control system cover optional 1 26 704 487 Screw 2 27 779 567 Strain relief 1 28 704 553 Power cord 1 29 700 287 Screw 3 30 763 551 Lock washer 3 31 800 658 Electronic control assembly 1 32 800 215 Fan shroud 1 33 800 294 Fan assembly 1 34 800 435 Baffle assembly 1 35 800 283 Screw 4 36 800 405 Motor shroud 1 37 704 599 Dust cover for sprayers withou...

Page 22: ...r packing with the side that has the o ring closest to the top of the packing facing up Install upper packing with raised lip facing down Raised Lip 22 Closer Top NOTE When repacking the fluid section make sure the raised lip on the bottom of the lower packing is fully outside the packing around the piston rod after insertion of the piston rod ...

Page 23: ...ncludes items 10 16 1 800 273 Repacking kit includes items 2 3 5 8 11 13 14 18 and 20 800 359 Lower packing insertion tool High Rider Cart P N 800 600 Item Part Description Quantity 1 800 280 Handle includes items 2 5 10 and 11 1 2 590 508 Roll pin 2 3 590 507 Snap button 2 4 590 504 Sleeve 2 5 590 506 Washer 2 6 800 011 Spacer 2 7 710 199 Plug 2 8 800 279 Cart includes items 7 and 9 1 9 335 018 P...

Page 24: ... Wheel 2 15 800 111 Cap 2 16 800 112 Cart weldment includes items 8 and 10 1 Low Rider Siphon Assembly 1 2 3 4 5 6 Item Part Description Quantity 1 800 903 Return hose 1 2 710 203 Siphon tube 1 3 710 195 Swivel 1 4 710 046 Inlet screen 1 5 730 334 Clamp 1 6 710 081 Siphon tube adapter 1 7 700 742 Tie wrap not shown 3 710 204 Siphon tube assembly includes items 2 6 1 Labels Part Description 313 170...

Page 25: ...uthorized service center PRIME SPRAY Valve Assembly P N 800 915 Item Part Description Quantity 1 800 915 PRIME SPRAY valve assembly 1 2 700 537 Gasket 1 3 222 012 O ring PTFE 1 4 221 012 O ring Viton 1 5 700 721 Valve stem o ring Viton 1 700 897 Valve stem o ring PTFE optional 6 700 252 Cam base 1 7 700 759 Groove pin 1 8 700 697 Valve handle 1 NOTE When using hot solvents replace Viton valve stem...

Page 26: ...sh filter 015 019 Oil and latex 60 mesh filter 021 026 Heavy bodied latex and blockfillers 30 mesh filter NOTE Do not exceed the sprayer s recommended maximum tip size Synergy Fine Finish Tips Perfect for all fine finish work Ideal for lacquers stain enamels urethane and clear top coats Increases standard tip life up to 80 Delivers up to a 27 finer atomization at lower pressures Increases transfer...

Page 27: ... Titan Tool Inc All rights reserved 27 Notes Nota ...

Page 28: ...ir normal operation Defective parts are to be returned to an authorized Titan sales service outlet All transportation charges including return to the factory if necessary are to be borne and prepaid by the End User Repaired or replaced equipment will be returned to the End User transportation prepaid THERE IS NO OTHER EXPRESS WARRANTY TITAN HEREBY DISCLAIMS ANY AND ALL IMPLIED WARRANTIES INCLUDING...

Reviews: