16
description of unit
ProMark
SeTup ScreeN
To go to the Setup
screen, touch ‘Setup’
on the Main Menu
screen.
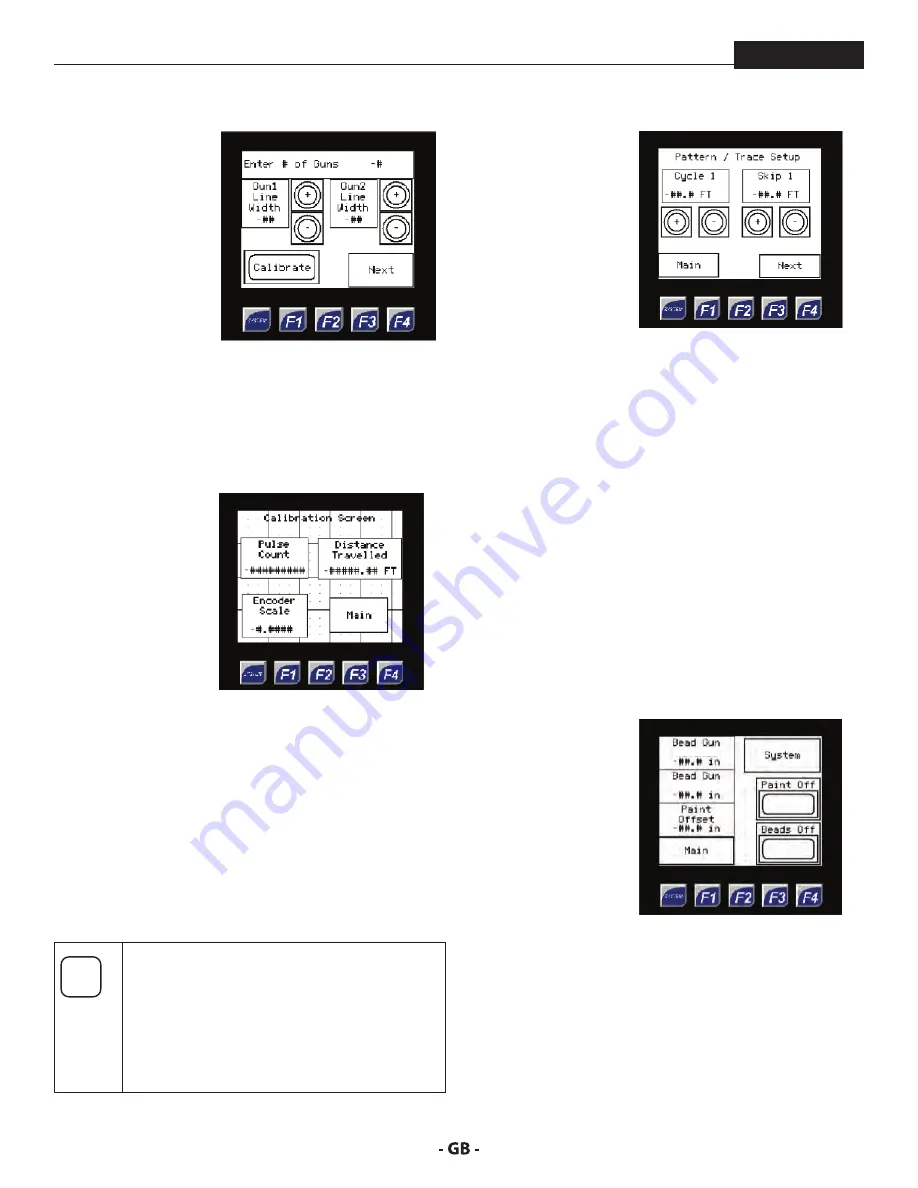
The Setup screen is
where the user enters
information about
the number of guns
being used, as well as
the width of the guns
being used.
The user can also calibrate the machine to ensure that the
distance sensor on the unit is working properly.
To calibrate the sprayer, press the ‘Calibrate’ button to bring
up the Calibration screen.
cAlIBrATIoN ScreeN
To begin calibration,
the operator needs to
have a distance marked
out prior to starting.
When ready, align the
machine to the start of
the marked distance
and then press the
‘Setup’ button from
the Main Menu screen,
and then press the
‘Calibrate’ button in the
lower left hand corner.
Once on this screen the operator can start to push the
machine along the measured distance, keeping the
machine as straight as possible. The pulse count in the
upper left corner should be increasing, signaling that the
sensor is receiving pulses.
Once the operator has reached the end of the measure
distance, press the ‘Distance Travelled’ box and manually
enter in the distance that was measured. The encoder scale
should be displayed in the lower left corner of the screen.
Press ‘Main’ to return to the Main Menu screen.
i
It is recommended that the operator perform
this procedure twice using the same measured
distance travelling in the same direction.
If the encoder scale is the same for both
tries, the operator knows that the machine is
properly calibrated and can be used for marking
distances.
pATTerN/TrAce ScreeNS
At the Setup screen,
press ‘Next’ to go to the
Pattern/Trace screen.
The trace/pattern
screen serves two
functions: the first is to
set up the trace pattern
for marking jobs.
The machine will
automatically mark
out the starting and
stopping point for
the line that is to be
painted.
The second function is to set up the pattern that will be
used for solid skip painting.
•
Cycle 1 and Skip 1 refer to the cycle and skip for gun 1
during TRACE mode.
•
Cycle 2 and Skip 2 refer to the cycle and skip for gun 2
during TRACE mode.
•
Cycle 1 and Skip 1 are also used for BOTH gun 1 and
2 when using the solid/skip toggle switches on the
enclosure. Cycle 2 and Skip 2 will NOT be used for the
skip/solid toggle switches.
To change the cycle and skip values press the (+) or (-)
button to increase or decrease the value. The user can also
manually enter a value by pressing on the box and hitting
‘Enter’.
Press ‘Next’ to go to the next Pattern/Trace Screen.
This screen is used for
setting the desired
Bead Gun Begin, Bead
Gun End, and Paint
Offset.
To change either of
these press on the
applicable box and
enter in the desired
value.
This screen also allows the user to turn the material spray
and beads off. Press the ‘Main’ button to get back to the
Main Menu screen.
Begin
End
Summary of Contents for 200
Page 12: ...12 description of unit ProMark 3 3 System controls FIGURE 3 1 5 4 8 2 3 6 7 9 10 11 12 ...
Page 45: ...45 troubleshooting ProMark ...
Page 56: ...56 Gerätebeschreibung ProMark 3 3 GERÄTESTEUERUNG abb 3 1 5 4 8 2 3 6 7 9 10 11 12 ...
Page 89: ...89 ProMark ...
Page 100: ...100 Description du matériel ProMark 3 3 COMMANDES DU SYSTÈME fig 3 1 5 4 8 2 3 6 7 9 10 11 12 ...
Page 133: ...133 ProMark ...


