background image

14

© Titan Tool Inc.  Todos los derechos reservados.

Seguridad

Este manual contiene información que debe leer y comprender
antes de usar el equipo. Cuando se encuentre con uno de los
siguientes símbolos, asegúrese de observar sus indicaciones
de seguridad.

Este símbolo indica la existencia de un peligro potencial que
puede causar lesiones graves o la muerte. Después del
mismo se incluye información de seguridad importante.

Este símbolo indica la existencia de un peligro potencial para
usted o el equipo. Después del mismo se incluye información
importante que indica la forma de evitar daños al equipo o la
forma de prevenir lesiones menores.

PELIGRO: LESIÓN POR INYECCIÓN  -  La corriente de

pintura de alta presión que produce este
equipo puede perforar la piel y tejidos
subyacentes, lo que conduciría a lesiones
serias y una posible amputación.  Consulte de
inmediato a un médico.

NO TRATE LAS LESIONES POR INYECCIÓN COMO SI
FUERAN SIMPLES CORTADAS!  Una inyección puede
conducir a una amputación.  Consulte de inmediato a un
médico.
El rango de operación máximo de la unidad es 3200 PSI /
221BAR de presión de fluidos.

PARA PREVENIR:

• NO dirija NUNCA la punta de la pistola hacia alguna parte

del cuerpo. 

• NO permita NUNCA que alguna parte del cuerpo tenga

contacto con la corriente del fluido. EVITE tener contacto
con corrientes de fluido que salgan de fugas que haya en
la manguera.

• NO ponga NUNCA la mano enfrente de la manguera.  Los

guantes no ofrecen ninguna protección contra lesiones
por inyección.

• Bloquee SIEMPRE el gatillo de la pistola, apague la

bomba de fluido y libere toda la presión antes de dar
mantenimiento, limpiar el protector de la boquilla, cambiar
la boquilla o dejar desatendido el equipo.  La presión no
se liberará al apagar el motor.  Para liberar la presión
debe girarse la perilla PRIME/SPRAY (cebar/atomizar)
hasta la posición PRIME.  Consulte el PROCEDIMIENTO
PARA LIBERAR LA PRESIÓN que se describe en este
manual.

• Mantenga puesto SIEMPRE el protector de la boquilla

mientras atomice.  El protector de la boquilla ofrece cierta
protección contra lesiones por inyección pero es
principalmente un dispositivo de advertencia.

• Quite SIEMPRE la boquilla del atomizador antes de

enjuagar o limpiar el sistema.

• Pueden desarrollarse fugas en la manguera de pintura

por causa del desgaste, retorcimientos o el abuso.  Una
fuga es capaz de inyectar el material en la piel.  Cada vez
que use la manguera de pintura, inspecciónela antes.

• NO use nunca una pistola de atomización que no tenga

un bloqueador o un protector de gatillo puesto y que
funcione.

• Todos los accesorios deben tener una capacidad de 3200

lb/pulg2 / 221BAR o mayor.  Esto incluye las boquillas de
atomizador, pistolas, extensiones y mangueras.

ADVERTENCIA

NOTA: los avisos contienen información importante,

présteles especial atención.

PRECAUCION

ADVERTENCIA

PELIGRO: EXPLOSIÓN O INCENDIO - Los vapores de

solventes y pintura pueden explotar o
incendiarse, causando con esto lesiones
severas y/o daños en la propiedad.

PARA PREVENIR:

• Debe proveerse un escape y aire fresco para hacer que el

aire que está dentro del área de atomización se mantenga
libre de acumulaciones de vapores inflamables.

• Evite todas las fuentes de ignición como son las chispas

electrostáticas, llamas abiertas, flamas de piloto, objetos
calientes, cigarros, y chispas que se generan al conectar
y desconectar las extensiones o de apagadores de luz
que estén funcionando.

• No fume en la zona de trabajo.
• Debe haber un equipo para extinguir incendios

permanentemente y en buenas condiciones.

• Coloque la bomba para pintar a un mínimo de 1 m (de

preferencia más) en una habitación aparte, bien ventilada,
alejada del objeto que va a pintar o a por lo menos 6 m
de dicho objeto, en una zona bien ventilada (utilice una
manguera más larga, si es necesario).  Los gases
inflamables a menudo son más pesados que el aire.  La
zona del piso debe tener la debida ventilación.  La bomba
para pintar contiene piezas que forman arcos que emiten
chispas y pueden encender los gases.

• El equipo que se utilice, así como los objetos que estén

dentro y alrededor del área de atomización, deben
conectarse a tierra de manera apropiada para prevenir las
descargas eléctricas y las chispas.

• Use solamente mangueras para fluidos de alta presión,

conductoras o conectadas a tierra, para aplicaciones sin
aire.  Asegúrese de que la pistola esté conectada a tierra
de manera apropiada, mediante conexiones de
manguera.

• El cable de alimentación debe enchufarse a un circuito

aterrado.

• Siempre enjuague la unidad en un recipiente de metal por

separado, con presión baja en la bomba y sin la boquilla.
Sostenga la pistola firmemente contra el recipiente para
ponerlo a tierra y evitar chispas estáticas.

• Siga las advertencias y avisos de seguridad del fabricante

de los materiales y solventes.

• Tenga muchísimo cuidado al usar materiales cuyo punto

de ignición sea inferior a 70° F (21° C).  El punto de
ignición es la temperatura a la cual pueden encenderse
los vapores emanados por un fluido al exponerlos a
llamas o chispas.

• El plástico puede causar chispas estáticas.  Nunca

cuelgue plástico en las ventanas ni en las puertas del
área donde va a pintar.  No utilice plástico para proteger
el piso cuando pinte materiales inflamables.

• Cuando enjuague el equipo utilice la presión más baja

posible.

MOTOR DE GAS (SEGÚN CORRESPONDA)

Coloque siempre la bomba fuera del edificio, al aire libre.
Mantenga todo solvente alejado del escape del motor.  Nunca
llene el tanque de combustible si el motor está encendido o
caliente.  La superficie caliente puede encender el combustible
derramado.  Conecte siempre un conductor de tierra desde la
unidad de la bomba a un objeto puesto a tierra, por ejemplo
una tubería de agua metálica.  Consulte el manual del motor
para obtener información completa de seguridad.

NOTA PARA EL MÉDICO: La inyección dentro de la piel
es una lesión traumática.  Es importante que la lesión
se trate quirúrgicamente tan pronto como sea posible .
NO retrase el tratamiento por investigar la toxicidad.
La toxicidad es motivo de preocupación con algunos
revestimientos que se inyectan directamente en la
corriente sanguínea.  Es recomendable consultar a un
cirujano plástico o reconstructor de manos.

Summary of Contents for 440xc

Page 1: ...rinted in the U S A Do not use this equipment before reading this manual 440XC Airless Sprayer Owner s Manual For professional use only NOTE This manual contains important warnings and instructions Please read and retain for reference Model Number 120V Complete 700 2000 ...

Page 2: ...IEF PRESSURE described in the pump manual ALWAYS keep the tip guard in place while spraying The tip guard provides some protection but is mainly a warning device ALWAYS remove the spray tip before flushing or cleaning the system The paint hose can develop leaks from wear kinking and abuse A leak can inject material into the skin Inspect the hose before each use NEVER use a spray gun without a trig...

Page 3: ...int off skin and hair Grounding Instructions This product must be grounded In the event of an electrical short circuit grounding reduces the risk of electric shock by providing an escape wire for the electric current This product is equipped with a cord having a grounding wire with an appropriate grounding plug The plug must be plugged into an outlet that is properly installed and grounded in acco...

Page 4: ... and Priming the Pump for Latex Paint 1 Secure the return hose into a waste container 2 Place the suction tube into a container of the appropriate solvent 3 Turn the pressure control knob fully counterclockwise its lowest pressure setting 4 Turn the PRIME SPRAY valve down to the PRIME position 5 Move the ON OFF switch to the ON position 6 Slowly turn the pressure control knob clockwise to increase...

Page 5: ... 9 Unlock the gun by turning the gun trigger lock to the unlocked position 10 Turn the pressure control knob fully counterclockwise to its lowest pressure setting 11 Turn the PRIME SPRAY valve down to the PRIME position and trigger the gun into the waste container to be sure that no pressure is left in the hose 12 Lock the gun by turning the gun trigger lock to the locked position WARNING Trigger ...

Page 6: ...e start stroke release trigger pull trigger end stroke WARNING 6 Titan Tool Inc All rights reserved For corners and edges split the center of the spray pattern on the corner or edge and spray vertically so that both adjoining sections receive approximately even amounts of paint If conditions are windy angle the spray pattern into the wind to minimize drifting Work from ground to roof Do not attemp...

Page 7: ...and the pump hose and gun are clean 14 Move the ON OFF switch to the OFF position 15 Turn the PRIME SPRAY valve to PRIME Remove the siphon tube from the solvent container 16 Move the ON OFF switch to the ON position and allow the unit to pump itself dry through the return tube 17 Follow the Pressure Relief Procedure found in the Operation section of this manual 18 Unplug the unit and store in a cl...

Page 8: ...erse the spray tip with the lever and pull the trigger Once the obstruction comes out of the spray tip release the trigger reverse the spray tip back to the spray pattern setting and resume spraying Siphon Set Intake Screen NOTE Do not apply so much that it overflows and drips into the paint 8 Titan Tool Inc All rights reserved Replacing the Gun Filter 1 Move the gun trigger lock to the unlocked p...

Page 9: ...ol while spraying and are less likely to plug Liquid Shield Cleans and protects spray systems against rust corrosion and premature wear Part No Description 700 888 Case of 12 1 quart bottles 700 889 1 Quart Piston Lube Specially formulated to prevent materials from adhering to the piston rod which becomes abrasive to the upper seals Piston Lube will break down any material that may accumulate in t...

Page 10: ...h defective 6 Fuse in pump blow 1 Air leak in siphon hose 2 Insufficient pressure 1 No paint 2 Inlet screen clogged 3 Pump gun filter clogged 4 Pump will not prime material too heavy 1 Air leak in system 2 Air leak in siphon hose 3 Inlet valve not seating 4 Worn packings 5 Dirty or worn ball valves 6 Worn valve seats 7 Worn PRIME SPRAY valve 1 Pressure setting too low 2 Plugged filters 3 Spray tip...

Page 11: ...fluid viscosity Reduce hose length Clean gun and filter s Reduce number of guns using pump 1 Same as above 1 Clean or replace nozzle tip 1 Inspect for suction hose leak 2 Change to a smaller tip orifice size Install pulsation dampener in system or drain existing one Reduce number of guns using pump Remove restrictions in system clean tip screen if filter is used 1 Replace tip 2 Increase pressure T...

Page 12: ...AVERTISSEMENT DANGER RISQUES D EXPLOSION OU D INCENDIE Les vapeurs dégagées par le solvant ou la peinture sont explosives et inflammables et peuvent causer des corporels sérieux ou dommages matériels MESURES PRÉVENTIVES Veiller à éviter toute accumulation de vapeurs inflammables en vous assurant que la zone où la pulvérisation a lieu est suffisamment ventilée Veiller à éviter la présence de toute ...

Page 13: ...raccord orientable pistolet et accessoire utilisé avec cet appareil doit pouvoir fonctionner à une pression égale ou supérieure à 3 200 lb po2 221BAR Ne jamais pulvériser lorsqu il vente Porter des vêtements pour protéger la peau et les cheveux contre tout contact avec la peinture Instructions de mise à la terre Cet appareil doit être mis à la terre La mise à la terre réduit les risques d électroc...

Page 14: ...Debe proveerse un escape y aire fresco para hacer que el aire que está dentro del área de atomización se mantenga libre de acumulaciones de vapores inflamables Evite todas las fuentes de ignición como son las chispas electrostáticas llamas abiertas flamas de piloto objetos calientes cigarros y chispas que se generan al conectar y desconectar las extensiones o de apagadores de luz que estén funcion...

Page 15: ...nte eléctrica Este producto está equipado con un cable que tiene un alambre de conexión a tierra con un enchufe de conexión a tierra apropiado El enchufe se debe enchufar en una toma de corriente que se haya instalado y conectado a tierra debidamente de acuerdo con todos los códigos y estatutos locales PELIGRO Una instalación inapropiada del enchufe de conexión a tierra puede dar como resultado el...

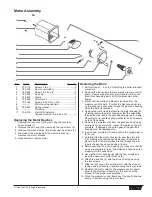
Page 16: ...ng Attention label In French 1 313 1432 Wraparound 440XC label 1 Before performing any type of maintenance or service on the unit follow the Pressure Relief Procedure in the Operation section of this manual Additionally follow all other warnings to reduce the risk of an injection injury injury from moving parts or electric shock Always unplug the unit before servicing WARNING ...

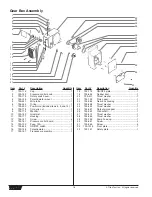
Page 17: ...the four screws that secure the motor housing 8 Carefully remove the motor housing so that the wires slide through the wire tube in the gear box housing one at a time Be careful not to lose the spring washer 9 as it sits loosely on top of the bearing 5 Remove the armature 10 from the gear box housing by pulling up on the armature Inspect the pinion on the old armature If damaged the pinion gear in...

Page 18: ...777 Housing 1 12 700 141 Screw 4 13 700 161 Pressure control board 1 14 700 720 Fuse 10A 1 15 700 646 ON OFF switch 1 16 700 158 Potentiometer 1 17 700 197 Transducer assembly 1 Gear Box Assembly Item Part Description Quantity 18 700 775 ON OFF plate 1 19 700 645 Rubber boot 1 20 700 511 Thrust washer 1 21 700 732 Pinion gear 1 22 704 083 Gear box housing 1 23 700 688 Thrust washer 1 24 700 593 Th...

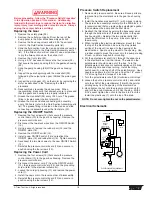
Page 19: ...ol board 13 to the gear box housing Remove the pressure control board 2 Disconnect the power cord 7 from the ON OFF switch 15 the pressure control board 13 and the grounding screw refer to the electrical schematic 3 Loosen the cord grip housing 11 and remove the power cord 7 4 Install the new cord in the reverse order of disassembly 5 Reinstall the pressure control board 13 and secure in position ...

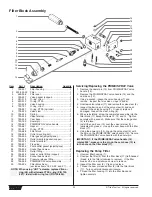
Page 20: ...730 560 Foot valve assembly 1 24 730 535 Fluid section complete includes items 2 3 4 5 and 7 21 1 25 762 202 Packing tool not shown 1 Servicing Repairing the Fluid Section Before proceeding follow the Pressure Relief Procedure in the Operation section of this manual Additionally follow all other warnings to reduce the risk of an injection injury injury from moving parts or electric shock Always un...

Page 21: ...ump housing 5 by lightly tapping on top of piston assembly 22 Clean and inspect the piston rod for wear Replace if necessary 17 Remove the upper packings 4 and the lower packings 8 from the pump housing 5 and replace with a new set Always insert the packings with the raised side facing into the pump housing 18 Reattach the retainer 2 and make sure that the upper guide 3 is clean and undamaged 19 P...

Page 22: ...he PRIME SPRAY valve handle 14 and the cam base 12 3 Using a wrench loosen the valve housing 7 and remove Inspect the two valve o rings 5 and 6 4 Unscrew valve retainer 11 and remove the valve stem 9 5 Inspect the ball on end of the valve stem 9 and seat located in the valve housing 7 Clean or replace if damaged Inspect the stem o ring 8 6 When reinstalling screw the completed assembly into the fi...

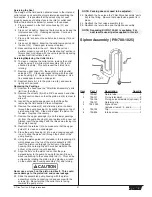
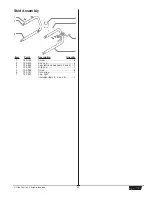
Page 23: ... Assembly Item Part Description Quantity 1 765 126 Screw 4 2 700 674 End cap 4 3 704 092 Leg left includes items 2 and 4 1 4 700 781 Drip cup 1 5 700 069 Screw 2 6 700 761 Cord wrap 1 7 704 091 Leg right includes items 2 5 and 6 1 1 2 3 4 5 6 7 ...

Page 24: ... the factory if necessary are to be borne and prepaid by the End User Repaired or replaced equipment will be returned to the End User transportation prepaid THERE IS NO OTHER EXPRESS WARRANTY TITAN HEREBY DISCLAIMS ANY AND ALL IMPLIED WARRANTIES INCLUDING BUT NOT LIMITED TO THOSE OF MERCHANTABILITY AND FITNESS FOR A PARTICULAR PURPOSE TO THE EXTENT PERMITTED BY LAW THE DURATION OF ANY IMPLIED WARR...

Reviews: