background image

7

Le liquide introduit dans un pistolet pulvérisateur

sans air doit l’être à pression extrêmement élevée.
Les liquides à haute pression, en provenance du pul-
vérisateur ou d’une fuite quelconque, sont capables
de pénétrer la peau et d’injecter d’importantes quan-
tités de liquide toxique dans l’organisme. Si elle n’est
pas traitée promptement et avec toute l’attention
voulue, la lésion causée de la sorte peut provoquer la
nécrose des tissus ou la gangrène et donner lieu à
de sérieux handicaps permanents, voire à l’amputa-
tion du membre atteint. Une prudence extrême s’im-
pose donc lors de l’utilisation de matériel de pulvéri-
sation sans air. 

EN CAS D’INJECTION, CONSUL-

TEZ UN MEDECIN IMMEDIATEMENT. NE TRAITEZ
PAS LA BLESSURE COMME S’IL S’AGISSAIT
D’UNE SIMPLE COUPURE!

REMARQUE A L’INTENTION DU MEDECIN :

Une injection pénétrant la peau constitue une lésion
traumatique grave qu’il est important de traiter chirur-
gicalement aussitôt que possible. Ne perdez pas de
temps à rechercher la toxicité de l’injection. Il s’agit là
d’un risque à envisager en cas d’injection directe
dans le circuit sanguin de certains revêtements exo-
tiques. La consultation d’un chirurgien plasticien ou
d’un spécialiste de la chirurgie reconstructive de la
main peut être conseillée.

1) Maniez le pistolet avec soin. Maintenez-vous à

l’écart de la buse. N’en dirigez 

JAMAIS

la buse vers

aucune partie de votre corps ou vers aucune autre
personne. Ne laissez 

JAMAIS

aucune partie de votre

corps entrer en contact avec le flux de liquide
s’échappant du pistolet ou d’une fuite quelconque au
niveau du flexible. Verrouillez 

TOUJOURS

le levier

de sûreté de la détente lorsque vous n’êtes pas
occupé à pulvériser. 

Veillez à TOUJOURS utiliser

un dispositif de sûreté à la buse du pistolet.

2) N’essayez 

JAMAIS

de refouler le flux de liquide

dans le pistolet au moyen de votre doigt, de votre
main ou d’un objet maintenu contre la buse du pisto-
let. 

CET APPAREIL N’EST PAS UN PISTOLET PUL-

VERISATEUR A AIR. 

N’utilisez aucune pièce de

matériel sans air avec une pompe non équipée d’une

soupape de surpression.

3) N’essayez 

JAMAIS

d’enlever la buse, de

démonter ou de réparer
l’appareil avant d’avoir accompli la procédure suiv-
ante :

4) Avant de procéder au rinçage du système,

enlevez toujours la buse de pulvérisation et réglez la
pression au niveau le plus faible possible.

5) Serrez bien tous les raccords du système

hydrodynamique avant chaque emploi. Ne dépassez

JAMAIS

, avec cet appareil, une pression de 3300 psi

(228 bar). Assurez-vous que tous les flexibles acces-
soires, raccords, articulations, etc. sont bien capables
de résister aux hautes pressions prévues. Ne
dépassez 

JAMAIS

la capacité de pression nominale

d’aucun composant du système. 

DANGER :

Afin de

réduire tout risque d’électrocution, n’exposez pas à la
pluie.

6) ATTENTION :

Des fuites risquent de se pro-

duire le long du flexible de peinture sous l’effet de
l’usure, des torsions, des rudes traitements, etc. aux-
quels il est éventuellement soumis. Les injections de
liquide dans la peau sont possibles par la voie de
telles fuites. Il est donc important d’inspecter le flexi-
ble avant chaque usage. N’essayez 

JAMAIS

d’obtur-

er une fuite à l’aide de votre doigt ou de tout autre
membre de votre corps, de ruban adhésif ou de tout
autre moyen de fortune. N’essayez pas non plus de
réparer un flexible de pulvérisation ; remplacez-le
plutôt par un nouveau flexible mis à la terre. Veillez à
n’utiliser que les flexibles munis de dispositifs de
sécurité à ressort. N’utilisez 

JAMAIS

moins de 15,2

m de flexible avec cet appareil.

7) Assurez-vous que le matériel sans air utilisé et

que l’objet à peindre sont adéquatement mis à la
terre, de façon à éviter toute décharge 
d’électricité statique ou toute étincelle susceptible de
provoquer un incendie ou une explosion. 

ATTEN-

TION

: Tenez 

TOUJOURS

le pistolet contre un réci-

pient en métal lors du rinçage du système, après en
avoir ôté la buse. Ne vaporisez 

JAMAIS

de sub-

stances inflammables à proximité de flammes nues,
lampes témoin ni d’aucune source d’allumage.
Rangez à l’intérieur.

INSTRUCTIONS DE MISE A LA TERRE : 

Ce pro-

duit doit être mis à la terre. Dans l’hypothèse d’un
court-circuit électrique, la mise à la terre réduit le
risque de chocs électriques en assurant un fil de fuite
pour le courant électrique. Ce produit est pourvu d’un
cordon possédant un fil de terre avec fiche appro-

priée de mise à la terre. La fiche doit être branchée
sur une prise qui est posée et mise à la terre
adéquatement conformément à tous les codes et

règlements locaux.

DANGER

- La pose inappropriée de la fiche de

terre peut provoquer un risque de chocs électriques.
Si le cordon ou la fiche doit être réparé ou remplacé,
ne raccordez pas le fil de terre à l’une ou l’autre
borne à lame plate. Le fil possédant une isolation
dont la surface extérieure est verte (avec ou sans
rayures jaunes) est le fil de terre. Consultez un élec-
tricien ou un technicien de service compétent si vous
ne comprenez pas parfaitement les instructions de
mise à la terre ou si vous ne pouvez affirmer avec
certitude que le produit est dûment mis à la terre. Ne
modifiez pas la fiche fournie ; si elle ne rentre pas
dans la prise, faites poser la prise appropriée par un
électricien compétent.
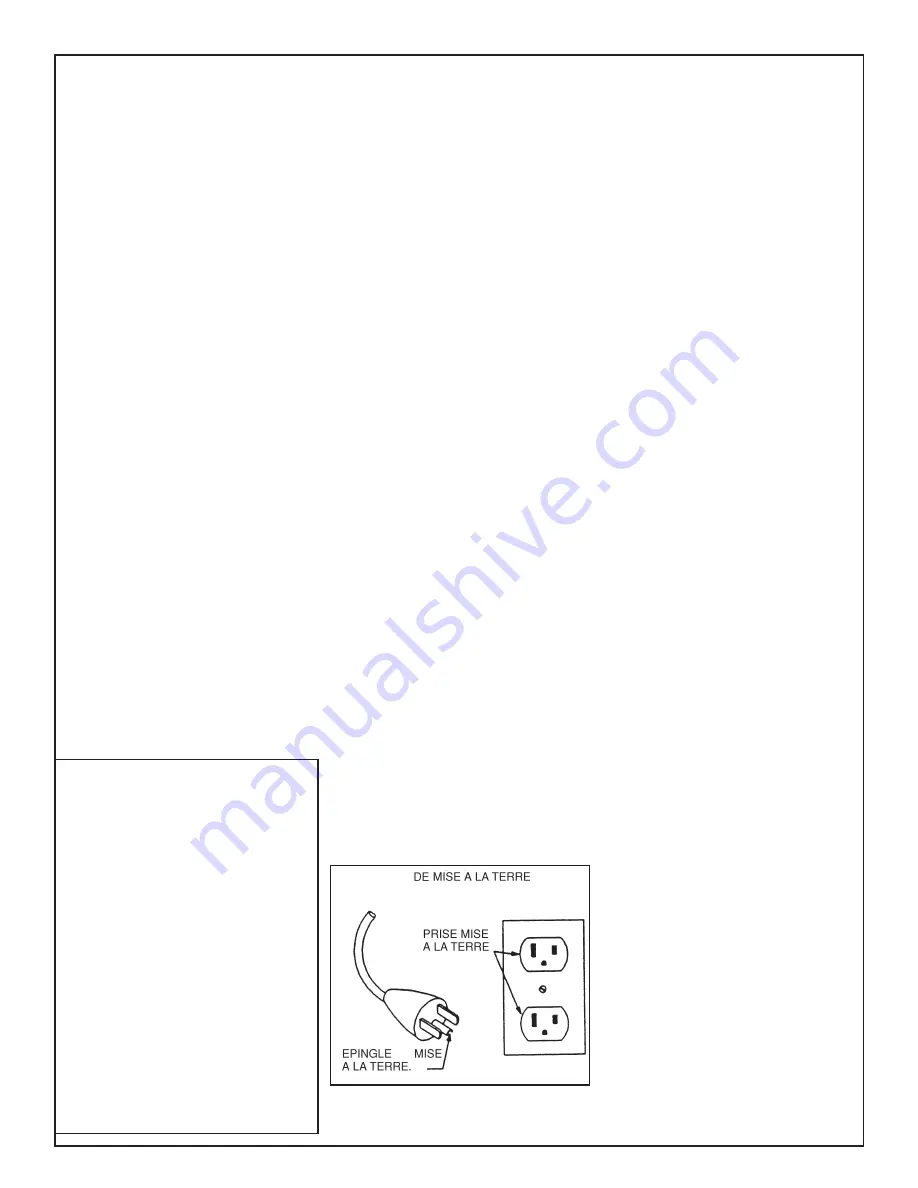
• Ce produit est destiné à être utilisé sur un circuit à

tension nominale de 120 volts et a une fiche de
terre qui ressemble à la fiche illustrée ci-après.

• S’assurer que le produit est branché sur une prise

ayant la même configuration que la fiche. Aucun
adaptateur ne doit être utilisé avec ce produit.

CORDONS DE RALLONGE

- Utilisez uniquement

un cordon de rallonge à trois fils pourvu d’une fiche
de mise à la terre à trois lames, et une prise à trois
fentes qui acceptera la fiche de la pompe. Assurez-
vous que votre cordon de rallonge est en bon état.
Lorsque vous utilisez un cordon de rallonge, veillez à
en utiliser un suffisamment puissant pour transporter
le courant que consommera cette pompe.

Pour les longueurs
de moins de                   Utilisez une rallonge de cali-
bre

7,6 m

16 AWG

15,2 m

14 AWG

30,4 m

12 AWG

45,7 m

10 AWG

Un cordon sous-calibré provoquera une chute de

tension secteur ayant pour conséquences une perte
de puissance et une surchauffe. En cas de doute,
utilisez le calibre immédiatement plus puissant. Plus
le numéro de
calibre est bas, plus le cordon est puissant.

8) Le moteur électrique de cet appareil n’est pas

protégé contre les explosions. Il est donc essentiel
d’assurer une bonne ventilation de la zone de travail
et des alentours de la pompe. Il est également impor-
tant de maintenir la pompe à une distance minimale
de 7,6 m de la zone de pulvérisation. Certains matéri-
aux présentent, à défaut de suivre ces consignes, un
risque d’incendie ou d’explosion. Suivez 

TOUJOURS

les précautions et avertissements du fabricant de
chaque solvant ou revêtement utilisé.

9) Portez 

TOUJOURS

un masque et des lunettes

de protection lors de vos travaux de pulvérisation.
D’autres articles de protection personnelle peuvent
être nécessaires suivant le type de produit pulvérisé
et les conditions d’aération. Demandez toujours ses
recommandations à votre fournisseur.

10) Maintenez toutes les tiges de rallonge à dis-

tance des fils électriques.

11) N´altérez ou ne modifiez 

JAMAIS

une partie

quelconque de cet appareil, ce qui pourrait causer
des défaillances.

12) Ne laissez 

JAMAIS

le matériel sans surveil-

lance. Gardez-le hors de portée des enfants et de
toute personne inexpérimentée quant à l’usage de
matériel sans air.

NE PAS UTILISER LE MATERIEL AVANT D’AVOIR LU CETTE SECTION

ATTENTION!

LES PULVERISATEURS A HAUTE PRESSION PEUVENT

PROVOQUER DE SERIEUSES LESIONS

Pression de travail maximale: 3300 psi — 228 bar

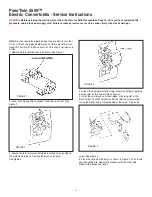
IMPORTANT -- PRESSURE RELIEF
PROCEDURE
ALWAYS reduce pressure when you are
cleaning a clogged tip, changing a tip,
servicing any part of the system, or
shutting down. Follow the steps below:
1. Engage the gun trigger lock.
2. Shut off the power source.
3. Close the orange handle shut-off ball
valve on the hydraulic pressure hose.
4. Open the Pressure Bleed Valve by
turning it counterclockwise at least
three full turns.
5. Disengage the gun trigger lock and
hold trigger open until flow of material
stops.
6. Be certain to hold a metal part of the
gun firmly to the side of a grounded
metal container.
7. Reset trigger safety to locked posi-
tion.

Summary of Contents for 449-700

Page 1: ...Twin 5500 PowrTwin 5500 Airless Sprayer WARNING HIGH PRESSURE DEVICE Model Number 449 700 Gas Model Number 449 704 DC Electric Model Number 449 706 AC Electric This manual contains important warnings and instructions Please read and retain for reference Never operate this unit unless it is properly grounded ...

Page 2: ...nt pump manufacturer and much more abrasion resistant Highly polished parts reduce friction extend packing life and avoid damage from corrosion and abrasion More than 75 000 of these pumps are in operation around the world PowrTwin 5500 offers other cost saving features Variable Pressure Control Choice of Power Gas or Electric Tungsten Carbide Valve Seats Self Adjusting Packings Exclusive Hand Tig...

Page 3: ...ten carbide 37 thiokol impregnated leather ultra high molecular weight polyethylene Electric Units AC Electric DC Electric Delivery GPM 1 50 1 25 LPM 5 70 4 70 Cycle Rate Gallon 55 Liter 14 5 Cycles per Minute Maximum 83 68 Maximum Tip Size 1 Gun 041 036 Maximum Tip Size 2 Guns 029 026 Maximum Tip Size 3 Guns 021 019 Pressure Range psi 400 3300 Pressure Range bar 28 228 Power 3 HP Baldor TEFC Moto...

Page 4: ...opera tion due to a possibility of burns from hot engine components or injury from any equipment the engine may be used to operate 4 Know how to stop the engine quickly and understand the oper ation of all controls Never permit anyone to operate the engine without proper instructions 5 Gasoline is extremely flammable and is explosive under certain conditions 6 Refuel in a well ventilated area with...

Page 5: ...unded in accordance with all local codes and ordinances DANGER Improper installation of the grounding plug can result in a risk of electric shock If repair or replacement of the cord or plug is necessary do not connect the ground ing wire to either flat blade terminal The wire with insulation having an outer surface that is green with or without yellow stripes is the grounding wire Check with a qu...

Page 6: ...minales de cuchilla plana El alambre con aislamien to exterior verde con o sin rayas amarillas es el alambre de puesta a tierra Consulte a un elec tricista o técnico competente si no comprende bien las instrucciones para la conexión a tierra o si tiene dudas de que el producto está conectado a tierra correctamente No modifique el enchufe que viene con el producto si no encaja en el tomacorriente p...

Page 7: ... à l intérieur INSTRUCTIONS DE MISE A LA TERRE Ce pro duit doit être mis à la terre Dans l hypothèse d un court circuit électrique la mise à la terre réduit le risque de chocs électriques en assurant un fil de fuite pour le courant électrique Ce produit est pourvu d un cordon possédant un fil de terre avec fiche appro priée de mise à la terre La fiche doit être branchée sur une prise qui est posée...

Page 8: ...8 ...

Page 9: ...g instructions See Accessories Page 31 for ordering informa tion 8 Strain all paints with Titan Speeflo 160 524 5 gallon Nylon Strainer or Titan Speeflo 160 124 1 gallon Nylon Strainer to assure trouble free operation and freedom from frequent cleaning of inlet screen and gun strainer WARNING Proper grounding is important This applies to both gas and electric powered models The passage of some mat...

Page 10: ...tory with mineral spirits You must clean the system before spraying to avoid contam ination of the sprayed material If you are spraying a water based latex flush with warm soapy water followed by a clean water rinse If you are using any other coating flush with warm soapy water followed by a solvent Check with the material manufacturer for a compatible solvent Place syphon tube assembly into prope...

Page 11: ...draulic fluid daily It should read Full on the dip stick If it is low add only Titan Speeflo Coolflo Hydraulic Fluid Part 430 361 Never add or change hydraulic fluid except in a clean dust free area Contamination of the hydraulic fluid will short en Hydraulic pump life and may void warranty 2 Change the hydraulic fluid every six months Drain old fluid from tank and fill with 5 quarts of Titan Spee...

Page 12: ...lacement elements can be purchased from your local Honda dealer ENGINE OPERATION AND SERVICE 1 Clean and oil air filter pad on gasoline engine every 25 hours or once weekly Do not permit the air intake screen around the fly wheel of the gas engine to load up with paint or trash Clean it reg ularly The service life and efficiency of the gas engine model depends upon keeping the gasoline engine runn...

Page 13: ... fan width The proper selec tion is determined by the fan width required for a specific job and by the orifice size that will supply the desired amount of fluid and accom plish proper atomization For light viscosity fluids smaller orifice tips generally are desired For heavier viscosity materials larger orifice tips are preferred Please refer to the chart below Note do not exceed the pump s recomm...

Page 14: ...adequate fluid delivery Same as above DISTORTED Plugged or worn nozzle tip Clean or replace nozzle tip PATTERN EXPANDING Suction leak Inspect for suction hose leak CONTRACTING SURGE Pulsating fluid delivery Change to a smaller tip orifice size Install pulsation dampener in system or drain existing one Reduce number of guns using pump Remove restrictions in system clean tip screen if filter is used...

Page 15: ... becomes hotter This will help determine if center O Ring is blown on spool valve If hot Note Engine labors at stall remove and replace O Ring on both strokes Bad hydraulic pump Replace hydraulic pump TROUBLESHOOTING GUIDE HYDRAULIC MOTORS 15 TROUBLESHOOTING GUIDE FLUID SECTIONS CONDITION POSSIBLE CAUSE CORRECTION Pump delivers on upstroke only or Lower foot valve ball is not seating due to Remove...

Page 16: ...p Assembly 1 1 2 Hydraulic System 1 1 3 Cart Assembly 1 1 4 506 130 Convertokit 5 5 HP Honda 1 1 Gasoline 5 930 515 Filter Assembly Outlet Manifold 1 1 6 840 211 Bleed Line Assembly w Valve 1 1 7 103 826 Syphon Hose Assembly 1 1 1 x 4 1 2 GAS MODELS PowrTwin 5500 Major Components 1 6 7 2 5 4 3 ...

Page 17: ... 506 248 NO NO DESCRIPTION QTY QTY 1 860 501 Nut Stop 6 6 2 860 002 Washer Lock 6 6 3 860 004 Washer Flat 12 12 4 978 382 Motor Electric 3 HP 1 60 Cycle 220 V 4a 978 374 Motor Electric 3 HP 1 50 Cycle 220 V 5 449 180 Pulley 1 5a 449 178 Pulley 1 6 449 121 Mounting Plate Elec Motor 1 1 3 HP 7 860 552 Screw HH 4 4 7a 860 544 Screw HH 2 2 8 590 068 Grip Handle 1 1 9 335 017 Handle 1 1 10 590 411 Spac...

Page 18: ...tric 2 HP 50 60 Hz 115 V 1 CSA approved 2 860 501 Nut Stop 4 4 4 3 860 002 Washer Lock 4 4 4 4 977 225 Pulley 1 1 1 5 449 170 Mount Plate 1 1 1 6 590 068 Grip Handle 1 1 1 7 335 017 Handle 1 1 1 8 860 004 Washer Flat 8 8 8 9 860 535 Screw 2 2 2 10 860 552 Screw 2 2 2 11 449 192 Shield Motor Shaft 1 12 747 951 Decal Identification Kit FRENCH 1 13 449 181 Belt Not illustrated Not part of this assemb...

Page 19: ...or on the commutator is normal 5 Install the new brush so its lead slides in the long slot of the brush holder Push the terminal under the terminal screw washer Insure the motor lead is still connected at the screw Tighten the screw See Figure 4 6 Place the spring on the brush as shown in Figure 4 Push in and hook the spring clip Repeat this procedure for the other side Reinstall the inspection co...

Page 20: ...her 1 8 449 120 Spacer 1 9 590 503 Axle 1 10 449 102 Motor Pump Bracket 1 11 862 002 Washer Lock 2 12 862 444 Screw 2 CART ASSEMBLY Continued ITEM PART NO NO DESCRIPTION QUANTITY 13 870 004 Washer 2 14 570 010 Key Cotter 2 15 670 109 Wheel 2 16 449 145 Spacer 1 17 590 525 Frame 1 18 785 007 Belt Guard Assembly 1 19 858 636 Screw 2 20 858 002 Washer Lock 2 21 862 001 Washer Flat 1 22 862 411 Nut 1 ...

Page 21: ...4 325 031 O Ring 1 25 858 636 Screw HH 8 26 858 002 Washer Lock 10 27 101 205 Lug Ground 1 28 862 002 Washer Lock 4 29 862 493 Screw HH 2 30 227 027 Plug 1 31 862 480 Screw HH 1 32 335 010 Cap Filler w Dipstick 1 33 449 621 Fitting 1 34 862 438 Screw Thumb 1 35 862 402 Nut Acorn 1 36 449 107 Retainer Mounting Plate 1 37 449 135 Spacer 1 38 449 610 Filter Hydraulic 1 39 449 609 Hydraulic By Pass 1 ...

Page 22: ...d to jam the two Lock Rings 22 together on the cylinder and a pipe wrench can now be used to unthread the Cylinder 23 from the Pump Block 25 5 To remove Connecting Rod Pin 2 slide the Ring up with a small screwdriver Then push the Connecting Rod Pin out See the illustration on Page 31 6 Remove the Piston Rod Assembly from the Pump Block 25 7 Remove Seal 24 being extremely careful not to scratch th...

Page 23: ...ng it well and replacing Piston 17 onto Piston Rod 21 Put one drop of blue Loctite on the Piston Retainer Screw 16 Tighten piston retainer screw until piston is locked into place Check Valve Rod Assembly 20 for normal spring action at this time 6 Install Piston Seal 18 with lips facing downward Carefully install The Piston Seal 18 Expand the ring and stretch it suffi ciently for installation 7 Wit...

Page 24: ...od to full tight position do not overtighten while holding valve rod below with vise grip pliers 13 Thread Cylinder Head 11 down onto the Cylinder 23 and then back off just enough to reassemble hydraulic fittings and Motor Tube 26 Tighten lock ring with spanner wrench to hold cylinder head in position 14 The Tee Assembly 27 and the Elbow 15 uses an O Ring 27a to seal on the O D of the Motor Tube 2...

Page 25: ... Ring 3 and 12 into O Ring groove of Pump Cylinder 11 and O Ring 3 into Pump Block 2 Place O Ring 3 into Foot Valve 15 3 Place Foot Valve Ball 14 in Foot Valve 15 and install Ball Stop Cage 13 4 Connect Foot Valve 15 to Pump Cylinder 11 Place Packing Set 4 over Piston Seat 10 CAUTION Peak of V packing must point down toward Foot Valve 15 Place Piston Ball 9 on Piston Seat 10 Follow with Lower Pack...

Page 26: ...hat the threads of the syphon hose fit snugly into the foot valve with the hose assembly couplings PTFE taped and sealed to prevent air leakage 143 500 SERVICE KIT MAJOR PUMP ITEM PART NO NO DESCRIPTION QUANTITY 143 050 Service Kit Pump 1 6 143 117 Displacement Rod 1 11 143 822 Pump Cylinder 1 143 050 SERVICE KIT MINOR PUMP ITEM PART NO NO DESCRIPTION QUANTITY 1 143 019 Retainer Ring 1 3 145 031 O...

Page 27: ... it rotates and wears evenly If there is leakage replace the ball CAUTION Open the Adjustment Knob 1 to full counterclockwise position before unthreading Valve Seat 9 from Valve Body 4 If the Valve Stem 3 is rotated inwardly with me ball removed the PTFE O Ring 5 may require replacement If mere has been leakage from the valve stem the PTFE O Ring should be replaced IMPORTANT The Valve Stem Stop 6 ...

Page 28: ...180 909 Seat Tungsten Carbide 1 1 1 8 930 920 Body Filter 1 1 1 9 227 027 Plug Pipe 1 1 1 10 227 033 Plug Pipe 1 1 1 11 191 324 Nipple Hex 1 1 1 12 191 449 Nipple Hex 1 1 1 PART NO 930 050 FILTER SERVICE KIT ITEM PART NO NO DESCRIPTION QUANTITY 2 930 020 Spring 1 4 920 006 Gasket PTFE 1 5 920 070 Gasket PTFE 1 6 891 193 O Ring PTFE 1 SPECIFICATIONS Maximum Working Pressure 5000 psi 345 bar Filter ...

Page 29: ... filter body 10 filter element with check ball 3 and filter cap with spring guide 1 with appropriate solvent Use care in handling parts as dirt debris scratches or nicks may prevent O Rings or gaskets from sealing The 930 Series Filter Elements filter from the inside out Be certain to clean the screen element thoroughly on the inside Soak in solvent to loosen hardened paint etc or replace SERVICE ...

Page 30: ...x 1 1 1a 814 004 Nipple Hex 1 1 2 940 553 Valve Ball 1 1 2a 941 555 Valve Ball 1 1 3 227 006 Nipple Hex 1 1 3a 808 555 Nipple Hex 1 1 4 227 033 Plug Pipe 1 1 5 970 100 Block Manifold 1 1 6 814 004 Nipple Hex 1 1 MULTIPLE GUN MANIFOLD ASSEMBLIES PART 975 212 975 213 975 214 975 312 975 313 975 314 NO DESCRIPTION 2 GUN 3 GUN 4 GUN 2 GUN 3 GUN 4 GUN 1 4 1 4 1 4 3 8 3 8 3 8 975 111 1 GUN ADD ON 1 4 1 ...

Page 31: ...ounding Wire 12 Gauge x 25 700 925 Piston Lube 430 362 Coolflo Hydraulic Fluid 1 Quart 430 361 Coolflo Hydraulic Fluid 1 Gallon 143 050 Service Kit for PowrTwin 5500 Fluid Pump 930 050 Service Kit for Paint Filter 944 050 Service Kit for Bleed Valve 975 212 2 Gun Manifold with Ball Valves 1 4 975 213 3 Gun Manifold with Ball Valves 1 4 975 312 2 Gun Manifold with Ball Valves 3 8 975 313 3 Gun Mani...

Page 32: ...equipment claimed to be defective to Titan Tool Inc or to an authorized Warranty Service Center for verification of the claimed defect If the alleged defect is verified Titan Tool Inc will at Titan Tool Inc s option repair or replace any defective parts The equipment will be returned including prepayment of transportation charges to the original purchaser If no defects in material and workmanship ...

Reviews: