

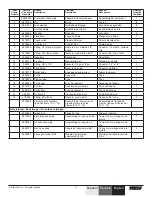


4
© Titan Tool Inc. All rights reserved.
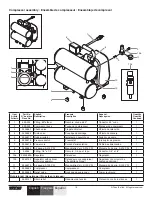
English
Setup
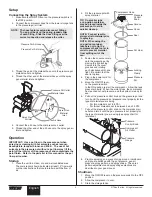
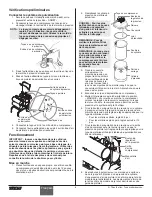
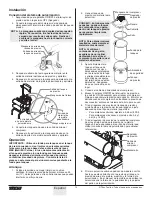
connecting the Spray System
1. Make sure the ON/OFF lever on the pressure switch is in
the OFF position.
2. Connect the compressor hose from the lower storage tank
to the pressure pot air inlet.
NOTE: The hose features quick-disconnect fittings.
To use, pull back on the spring-loaded collar
of each fitting. Slide the hose fitting over the
correct connection and release the collar.
Pressure Pot Air Inlet
Pressure Pot Air Hose
3. Thread the end of the material hose onto the pressure pot
material outlet and tighten.
4. Thread the other end of the material hose onto the spray
gun material inlet and tighten.
Pressure Pot Outlet
Material Hose
Air Hose
Spray Gun
Material
Inlet
Spray Gun
Air Inlet
5. Connect the air hose to the compressor air outlet.
6. Thread the other end of the air hose onto the spray gun air
inlet and tighten.
Operation
ImPORTaNT: use a pot liner in the pressure pot when
spraying or cleaning with hot solvents such as lacquer-
based paints, lacquer thinner, and m.E.k. The use of hot
solvents in the pressure pot without a pot liner may lift the
paint off the interior of the pressure pot and contaminate the
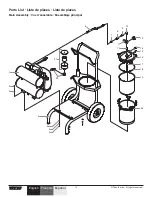
paint finish. Refer to the parts list in this manual for the pot
liner part number.
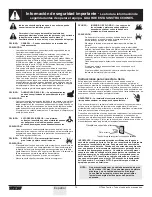
Startup
1. Place the unit in a clean, dry, and well-ventilated area.
The compressor should be located at least 12” from walls
or other obstructions that could interfere with the flow of
air.
Cover
Groove
Seal
Locking
Clamp
Pressure
Pot
Compressor Hose
Pressure
Control
Knob
Pot Liner
2. Fill the pressure pot with
spray material.
TIP: On smaller jobs
a one-gallon container
may be placed inside the
pressure pot to aid in
quicker cleanup.
NOTE: For best results,
always strain material prior
to spraying.
NOTE: When using the
one-gallon container,
take care not to tip the
compressor back too far in
order to prevent material
from spilling out of the
can.
3. Fasten the cover securely
onto the pressure pot by
placing the five locking
clamps into the cover
grooves and rotating
each clockwise until hand
tight. Be certain that the
seal is in place.
4. Plug in the power cord for
the compressor.
5. Move the ON/OFF lever
on the pressure switch
to the ON position to start the compressor. Allow the tank
pressure to build. When the motor stops, the compressor
has reached cut-out pressure, and the system is ready for
use.
6. Pull out the pressure control knob on the pressure pot and
turn it until the pressure pot pressure is set properly for the
type of material you are using.
• For thin materials, set to 8 PSI.
• For thicker materials, set to between 8 and 14 PSI.
7. Pull out the pressure control knob on the compressor air
outlet and turn it until the gun pressure is set properly for
the type of material you are using.(see spray chart for
reference).
Compressor
Air Outlet
Pressure
Gauge
Pressure
Control Knob
8. Practice spraying on a piece of scrap wood or cardboard
until you are satisfied with the pot pressure, gun air
pressure, spray pattern, and spray shape. The spray
pattern adjustments and spray shape selections are
described in your gun manual.
Shutdown
1. Move the ON/OFF lever on the pressure switch to the OFF
position.
2. Allow the compressor to cool.
3. Drain the storage tanks.


