© Titan Tool Inc. All rights reserved.
7
English
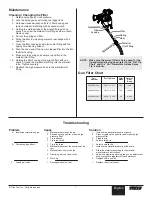
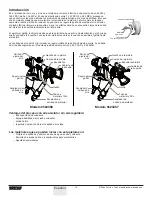
Maintenance
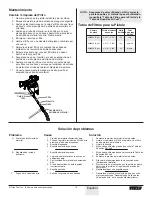
cleaning / changing the Filter
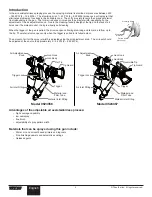
1. Relieve spray gun and unit pressure.
2. Lock the spray gun by activating the trigger lock.
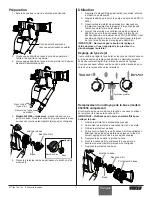
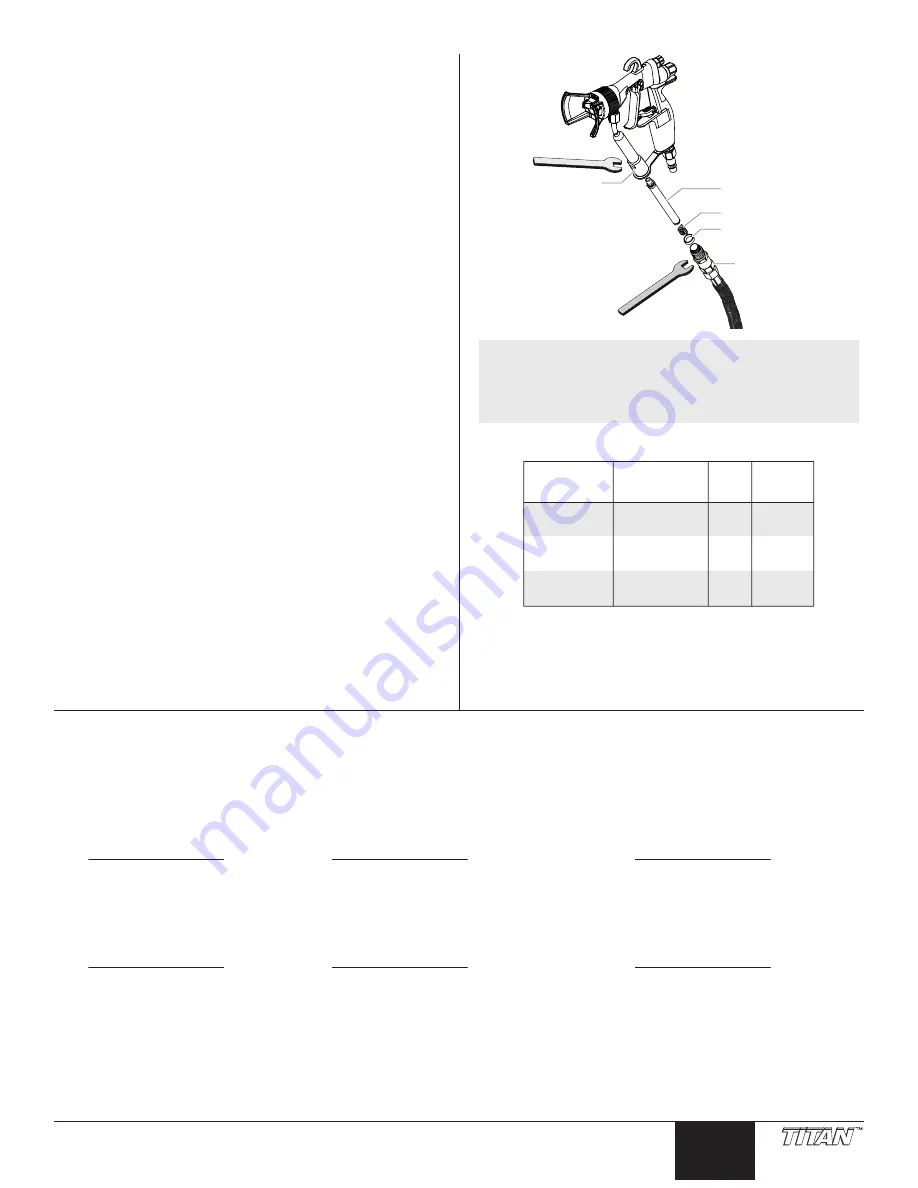
3. Hold open-ended wrench on flats of filter housing and
remove material inlet fitting with a second wrench.
4. Holding the material tube at the wrench flats with one
wrench, unscrew the material inlet fitting another wrench.
Remove seal.
5. Pull out the spring and filter.
6. Rinse the filter in a cleaning solvent or exchange with a
new filter.
7. Clean the filter housing and material inlet fitting with the
appropriate cleaning solvent.
8. Push the cone end of the new or cleaned filter into the into
the filter housing.
9. Make sure the spring and seal are in position in the
material inlet fitting.
10. Holding the filter housing at the wrench flats with one
wrench, thread the material inlet fitting into the material
tube. Tighten securely.
11. Reattach the high pressure hose to the material inlet
fitting.
Material
Inlet Fitting
Seal
Spring
Filter
Filter
housing
NOTE
: Make sure the correct filter is being used for the
tip and material being used (refer to the “Flat Tip
chart” and the “XL-1 Reversible airless Spray
Tip” sections).
Gun Filter chart
Part
Number
For Tip Sizes
Filter
Mesh
Color of
Filter
Body
0089960 (2 pk.)
0.007" – 0.011"
180
red
0089959 (2 pk.)
0.013" – 0.015"
100
yellow
0089958 (2 pk.)
0.018" – 0.036"
50
white
Problem
A. Insufficient material supply.
B. Poor spraying pattern.
C. Leaking air valve.
cause
1. Material pressure set too low.
2. Blocked spray gun filter or pump high
pressure filter.
3. Tip is blocked.
4. Tip is too small.
1. Tip is too large.
2. Material pressure at the pump is set too
low.
3. Material viscosity is too high.
4. Atomizing air is set incorrectly.
5. Worn tip.
1. Damaged air valve seal.
Solution
1. Increase the material pressure at pump.
2. Clean or replace the gun filter and/or pump high
pressure filter.
3. Clean the tip.
4. Select a larger tip.
1. Select a smaller tip.
2. Increase the material pressure at the pump.
3. Dilute the material according to the material
manufacturer’s instructions.
4. Adjust the atomizing air using the gun air adjustment
knob or pressure regulator at the compressor.
5. Replace with a new tip.
1. Replace the air valve seal.
Troubleshooting


