background image


15

 OPERATION

HYDRA X

4.3 

PREPARING A NEW SPRAYER

i

If this unit is new, it is shipped with test fluid in 

the fluid section to prevent corrosion during 

shipment and storage.  This fluid must be 

thoroughly cleaned out of the system with 

mineral spirits before you begin spraying.

Attention

Always keep the trigger lock on the spray gun in 

the locked position while preparing the system.  

Refer to the spray gun instruction manual for 

trigger lock instructions.

1.  Lower the siphon tube into a container of mineral spirits.
2.  Place the bleed hose into a metal waste container.
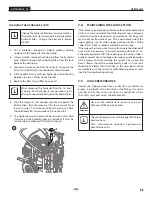
3.  Turn the pressure control knob fully counterclockwise to 

its lowest pressure setting (Fig. 10, item 1).

4.  Open the bleed valve (2) by turning it fully counterclockwise.

1

2

5.  Start the engine (see section 4.2).
6.  Turn the master power switch ON (I).  
7.  Turn the pressure control knob (fig. 10, item 1) clockwise 

approximately 1/3 of the way to increase pressure until 

the sprayer cycles evenly and solvent flows freely from the 

bleed hose.

8.  Allow the sprayer to run for 15–30 seconds to flush the 

test fluid out through the bleed hose and into the waste 

container.

9.  Turn off the sprayer.


•  set the pressure to minimum by turning the pressure 

control knob fully counterclockwise,


•  move the throttle lever to the slow position, and 


•  turn the engine switch to the OFF position.

4.4 

PREPARING TO SPRAY 

i

Before spraying, it is important to make sure that 

the fluid in the system is compatible with the 

paint that is going to be used.
Incompatible fluids and paint may cause the 

valves to become stuck closed, which would 

require disassembly and cleaning of the sprayer’s 

fluid section.

Attention

Always keep the trigger lock on the spray gun in 

the locked position while preparing the system.  

Refer to the spray gun instruction manual for 

trigger lock instructions.

1.  Lower the siphon tube into a container of mineral spirits.
2.  Place the bleed hose into a metal waste container.
3.  Turn the pressure control knob fully counterclockwise to 

its lowest pressure setting (Fig. 10, item 1).

4.  Open the bleed valve (2) by turning it fully counterclockwise.
5.  Start the engine (see section 4.2).
6.  Turn the master power switch ON (I).  
7.  Turn the pressure control knob (Fig. 10, item 1) clockwise 

approximately 1/3 of the way to increase pressure until 

the sprayer cycles evenly and solvent flows freely from the 

bleed hose.

8.  Allow the sprayer to run for 15–30 seconds to flush the fluid 

out through the bleed hose and into the waste container.

9.  Turn off the sprayer.


•  set the pressure to minimum by turning the pressure 

control knob fully counterclockwise,


•  move the throttle lever to the slow position, and 


•  turn the engine switch to the OFF position.

i

Make sure that the spray gun does not have a tip 

or tip guard installed.

10.  Close the bleed valve by turning it fully clockwise.
11.  Start the engine (see section 4.2).
12.  Turn the master power switch ON (I).  
13.  Turn the pressure control knob clockwise approximately 

1/3 of the way down to increase pressure.

14.  Unlock the gun by turning the gun trigger lock to the 

unlocked position.

Summary of Contents for HYDRA X

Page 1: ...HAUTE PRESSION AIRLESS EQUIPO DE ALTA PRESI N PARA PULVERIZAR OPERATING MANUAL Models 2412275 4540 4500 PSI 2412277 7230 7250 PSI EN OPERATING MANUAL 2 F MODE D EMPLOI 28 ES INSTRUCCIONES DE USO 54 UN...

Page 2: ...t Inform the doctor about the coating material or solvent used The operating instructions state that the following points must always be observed before starting up 1 Faulty units must not be used 2 S...

Page 3: ...Spraying_____________________________________17 4 7 Pressure relief procedure________________________17 5 SPRAYING TECHNIQUE___________________ 18 5 1 Cleaning a clogged tip__________________________1...

Page 4: ...ctive harm For more information go to www P65warnings ca gov 1 2 SAFETY HAZARDS i IMPORTANT SAFETY INSTRUCTIONS SAVE THESE INSTRUCTIONS WARNING INJECTION INJURY A high pressure stream produced by this...

Page 5: ...s in work area can ignite or explode PREVENTION Use equipment only in well ventilated area Keep a good supply of fresh air moving through the area to keep the air within the spray area free from accum...

Page 6: ...moved and high pressure has been set on the airless pump When cleaning without a spray tip set the pressure control knob to the lowest pressure Use only manufacturer authorized parts User assumes all...

Page 7: ...oline that has a pump octane number of 86 or higher or that has a research octane number of 91 or higher Use of a lower octane gasoline can cause persistent pinging or heavy spark knock a metallic rap...

Page 8: ...ng solvents two component coating materials dispersion and latex paints No other materials should be used for spraying without Titan s approval i Pay attention to the Airless quality of the coating ma...

Page 9: ...RM DESCRIPTION HOW TO FIND 2412595 Operation Manual EN FR ES included with unit online 2412594 Service manual spare parts accessories EN FR ES online 3 3 FUNCTIONING OF THE UNIT The following section...

Page 10: ...4 Engine key ignition 5 Suction tube storage 6 Hydraulic motor 7 Oil measuring stick 8 Oil cup for Piston Lube Piston Lube prevents increased wear and tear of the packings 9 High pressure hose outlet...

Page 11: ...ure 0 2 MPa 2 bar 30 PSI 0 2 MPa 2 bar 30 PSI Place of measurement 1 m distance from unit and 1 60 m above reverberant floor 120 bar 12 MPa operating pressure OPERATING TEMPERATURE This equipment will...

Page 12: ...o the entire system Press and hold the button for 3 seconds to turn electrical power ON Press the button once to turn electrical power OFF LIFT SWITCH The lift switch raises and lowers the hydraulic m...

Page 13: ...he spray hose Do not attach the tip to the spray gun yet Remove the tip if it is already attached i For multiple gun operation connect the multiple gun manifold to the single gun outlet see manifold k...

Page 14: ...latile solvents or exhaust fumes If lacquer or other flammable materials are to be sprayed ALWAYS locate the sprayer outside the immediate spraying area Failure to do so may cause an explosion 15 Loca...

Page 15: ...system is compatible with the paint that is going to be used Incompatible fluids and paint may cause the valves to become stuck closed which would require disassembly and cleaning of the sprayer s flu...

Page 16: ...g for cleanup 4 5 55 GALLON DRUM SETUP i Follow these steps when drawing material from a 55 gallon drum 1 Make sure the sprayer is shut off and relieved of all pressure follow Pressure Relief Procedur...

Page 17: ...the slow position and turn the engine switch to the OFF position turn the master power switch OFF 0 18 Attach tip guard and tip to the gun as instructed by the tip guard or gun manuals POSSIBLE INJEC...

Page 18: ...rwise one end of the pattern will be thicker than the other B C Trigger gun after starting the stroke Release the trigger before ending the stroke The spray gun should be moving when the trigger is pu...

Page 19: ...g spraying again remove the plastic from the material container and restart the sprayer by following the steps in section 4 5 5 3 HANDLING THE HIGH PRESSURE HOSE All accessories must be rated at or ab...

Page 20: ...terclockwise 7 Start the engine see section 4 2 8 Turn the master power switch ON I 9 Allow the solvent to circulate through the sprayer and flush the paint out of the bleed hose into the metal waste...

Page 21: ...efore returning the motor pump to the storage position 1 1 2 6 5 CLEANING THE FILTER SCREEN i A clean filter screen always guarantees maximum feed quantity constant spraying pressure and problem free...

Page 22: ...fluid section 3 Fill the packing oil reservoir 1 2 full with Piston Lube P N 314 480 supplied by the factory This will extend packing life 2 1 i Do not over fill the reservoir so that it overflows an...

Page 23: ...rized Titan Service Center 1 2 3 7 4 MAINTAINING THE FLUID SECTION Ifthesprayerisgoingtobeoutofserviceforanextendedperiod of time it is recommended that following cleanup a kerosene and oil mixture be...

Page 24: ...daily Replace the element as needed Replacement elements can be purchased from your local engine manufacturer dealer ENGINE OPERATION AND SERVICE Clean and oil air filter pad on gasoline engine every...

Page 25: ...pray tip is worn 2 Gun filter is clogged 3 Hose size or length is too small or too long 1 Solvent has caused upper packing to swell SOLUTION 1 Inspect connections for air leaks 2 Disassemble and clean...

Page 26: ...the unit If the hydraulic motor cycles when the hydraulic piston is de coupled from the paint piston then the problem is most likely in the fluid section Please visit a Titan Authorized Service Center...

Page 27: ...correctly Increase fluid pressure Change to smaller tip orifice size Reduce fluid viscosity Reduce hose length Clean gun and filter s Reduce number of guns using pump 1 Same as above 1 Clean or repla...

Page 28: ...cin Renseignez le m decin sur la nature de la peinture ou du solvant utilis s Avant toute mise en service respecter les points suivants conform ment aux instructions de service 1 Ne jamais utiliser un...

Page 29: ...__________________________________43 4 6 Proc dure de d charge de pression_______________43 5 PULV RISATION_________________________ 44 5 1 Nettoyage d une buse obstru e__________________44 5 2 Interr...

Page 30: ...DE S CURIT IMPORTANTES CONSERVEZ CES INSTRUCTIONS MISE EN GARDE BLESSURE PAR PROJECTION Un courant de liquide haute pression produit par cet quipement peut percer la peau et les tissus sous cutan s et...

Page 31: ...t dans un endroit bien a r Faites circuler beaucoup d air frais dans l endroit afin d viter l accumulation de vapeurs inflammables dans la zone de pulv risation Entreposez l ensemble de la pompe dans...

Page 32: ...dent pas aux sp cifications minimales et aux dispositifs de s curit du fabricant de la pompe Respectez TOUJOURS les consignes du fabricant du mat riau pour manipuler la peinture et les solvants en tou...

Page 33: ...tenace qui s il est grave peut endommager le moteur i S il y a un cognement ou une d tonation une vitesse constante avec une charge normale utilisez une autre marque d essence Si vous obtenez toujours...

Page 34: ...ues et peintures diluables l eau et solvant es produits de rev tement deux composants dispersions peintures latex Mise en uvre d autre produits seulement avec l accord de Titan i Veiler la qualit Airl...

Page 35: ...peuvent tre t l charg s partir du site www titantool com FORM N DESCRIPTION O LE TROUVER 2412595 Mode d emploi EN FR ES Inclus avec l appareil En ligne 2412594 Manuel d entretien pi ces de rechange ac...

Page 36: ...e 7 Jauge de niveau d huile 8 Ouverture de remplissage pour Piston Lube Piston Lube emp che usure rapide des garnitures 9 Sortie du tuyau haute pression 10 Poign e de la vanne de d charge tourner gauc...

Page 37: ...a 2 bar 30 PSI Lieu de mesure distance lat rale de 1 m de l appareil et 1 60 m au dessus du sol pression de service 12 MPa 120 bars sol r verb rant TEMP RATURE DE FONCTIONNEMENT Cet quipement fonction...

Page 38: ...Appuyez sur le bouton et maintenez le enfonc pendant 3 secondes pour allumer l alimentation lectrique Appuyez une fois sur le bouton pour couper l alimentation lectrique INTERRUPTEUR DU SOUL VATEUR L...

Page 39: ...pulv risation 1 2 3 8 Attachez un pistolet de pulv risation sans air au tuyau de pulv risation N attachez pas encore la buse de pulv risation au pistolet Retirez la buse si elle se trouve d j sur le p...

Page 40: ...ne et le filtre du pistolet 14 V rifiez que la zone de vaporisation est bien ventil e pour emp cher tout fonctionnement dangereux avec des solvants volatiles ou des fum es d chappement Si vous devez p...

Page 41: ...on lente et tournez l interrupteur du moteur sur OFF tournez l interrupteur g n ral d alimentation la position OFF 0 4 4 PR PARATION AVANT DE PEINDRE i Avant de peindre il est important de s assurer q...

Page 42: ...en suivre la Proc dure de charge de pression lorsque vous arr tez l appareil pour une raison quelconque y compris lors de l entretien ou du r glage d une pi ce du circuit de vaporisation du remplaceme...

Page 43: ...d acc l ration en position lente et tournez l interrupteur du moteur sur OFF tournez l interrupteur g n ral d alimentation la position OFF 0 18 Fixez la protection d embout au pistolet comme indiqu su...

Page 44: ...ue de l autre B C Actionnez le pistolet apr s avoir commenc le passage Rel chez la g chette avant la fin du passage Le pistolet pulv risateur doit tre en mouvement au moment d appuyer sur la g chette...

Page 45: ...tiliser exclusivement des tuyaux flexibles haute pression d origine de Titan 5 2 INTERRUPTIONS DE TRAVAIL i Suivez ces tapes si vous arr tez de pulv riser pendant jusqu 20 heures Suivez ces tapes seul...

Page 46: ...nant au maximum le bouton de r glage de pression dans le sens inverse des aiguilles d une montre 6 Ouvrez la vanne de purge 3 en la tournant au maximum dans le sens contraire des aiguilles d une montr...

Page 47: ...s 1 x2 du syst me de levage du moteur pompe et la tige de l actionneur 2 sont propres avant de remettre le moteur pompe en position de stockage 1 1 2 6 5 NETTOYAGE DE LA CR PINE i Des filtres propres...

Page 48: ...e l huile Piston Lube n de pi ce 314 480 fournie par le fabricant Cela permet d accro tre la dur e de vie de l quipement 2 1 i Ne remplissez pas trop le collecteur d huile de fa on viter que l huile n...

Page 49: ...ces Titan autoris 1 2 3 7 4 ENTRETIEN DE LA SECTION DES FLUIDES Si le pulv risateur doit ne pas tre utilis pendant une longue p riode il est conseill suite au nettoyage d introduire un m langedek ros...

Page 50: ...e couvercle du filtre air et nettoyez l l ment Dans les environnements tr s poussi reux v rifiez le filtre quotidiennement Remplacez l l ment le cas ch ant Les pi ces de rechange peuvent tre achet es...

Page 51: ...ulv risateur est us 2 Le filtre du pistolet sont obstru s 3 Taille ou longueur du tuyau trop petite ou trop grande 1 Le solvant a fait gonfler la garniture sup rieure SOLUTION 1 Inspectez les raccords...

Page 52: ...d aide Si le moteur hydraulique ne fonctionne toujours pas v rifiez le joint d tanch it de la tige de piston hydraulique 7 D montez le cylindre hydraulique en enlevez le piston hydraulique pour acc d...

Page 53: ...au diam tre plus petit R duisez la viscosit du liquide R duisez la longueur du tuyau Nettoyez le pistolet et le s filtre s R duisez le nombre de pistolets utilisant la pompe 1 Cf ci avant 1 Nettoyez...

Page 54: ...orrecto Informe al m dico sobre el material de recubrimiento o disolvente utilizado Antes de toda puesta en funcionamiento se tendr n en cuenta los puntos siguientes conforme a las instrucciones de us...

Page 55: ..._______________________69 4 7 Procedimiento para liberar presi n_______________69 5 PULVERIZACI N_________________________ 70 5 1 Limpieza de una boquilla obstruida_______________70 5 2 Interrupci n d...

Page 56: ...e de l quido a alta presi n que produce este equipo puede perforar la piel y tejidos interiores pudiendo provocar graves lesiones e incluso hay posibilidad de amputaci n No trate una lesi n por pulver...

Page 57: ...o solo en reas bien ventiladas Mantenga un buensuministrodeairefrescomovi ndoseatrav sdel rea para mantener el aire al interior del rea de pulverizaci n libre de acumulaci n de vapores inflamables Man...

Page 58: ...o utilice piezas que no cumplan con las especificaciones m nimas y dispositivos de seguridad del fabricante de la bomba Siga SIEMPRE las instrucciones del fabricante del material para que la manipulac...

Page 59: ...ciones persistentes o un fuerte golpe de buj a un sonido de golpeteo met lico el cual si es grave puede causar da os al motor i Si se presenta un golpe de buj a o detonaci n a una velocidad constante...

Page 60: ...ontienen disolvente materiales de recubrimiento bicomponentes dispersiones pinturas l tex El procesamiento de otros materiales de recubrimiento se admite s lo con autorizaci n de la empresa TITAN i Pr...

Page 61: ...esta unidad Los documentos en l nea se pueden descargar en www titantool com N DE FORM DESCRIPCI N C MO ENCONTRARLO 2412595 Manual de operaci n EN FR ES Incluido con la unidad En l nea 2412594 Manual...

Page 62: ...rilla indicadora del nivel de aceite 8 Abertura de relleno para Piston Lube Piston Lube el desgaste excesivo de las empaquetaduras 9 Salida de manguera de alta presi n 10 Mando de v lvula de descarga...

Page 63: ...x 0 2 MPa 2 bar 0 2 MPa 2 bar Punto de medici n Distancia 1 m al lado del equipo y 1 60 m sobre el suelo presi n de servicio 12 MPa 120 barios suelo antiac stico TEMPERATURA DE FUNCIONAMIENTO Este equ...

Page 64: ...sistema Mantenga presionado el bot n durante 3 segundos para encender la energ a el ctrica Presione una vez el bot n para apagar la energ a el ctrica INTERRUPTOR DE ELEVACI N El interruptor de elevac...

Page 65: ...PTFE ni sellante para roscas en la conexi n de la manguera de pulverizaci n 1 2 3 8 Conecte una pistola pulverizadora sin aire a la manguera de pulverizaci n No conecte la punta a la pistola pulveriz...

Page 66: ...ente el tamiz de admisi n y el filtro de la pistola 14 Aseg rese de que la zona a pulverizar est bien ventilada para evitar riesgos durante la pulverizaci n provocados por humos de escape o disolvente...

Page 67: ...el interruptor del motor a la posici n OFF Ponga el interruptor de encendido maestro en posici n de apagado 0 4 4 PREPARARSE PARA PINTAR i Antes de pintar es importante asegurarse de que el l quido de...

Page 68: ...cuando pare el pulverizador por cualquier motivo incluyendo labores de reparaci n mantenimiento o ajuste de cualquier pieza del sistema pulverizador sustituci n o limpieza de boquillas o preparaci n p...

Page 69: ...lanca de la v lvula mariposa en velocidad lenta y gire el interruptor del motor a la posici n OFF Ponga el interruptor de encendido maestro en posici n de apagado 0 18 Acople el protector de la boquil...

Page 70: ...n de la punta en su lugar NUNCA apriete el gatillo de la pistola a menos que la punta est completamente girada en la posici n de pulverizaci n o de destrabado SIEMPRE bloquee el gatillo de la pistola...

Page 71: ...e el pl stico del recipiente de material y siga los pasos de la secci n 4 6 para volver a arrancar el pulverizador 5 3 MANEJO DE LA MANGUERA DE ALTA PRESI N Todos los accesorios deben cumplir o supera...

Page 72: ...en sentido contrario a las agujas del reloj para poner la presi n al m nimo 6 Abra la v lvula de purga gir ndola del todo en sentido contrario a las agujas del reloj 7 Arranque del motor de gasolina s...

Page 73: ...or 2 est n limpios antes de devolver el motor bomba a la posici n de almacenamiento 1 1 2 6 4 LIMPIEZA DEL FILTRO DE ENTRADA i Un filtro de aspiraci n limpio garantiza siempre m xima cantidad transpor...

Page 74: ...l fluido 6 Llene hasta la mitad el vaso lubricador con Piston Lube P N 314 480 provisto por el fabricante De esta manera la vida til de las empaquetaduras se prolongar 2 1 i No llene en exceso el vaso...

Page 75: ...ntro de mantenimiento de Titan 1 2 3 7 4 MANTENIMIENTO DEL SECTOR DEL FLUIDO Si el pulverizador no se utilizar durante un per odo prolongado de tiempo luego de su limpieza se recomienda introducir una...

Page 76: ...n ambientes con mucho polvo revise el filtro diariamente Reemplace el elemento cuando sea necesario Para adquirir los repuestos consulte al distribuidor local del fabricante del motor FUNCIONAMIENTO Y...

Page 77: ...es est desgastado 2 La bola superior o la inferior no asientan 1 La boquilla de pulverizaci n est desgastada 2 El filtro de la pistola est n obstruidos 3 La manguera no tiene el tama o o largo suficie...

Page 78: ...r hidr ulico a n no se enciende revise el sello de la biela del pist n hidr ulico 7 Desmonte el cilindro hidr ulico y retire del pist n hidr ulico para acceder al bloque del sello de la biela que cont...

Page 79: ...bie la boquilla por una con orificio m s peque o Reduzca la viscosidad del fluido Reduzca la longitud de la manguera Limpie la pistola y lo s filtro s Reduzca la cantidad de pistolas que utilizan la b...

Page 80: ...tory if necessary are to be borne and prepaid by the End User Repaired or replaced equipment will be returned to the End User transportation prepaid THERE IS NO OTHER EXPRESS WARRANTY TITAN HEREBY DIS...

Reviews: