background image

Español

© Titan Tool Inc.  Todos los derechos reservados. 

19

Información de seguridad importante

 · 

Lea toda la información de 

seguridad antes de operar el equipo.  GuaRDE ESTaS INSTRuccIONES.

  12.  Aprenda a detener el aparato y a liberar la presión 

rápidamente. Familiarícese a conciencia con los controles. 

La presión no se libera apagando el motor. Para liberar 

la presión hay que poner la manija de la válvula PRIME/

SPRAY (cebar/pulverizar) en PRIME. Consulte el 

Procedimiento para liberar presión que se describe en el 

manual de la bomba.

  13.  Quite siempre la boquilla pulverizadora antes de enjuagar 

o limpiar el sistema.

aDvERTENcIa – Para reducir el riesgo de lesiones:

  1.  Cuando pinte, lleve siempre guantes, protección para los 

ojos, ropa y un respirador o máscara adecuados. Vapores 

peligrosos: Las pinturas, disolventes, insecticidas y otros 

materiales pueden ser perjudiciales si se inhalan o entran 

en contacto con el cuerpo. Los vapores pueden producir 

nauseas intensas, desmayos o envenenamiento.

  2.  Nunca utilice el aparato ni pulverice cerca de niños. 

Mantenga el equipo alejado de los niños en todo 

momento.

  3.  No se estire demasiado ni se apoye sobre un soporte 

inestable. Mantenga los pies bien apoyados y el equilibrio 

en todo momento.

  4.  No se distraiga y tenga cuidado con lo que hace.

  5.  No utilice el aparato si está fatigado o se encuentra bajo la 

influencia del alcohol o de las drogas.

  6.  No retuerza ni doble la manguera en exceso. En la 

manguera airless pueden aparecer fugas a causa del 

desgaste, de retorcimientos o de un mal uso. Una fuga 

puede inyectar material en la piel. 

  7.  No exponga la manguera a temperaturas o presiones que 

superen las especificadas por el fabricante.

  8.  No utilice la manguera como elemento de fuerza para tirar 

del equipo o levantarlo.

  9.  Utilice la presión más baja posible para enjuagar el 

equipo.

  10.  Cumpla todos los reglamentos locales, estatales y 

nacionales pertinentes relativos a ventilación, prevención 

de incendios y funcionamiento.

  11.  Las normas sobre seguridad del gobierno de los Estados 

Unidos se han adoptado al amparo de la Ley de salud 

y seguridad ocupacional (OSHA). Deben consultarse 

tres normas, particularmente la sección 1910 de las 

Normas generales y la sección 1926 de las Normas sobre 

construcción.

  12.  Cada vez que vaya a utilizar el equipo, compruebe antes 

todas las mangueras en busca de cortes, fugas, abrasión 

o bultos en la cubierta. Compruebe el movimiento 

de los acoplamientos y si están dañados. Sustituya 

inmediatamente una manguera si descubre alguna de 

estas anomalías. No repare nunca una manguera de 

pintura. Sustitúyala por una manguera conductora a alta 

presión.

  13.  No pulverice al aire libre si hace viento.

  14.  Desenchufe siempre el cable antes de trabajar en el 

equipo.

IMPORTaNTE:  No cargue el equipo por el asa del carrito 

durante la carga y descarga.

Seguridad con los motores de gasolina

El escape del motor de esta unidad contiene 

químicos que el Estado de california ha 

determinado causan cáncer, defectos de 

nacimiento u otros daños al sistema reproductor.

  1.  Los motores Honda están diseñados para proporcionar 

un servicio seguro y fiable, si se utilizan de acuerdo a 

las instrucciones.  Lea y entienda las instrucciones del 

Manual del Propietario de Honda antes de utilizar el 

motor.  De lo contrario, podría causar lesiones personales 

o daño al equipo.

  2.  Para evitar peligros de incendio y para proporcionar una 

ventilación adecuada, mantenga el motor por lo menos a 

1 metro de los edificios y de otro equipo durante su uso.  

No coloque objetos inflamables cerca del motor.

  3.  Mantenga a los niños y las mascotas alejados de la zona 

de trabajo, pues existe la posibilidad de quemaduras 

causadas por los componentes calientes del motor o 

lesiones causadas por cualquier equipo en el que se 

utilice el motor.  

  4.  Sepa cómo apagar el motor rápidamente y comprenda el 

funcionamiento de todos los controles.  Nunca permita a 

nadie operar el motor sin las instrucciones apropiadas. 

  5.  La gasolina es extremadamente inflamable y es explosiva 

bajo ciertas condiciones. 

  6.  Llene el tanque de combustible en un lugar bien ventilado 

y con el motor apagado.  No fume ni permita que haya 

llamas ni chispas en la zona de llenado ni en donde se 

almacena el combustible. 

  7.  No llene en exceso el tanque de combustible.  Después 

de ponerle combustible, asegúrese de que la tapa del 

tanque esté cerrada completamente. 

  8.  Tenga cuidado de no derramar el combustible.  Los gases 

del combustible o el combustible derramado pueden 

encenderse.  Si se derrama combustible, asegúrese de 

que la zona esté seca antes de encender el motor. 

  9.  Nunca utilice el motor en un lugar encerrado o confinado.  

El escape contiene gas de monóxido de carbono 

venenoso; la exposición a este gas puede causar pérdida 

del conocimiento y puede conducir a la muerte. 

  10.  El escape se calienta mucho durante su uso y permanece 

caliente durante un rato después de apagar el motor.  

Asegúrese de no tocar el escape cuando esté caliente.  

Para evitar quemaduras graves o peligros de incendio, 

deje que el motor se enfríe antes de transportarlo o 

guardarlo bajo techo. 

  11.  Nunca envíe ni transporte la unidad con gasolina en el 

tanque.

No utilice este equipo para rociar agua o ácido.

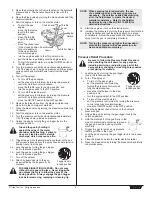
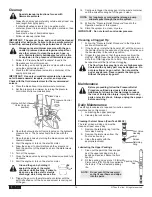
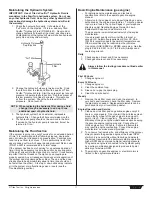
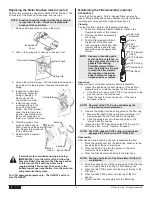
Summary of Contents for SPEEFLO PowrTex 12000 SV

Page 1: ...ns important warnings and instructions Please read and retain for reference Do not use this equipment before reading this manual Owner s Manual For professional use only SPEEFLO PowrTex 6900 SF 12000...

Page 2: ...paints and solvents Follow the paint and solvent manufacture s safety instructions 13 Place pump at least 25 feet 7 62 meters from the spray object in a well ventilated area add more hose if necessar...

Page 3: ...nderstood or if you are in doubt as to whether the product is properly grounded Do not modify the plug provided If the plug will not fit the outlet have the proper outlet installed by a qualified elec...

Page 4: ...23 4 guns 019 Maximum pressure 3300 PSI 22 8 MPa Power 4 8 HP 4 stroke single cylinder overhead valve engine w oil alert Fuel capacity 0 83 US gallons approx 3 5 hours run time Halogenated solvent com...

Page 5: ...ugged Dimensions 43 L 109 cm x 26 W 66 cm x 35 H 89 cm Fluid section wetted parts Electroless nickel plated ductile iron electroless nickel plated carbon steel stainless steel tungsten carbide 37 thio...

Page 6: ...l that contains more than 10 ethanol Do not use gasoline containing methanol methyl or wood alcohol that does not also contain co solvents and corrosion inhibitors for methanol Never use gasoline cont...

Page 7: ...This reduces the amperage draw on starting and may avoid tripping the circuit breaker 8 Make sure the sprayer is grounded All sprayers are equipped with a grounding lug A grounding cable not supplied...

Page 8: ...r move the ON OFF switch to the ON position 7 Turn the pressure control knob clockwise approximately 1 3 of the way down to increase pressure until the sprayer cycles evenly and solvent flows freely f...

Page 9: ...the gun trigger lock to the locked position 17 Turn off the sprayer 18 Attach tip guard and tip to the gun as instructed by the tip guard or tip manuals POSSIBLE INJECTION HAZARD Do not spray without...

Page 10: ...e 13 Trigger the gun into the metal waste container until the paint is flushed out of the hose and solvent is coming out of the gun 14 Continue to trigger the spray gun into the waste container until...

Page 11: ...her A fast up or down stroke may indicate air in the system or malfunctioning valve or seats see the Troubleshooting section Basic Engine Maintenance gas engine For detailed engine maintenance and tec...

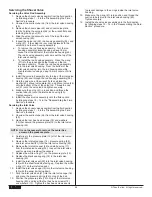
Page 12: ...Gasket thick PTFE Gasket thin PTFE O ring Carbide Seat Filter Body Spring 2 Remove the filter cap assembly and spring 3 Pull the filter element with ball straight out of the filter body 4 Clean inside...

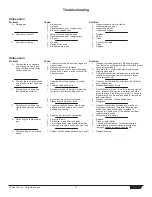
Page 13: ...r is clogged 3 Low voltage and or inadequate amperage 4 Hose size or length is too small or too long 1 Solvent has caused upper packing to swell Solution 1 Inspect connections for air leaks 2 Disassem...

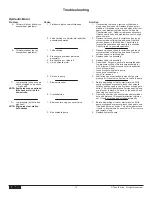
Page 14: ...condition Check trip rod for possible separation and spool in this condition Check trip rod for possible separation 1 Remove valve and check for scratches and rough movement when sliding it up and do...

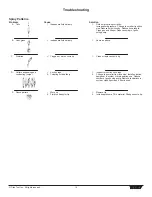
Page 15: ...d not atomizing correctly Increase fluid pressure Change to smaller tip orifice size Reduce fluid viscosity Reduce hose length Clean gun and filter s Reduce number of guns using pump 1 Same as above 1...

Page 16: ...s dans la zone de pulv risation 11 Maintenez la propret de la zone et veillez ce qu elle ne contienne pas de conteneurs de peinture ou de solvant de chiffons et autres mati res inflammables 12 Sachez...

Page 17: ...st v rifi e Ne r parez jamais un tuyau de peinture Remplacez le par un tuyau conducteur haute pression 13 Ne pulv risez pas l ext rieur par temps venteux 14 D branchez toujours le cordon lectrique de...

Page 18: ...trapos y otros materiales inflamables 12 Inf rmese del contenido de la pintura y de los disolventes que pulverice Lea las hojas de datos sobre seguridad de los materiales MSDS y las etiquetas en los...

Page 19: ...si descubre alguna de estas anomal as No repare nunca una manguera de pintura Sustit yala por una manguera conductora a alta presi n 13 No pulverice al aire libre si hace viento 14 Desenchufe siempre...

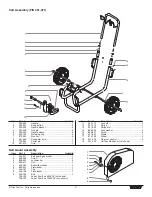
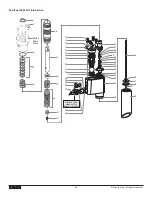
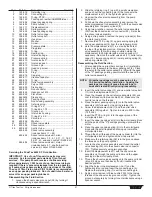
Page 20: ...ty outlet assembly 1 3 703 136 O ring 1 4 703 137 Swivel fitting assembly includes item 3 1 5 Belt guard assembly 1 6 Hydraulic system 1 7 449 181 V Belt 6900 SF gas model 1 449 986 V Belt 12000 SV ga...

Page 21: ...embly Item Part Description Quantity 1 449 217 Belt guard gas model 1 2 858 636 Screw 2 3 858 002 Lockwasher 2 4 862 411 Nut 1 5 449 185 Belleville washer 1 6 862 001 Flat washer 1 7 449 187 Clip 1 8...

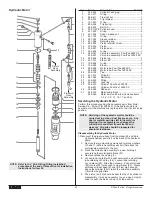
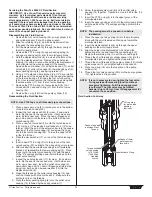
Page 22: ...includes items 2 3 5 7 9 11 16 17 and 30 Servicing the Hydraulic Motor Perform this procedure using the necessary parts from Motor Service Kit Minor P N 235 050 If the hydraulic motor is operable sta...

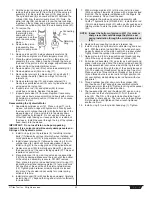
Page 23: ...inder head 4 Replace rod seal 30 in motor pump block 31 Be sure the open portion of the seal is facing upward V This seal requires no special tool 5 Place piston rod 19 in vise Inspect valve rod assem...

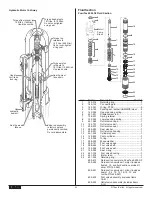
Page 24: ...ng set leather UHMWPE steel 2 5 142 004 Upper packing spring 1 6 451 031 Displacement rod 1 7 138 001 Spring retainer 1 8 142 003 Lower packing spring 1 9 451 085 Outlet valve cage 1 10 704 701 Outlet...

Page 25: ...the foot valve housing 22 Torque the cage to 300 in lbs 25 ft lbs 4 Place the wave washer 17 on top of the foot valve cage 18 5 Insert a new PTFE o ring 3 into the groove of the foot valve housing 22...

Page 26: ...PowrTex 12000 SV Fluid Section 1 5 7 8 9 11 10 6 4 4 2 3 Motor Pump Block 12 13 14 15 16 17 22 17 23 24 25 26 27 28 29 18 19 20 21 45 46 47 48 31 49 30 31 32 32 34 35 36 37 39 38 40 41 42 43 44 33 Suc...

Page 27: ...the pump cylinder 6 5 Using two wrenches remove the outlet valve assembly 30 from the shovel valve rod connector 33 Set aside the shovel valve assembly 6 Using a strap wrench remove the pump cylinder...

Page 28: ...nstall the shovel valve assembly onto the fluid section by following steps 10 14 in the Reassembling the Fluid Section procedure Servicing the Inlet Valve 1 Remove the shovel valve assembly from the f...

Page 29: ...208 Inlet screen 1 24 449 718 Hydraulic tank 1 25 862 411 Flex lock nut 2 26 862 001 Flat washer 6 27 862 002 Lock washer 4 28 449 212 Plug 1 29 862 493 Screw HH 2 30 862 496 Tap bolt 1 31 449 982 Shi...

Page 30: ...late gas engine 12000 SV 7 860 502 Stop nut 6900 SF 4 862 410 Stop nut 12000 SV 8 449 181 V Belt 6900 SF not shown not part of assembly 449 986 V Belt 12000 SV not shown not part of assembly Item Part...

Page 31: ...HH 2 10 590 068 Handle grip 1 11 335 016 Handle 1 12 449 181 Belt V not shown not part of assembly Item Part Description Quantity 1 945 600 Heavy duty bleed valve assembly 1 2 600 271 Tee fitting 1 2...

Page 32: ...4 5 and 6 Filter Assembly Specifications Maximum Working Pressure 5000 psi 34 5 MPa Filter Area 18 In2 116 cm2 Outlet Ports 1 1 4 NPT F for bleed valve 1 3 8 NPT F with 3 8 NPSM M hose connection 1 3...

Page 33: ...of fluid and accomplish proper atomization For light viscosity fluids smaller orifice tips generally are desired For heavier viscosity materials larger orifice tips are preferred Please refer to the c...

Page 34: ...pressure controls precise consistent and repeatable textured finishes can be achieved Part No Description 765 360 Splatter nozzle 765 349 0 079 Air Mix Nozzle 765 350 0 102 Air Mix Nozzle 765 351 0 31...

Page 35: ...Titan Tool Inc All rights reserved 35 Notes...

Page 36: ...ned to an authorized Titan sales service outlet All transportation charges including return to the factory if necessary are to be borne and prepaid by the End User Repaired or replaced equipment will...

Reviews: